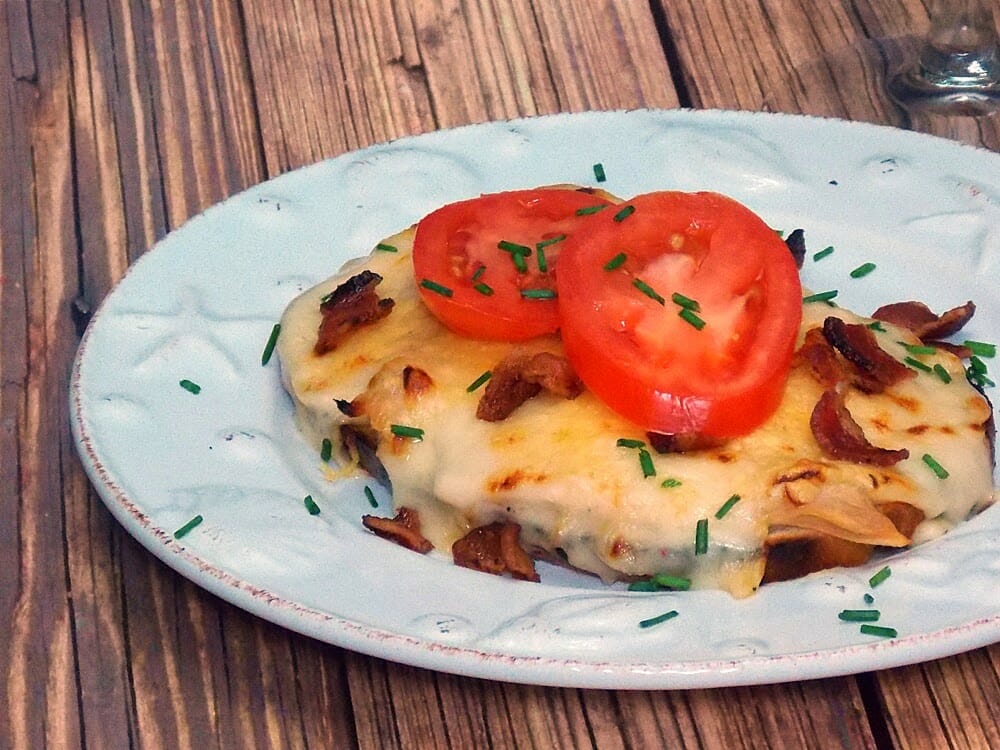
Grumpy's Honeybunch

  • Tried and True Favorite Recipes
  • Recipes
    • Breakfast
    • Lunch
    • Dinner
    • Desserts
    • Low Carb Keto Recipes
  • Disclosure & Privacy Policy
menu icon
go to homepage
  • About
  • Recipes
  • ❤️ Save Your Favs

search icon
Homepage link
  • About
  • Recipes
  • ❤️ Save Your Favs

×
Home

To Die For Blueberry Muffins

July 24, 2024 by Shelby Law Ruttan 19 Comments

Up close image of To Die For Blueberry Muffin on a pink and blue floral plate.

If you love muffins packed with fresh blueberries and almond flavors, then you are going to love these To Die For Blueberry Muffins! Tender muffins are bursting with flavor and blueberries and are lower in sugar than your typical bakery muffins.

One blueberry muffin drizzled with almond flavored icing on a plate with a few scattered blueberries around the muffin.

These muffins are perfect for blueberry season, when berries are plump and juicy and plentiful in the market!

This was inspired by my buttermilk blueberry muffins on this site, and pairs well with an Almond Coffee Cream!

[feast_advanced_jump_to]

Why You'll Love To Die For Blueberry Muffins

  • Fresh berries: this recipe is packed with juicy fresh blueberries!
  • Compliment of flavors: blueberry and almond are a flavor pairing that goes together very well!
  • Easy to make: muffins are so easy to make and are ready to serve in just 30 minutes!

Muffin Ingredients

Just a few basic pantry ingredients will bring you the most incredible flavor in these To Die For Blueberry Muffins!

Muffin ingredients: granulated sugar, vegetable oil, flour, baking powder, milk, almond extract, large egg, salt, and fresh blueberries.
  • All-purpose flour
  • Granulated sugar
  • Salt
  • Baking powder
  • Vegetable oil
  • Large egg
  • Almond extract
  • 2% milk
  • Fresh blueberries
  • Butter
  • Powdered sugar

See recipe card for quantities.

How To Make To Die For Blueberry Muffins

Just a few easy steps and you will have delicious, moist muffins bursting with blueberries for your breakfast table.

Wet ingredients, dry ingredients, and fresh blueberries in a white bowl.
  1. Step 1: Mix dry ingredients and wet ingredients into separate bowls.
Muffin batter in mixing bowl with fresh blueberries on top of batter.
  1. Step 2: Add the wet to the dry ingredients and stir until just combined. Fold in blueberries.
To Die For Blueberry muffin batter in paper liners in a muffin pan.
  1. Step 3: Scoop muffin batter into parchment lined muffin pan. Bake for 18 minutes.
Baked blueberry muffins in a pan.
  1. Step 4: Cool in pan for 10 minutes, then remove and cool completely on wire rack.

Hint: a ¼ cup sized cookie scoop (affiliate link) gives the perfect portion of muffin batter for evenly sized muffins.

Substitutions

Sometimes you don't have all the ingredients on hand but you can still make these muffins by making any of the substitutions below.

  • Frozen berries - it is ok to use frozen blueberries, just be sure they are frozen when added to the batter (do not thaw).
  • Vanilla extract - use vanilla extract in place of the almond extract.
  • Low fat muffins - substitute equal amounts of unsweetened applesauce for the oil.
Baked muffins on cooling rack.

Variations

Try making these muffins with the suggestions below for a different take on this to die for blueberry muffin recipe!

  • White Chocolate Blueberry Muffin - stir ¾ cup of white chocolate chips into the muffin batter.
  • Blueberry Nut Muffins - stir 1 cup chopped pecans or walnuts into the muffin batter.
  • Berry swap - substitute fresh or frozen blackberries for the blueberries.

Love citrus? Try this orange flavored blueberry muffin recipe!

Equipment

  • Muffin pan
  • Large bowl
  • Medium bowl
  • ¼ cup size cookie scoop
  • Parchment paper muffin liners
To Die For Blueberry Muffins on a cooling rack with icing drizzle.

Storage

Store leftover muffins in an airtight container at room temperature up to 3 days. Can be stored in the refrigerator up to 1 week and in the freezer up to 3 months.

If desired, reheat thawed muffins in the air fryer or microwave until heated through.

Top tips

  • Be sure to gently mix the wet and dry ingredients together until the dry ingredients are just combined. Over mixing can cause a tough muffin.
  • When adding blueberries, gently fold them in to prevent berries from bursting.
  • Place a sheet of foil or parchment paper beneath the cooling rack to catch any icing drips when frosting the muffins.
One blueberry muffin drizzled with almond flavored icing on a plate with a few scattered blueberries around the muffin.

FAQ

Can I use frozen blueberries to make these muffins?

Yes, frozen blueberries can be used in place of fresh. Just be sure the berries are added while still frozen.

Serve with...

These blueberry muffins are a delicious addition your breakfast or brunch table and make great snacks. They pair well with overnight oats or garlic scrambled eggs.

One muffin on a plate that has been cut in half with a few blueberries scattered around the plate.

More Blueberry Recipes

Looking for more blueberry recipes like this? Try these:

  • Upclose image of baked blueberry lavender muffin with crumb topping in a green paper wrapper on a cooling rack.
    Blueberry Lavender Muffins with Crumb Topping
  • Up close image of To Die For Blueberry Muffin on a pink and blue floral plate.
    To Die For Blueberry Muffins
  • Featured image for Orange Blueberry Muffins
    Orange Blueberry Muffins
  • Keto blueberry sweet roll that has been cut in half so you can see the blueberry filling.
    The Best Keto Blueberry Sweet Rolls

When you make this recipe for To Die For Blueberry Muffins, please comment below and let me know what you think. I'd love it if you tag me on Instagram @grumpyshoneybunch or #grumpyshoneybunch so I can see your photos!

If you love this recipe, please leave a ⭐⭐⭐⭐⭐ rating

📖 Recipe

Up close image of To Die For Blueberry Muffin on a pink and blue floral plate.

To Die For Blueberry Muffins

Shelby Law Ruttan
These blueberry muffins are a lower sugar muffin recipe bursting with blueberries and topped with a sweet almond flavored icing. The flavor and texture of these to die for muffins are one you will want to make a regular part of your breakfast table.
5 from 1 vote
Print FREE recipe card with your email address Pin Recipe Save Go to Collections
Prep Time 10 minutes mins
Cook Time 20 minutes mins
Total Time 30 minutes mins
Course Breakfast, Snack
Cuisine American
Servings 12
Calories 181 kcal

Equipment

  • Muffin pan
  • Large bowl
  • Medium bowl
  • ¼ cup size cookie scoop
  • Parchment paper muffin liners

As an Amazon Associate I earn from qualifying purchases.

Ingredients
  

For the muffins

  • 1½ cups all-purpose flour
  • ½ cup white sugar
  • ½ teaspoon salt
  • 2 teaspoons baking powder
  • ⅓ cup vegetable oil
  • 1 large egg
  • ½ teaspoon almond extract
  • ½ cup 2% milk
  • 1 cup fresh blueberries

For the almond icing drizzle

  • ½ tablespoon butter
  • ⅓ cup powdered sugar
  • ½ teaspoon almond extract
  • ½ tablespoon 2% milk

Instructions
 

  • Preheat oven to 350 degrees F. Line a muffin pan with paper liners and set aside.
  • In a large bowl, whisk together flour, sugar, salt, and baking powder. Set aside.
  • In another bowl, whisk together vegetable oil, egg, milk, and almond extract.
  • Add the dry ingredients to the wet ingredients and stir with a wooden spoon until dry ingredients are just combined.
  • Fold in blueberries then scoop blueberry muffin batter into the prepared muffin cups.
  • Bake for 20 minutes, or until lightly browned and a toothpick comes out clean after inserted into the center of the muffin.
  • Cool on wire rack for 5 minutes, then remove muffins from pan and continue cooling.
  • In a small saucepan, heat butter over low heat until melted.
  • Stir in powdered sugar, almond extract, and milk.
  • Drizzle icing over top of the baked muffins.

Nutrition

Calories: 181kcalCarbohydrates: 26gProtein: 3gFat: 8gSaturated Fat: 1gPolyunsaturated Fat: 2gMonounsaturated Fat: 4gTrans Fat: 0.1gCholesterol: 18mgSodium: 183mgPotassium: 48mgFiber: 1gSugar: 13gVitamin A: 54IUVitamin C: 1mgCalcium: 57mgIron: 1mgNet Carbohydrates: 25g
Keyword To Die For Blueberry Muffins
Tried this recipe?Mention @grumpyshoneybunch or tag #grumpyshoneybunch!

Apple Bran Muffins

July 24, 2024 by Shelby Law Ruttan 1 Comment

Upclose image of apple bran muffin with slices of apple next to the muffin.

These Apple Bran Muffins are a dense and hearty muffin made with spiced apple butter, raisin bran cereal, and diced fresh apple pieces. It is moist muffin packed with fruit, fiber, and flavor.

Apple bran muffins on a white plate with apple slices.

Muffins are a great portable breakfast or a satisfying afternoon snack to go with a cup of hot tea. This particular Apple Butter Bran Muffin is full of spicy flavor and can be a wholesome snack you won't feel guilty about serving.

I was inspired to make these muffins after making this delicious by this apple butter recipe!

[feast_advanced_jump_to]

Why You'll Love Apple Butter Muffins

Hearty muffins: made with white whole wheat flour and raisin bran cereal, these apple stuffed muffins are packed with flavor and fiber (4 grams each muffin!)

Low fat: apple butter replaces some of the fat in this muffin, making it a healthier muffin.

Portable breakfast: these are great for on the go breakfast or afternoon snacks. They also make a great lunch box treat!

Ingredients

Muffin ingredients: diced apple, milk, flour, baking powder, vegetable oil, cinnamon, salt, egg, apple butter, brown sugar, diced apple, and raisin bran cereal.
  • Raisin bran cereal
  • White whole-wheat flour
  • Baking powder
  • Salt
  • Ground cinnamon
  • Large egg
  • Low-fat milk
  • Apple butter
  • Brown sugar substitute (monkfruit or stevia)
  • Vegetable oil
  • Fresh apple

See recipe card below for ingredient amounts.

How to Make Apple Bran Muffins

Wet ingredients mixed together in a green mixing bowl.
  1. In a large bowl, combine the wet ingredients.
Stirring the dry ingredients into the wet ingredients.
  1. Add the dry ingredients to wet ingredients and stir until just combined.
A mixing bowl with muffin batter, raisin bran cereal, and diced apples on top.
  1. Gently fold in the raisin bran cereal and diced apples.
Muffin batter in paper lined muffin pan.
  1. Scoop ¼ portions into paper lined muffin pan and bake at 375 for 18 minutes.

Substitutions

See below for ways to substitute ingredients to either fit your diet plan or to replace ingredients you may not have on hand.

  • Cereal swap - feel free to use Wheat bran cereal without the raisins in place of the raisin bran.
  • No Fat - substitute equal amounts of apple butter or applesauce for the vegetable oil.
  • Flour swap - all purpose flour can be substituted for the all of or part of the white whole wheat flour.
  • Sugar substitutions: regular brown sugar can be used in place of monkfruit, or you can leave the sugar out entirely.
Angled image of apple bran muffins on cooling rack.

Variations

See the ideas below for ways to change this recipe up a little and make it the way you may like!

  • Apple Pie Bran Muffins: use Mom's apple pie filling in place of the apples.
  • Apple Nut Muffins: Up the fiber more and add a little texture by stirring in a tablespoon or two of hemp seed.
  • Apple Butter Date: swap the apples out for chopped fresh dates.

Love raisins and bran muffins? Then you want to try these raisin bran muffins!

Equipment

  • Mixing bowls (2)
  • Muffin pan
  • Parchment paper muffin liners
  • Rubber scraper
  • Wooden spoon
  • Hand whisk
Upclose image of apple butter raisin bran muffins.

Storage

Store apple bran muffins in an airtight container at room temperature up to 5 days

These muffins can be stored in a freezer safe container in the freezer up to 3 months. To reheat thawed muffins, place in 350 degree oven or air fryer for 5-7 minutes.

Top tip

Gently fold the dry ingredients into the wet ingredients until dry ingredients are almost incorporated. Don't over mix or you will have a tough muffin.

Related Recipes

These Apple Bran Muffins are a delicious treat, and muffins have always been a way for me to share my love of baking with others. I have a variety of muffin recipes that will appeal to several tastes and diets!

  • Up close image of a pumpkin chocolate chip muffin on a white plate.
    Pumpkin Chocolate Chip Muffins
  • Upclose image of apple bran muffin with slices of apple next to the muffin.
    Apple Bran Muffins
  • Upclose image of maple cornbread muffins on a white plate.
    Maple Cornbread Muffins
  • One blueberry cherry muffin on a floral saucer.
    Blueberry Cherry Muffins
See more Muffin Recipes →

Serve with...

These Apple Raisin Bran Muffins are delicious served next to eggs or scrambled tofu, along with a cup of coffee or glass of milk!

When you make this recipe, please comment below and let me know what you think. I'd love it if you tag me on Instagram @grumpyshoneybunch or #grumpyshoneybunch so I can see your photos!

If you love this recipe, please leave a ⭐⭐⭐⭐⭐ rating

📖 Recipe

Upclose image of apple bran muffin with slices of apple next to the muffin.

Apple Bran Muffins

Shelby Law Ruttan
A hearty apple bran muffin made with apple butter, raisin bran cereal, and fresh diced apple. These moist muffins make a delicious addition to your breakfast table and are perfect for snacking.
4.34 from 3 votes
Print FREE recipe card with your email address Pin Recipe Save Go to Collections
Prep Time 15 minutes mins
Cook Time 18 minutes mins
Total Time 33 minutes mins
Course Breakfast, Breakfast & Brunch
Cuisine American
Servings 12
Calories 202 kcal

Equipment

  • Muffin pan
  • Large bowl
  • Wooden spoon
  • Hand whisk
  • Rubber scraper

As an Amazon Associate I earn from qualifying purchases.

Ingredients
  

  • 1½ cup raisin bran cereal
  • 3 cups white whole-wheat flour
  • 2½ teaspoons baking powder
  • ¼ teaspoon salt
  • ½ teaspoon ground cinnamon
  • 1 large large egg lightly beaten
  • ½ cup low-fat milk
  • ½ cup spiced apple butter
  • ¼ cup brown sugar truvia
  • ¼ cup oil
  • 1 cup finely diced peeled apple

Instructions
 

  • Preheat oven to 375°F. Line muffin tin with muffin cups.
  • In a large bowl, whisk together the flour, baking powder, salt and cinnamon. Set aside.
  • In another large bowl, whisk together egg, milk, apple butter, brown sugar, and oil until blended.
  • Make a well in the dry ingredients and pour in the wet ingredients. Stir until just combined.
  • Fold in the raisin bran cereal and diced apples.
  • Using a ¼ cup sized scoop, place batter in prepared muffin pan.
  • Bake muffins for 18 minutes, until the top of muffins are no longer wet and they spring back when touched lightly.

Nutrition

Serving: 1gCalories: 202kcalCarbohydrates: 37gProtein: 5gFat: 6gSaturated Fat: 1gPolyunsaturated Fat: 1gMonounsaturated Fat: 3gTrans Fat: 0.02gCholesterol: 16mgSodium: 177mgPotassium: 115mgFiber: 4gSugar: 8gVitamin A: 144IUVitamin C: 1mgCalcium: 90mgIron: 2mgNet Carbohydrates: 30g
Keyword Apple Bran Muffins, Apple Butter Muffins with Blueberries, Spiced Apple Butter Bran Muffins
Tried this recipe?Mention @grumpyshoneybunch or tag #grumpyshoneybunch!

Maple Cornbread Muffins

July 22, 2024 by Shelby Law Ruttan 12 Comments

Upclose image of maple cornbread muffins on a white plate.

These Maple Cornbread Muffins are a vegan muffin that is light, slightly crumbly, sweet, savory, and delicious! They are light with that classic cornbread texture and go perfect with a bowl of spicy chili!

Maple Cornbread Muffins on a white plate.

These cornbread muffins are egg free, so if you're out of eggs - or if you just want to make this recipe (and you should because it is awesome!) try this out!

I made these muffins to go with my vegan chili recipe. They are very easy to make and are delicious warm or room temperature.

Why You'll Love These Vegan Muffins

Vegan recipe: they are dairy-free and egg-free making them perfect for the vegan diet.

Balanced flavors: a delicious combination of sweet maple flavor and savory cornbread.

Versatile: ideal for breakfast, a mid-day snack, or served as a side dish, these muffins are a versatile addition to any meal.

[feast_advanced_jump_to]

Ingredients

All of the ingredients used in this maple cornbread muffin are easy to find and vegan friendly. Below is a list of ingredients needed to make these muffins:

Ingredients for Maple Cornbread Muffins recipe.
  • Unsweetened almond milk
  • Smart Balance margarine
  • Pure maple syrup
  • Stone-ground cornmeal
  • All-purpose flour
  • Granulated sugar
  • Baking powder
  • Salt
  • Corn on the cob

See recipe card for quantities.

How to Make Maple Cornbread Muffins

Wet ingredients in a mixing bowl.
  1. In a large bowl, whisk together almond milk, melted margarine, maple syrup, and vinegar.
Wet and dry muffin ingredients in a mixing bowl.
  1. Stir dry ingredients into wet ingredients until just combined.
Maple Cornbread Muffin batter in mixing bowl.
  1. Gently fold corn kernels into muffin batter.
Maple cornbread muffin batter in paper muffin cup liners.
  1. Divide batter among prepared muffin cups and bake 20 minutes at 375 degrees F.

Hint: Use these parchment paper muffin liners (affiliate link) for muffins that don't stick to the wrapper!

Substitutions

While this recipe is for a vegan muffin, if you aren't vegan, and don't mind using dairy products, you can make adjustments as listed below for similar results.

  • 2% Milk - instead of almond milk, use 2% or 1% milk in it's place.
  • Unsalted butter - can be used in place of smart balance butter.
  • Honey substitute - substitute raw honey in place of the maple syrup.

Tip: I found out this this half and half almond coconut creamer (affiliate link) is another great substitute for the almond milk!

Maple Cornbread Muffins with paper wrappers on cooling rack.

Variations

Looking for ways to make this an extra special maple cornbread muffin? Try some of these suggestions below!

  • Spicy - add 1 diced fresh jalapeno to the muffin batter with the fresh corn kernels.
  • Blueberry corn muffin - skip the fresh corn and fold in 1 cup of blueberries in it's place.
  • Savory corn muffin - leave out the maple syrup for a savory muffin.

See this spicy jalapeno cornbread on my website!

Equipment

  • Mixing bowls
  • Wooden spoon
  • Rubber scraper
  • Large scoop
  • Muffin pan
  • Parchment paper muffin liners
Maple Cornbread Muffins on a white plate with one muffin cut in half.

Storage

Store muffins in an airtight container at room temperature up to 3 days. They can be stored in the freezer up to 3 months.

To reheat thawed muffin, place in the air fryer or oven at 350 degrees for 5-7 minutes.

Top tip

Frozen corn is an excellent substitute for corn on the cob (which is not always readily available). Just measure out the frozen corn and add to the muffin batter while still frozen (do not thaw).

Related Recipes

Looking for other recipes like this? Try these:

  • Sweet Corn Muffins
  • Upclose image of a white bowl filled with spicy sweet chili topped with cheddar cheese, avocado, and cilantro.
    Spicy Sweet Chili Bowl
  • Mexican Black Bean Chili in an orange bowl topped with jalapeno slices and corn chips.
    Black Bean Chili with Ground Beef and Chipotle
  • Jalapeno Creamed Corn with Sweet Chili Shrimp.
    Jalapeno Creamed Corn with Chai Sweet Chili Shrimp

When you make these Maple Cornbread Muffins, please comment below and let me know what you think. I'd love it if you tag me on Instagram @grumpyshoneybunch or #grumpyshoneybunch so I can see your photos!

If you love this recipe, please leave a ⭐⭐⭐⭐⭐ rating

📖 Recipe

Upclose image of maple cornbread muffins on a white plate.

Maple Cornbread Muffins

Shelby Law Ruttan
Savor the delightful combination of sweet and savory with our vegan Maple Cornbread Muffins, featuring the rich flavor of maple syrup and the classic texture of cornbread. Perfect for any occasion, these muffins are easy to make and studded with pieces of fresh corn!
5 from 1 vote
Print FREE recipe card with your email address Pin Recipe Save Go to Collections
Prep Time 10 minutes mins
Cook Time 20 minutes mins
Total Time 30 minutes mins
Course Breakfast
Cuisine American
Servings 12
Calories 164 kcal

As an Amazon Associate I earn from qualifying purchases.

Ingredients
  

  • 1 cup unsweetened almond milk
  • ¼ cup smart balance margarine melted
  • 2 tablespoons pure maple syrup
  • 1 cup stone-ground cornmeal
  • 1 cup all-purpose flour
  • ¼ cup sugar
  • 1 tablespoon baking powder
  • ¼ teaspoon salt
  • 1 cup fresh corn kernels I cut them from the cob – you can use thawed frozen corn though

Instructions
 

  • Preheat oven to 375 degrees. Line 6 cup muffin pan with paper liners.
  • In a large bowl, whisk together almond milk, melted margarine, maple syrup, and vinegar.
  • In another bowl, whisk together cornmeal, flour, sugar, baking powder, and salt.
  • Stir wet ingredients into dry ingredients until just combined.
  • Gently fold corn kernels into muffin batter.
  • Divide batter among prepared muffin cups and bake 20 minutes. Cool 10 minutes in pan.

Nutrition

Calories: 164kcalCarbohydrates: 27gProtein: 3gFat: 5gSaturated Fat: 1gPolyunsaturated Fat: 2gMonounsaturated Fat: 2gTrans Fat: 0.001gSodium: 231mgPotassium: 99mgFiber: 2gSugar: 7gVitamin A: 200IUVitamin C: 1mgCalcium: 92mgIron: 1mgNet Carbohydrates: 25g
Keyword Maple Cornbread Muffins
Tried this recipe?Mention @grumpyshoneybunch or tag #grumpyshoneybunch!

Blueberry Cherry Muffins

July 11, 2024 by Shelby Law Ruttan 6 Comments

One blueberry cherry muffin on a floral saucer.

A whole grain muffin bursting with fresh blueberries and cherries make Blueberry Cherry Muffins a satisfying on the go breakfast. They would also be a great choice as a snack to help ward off those hunger pains mid-day!

One blueberry cherry muffin broken in half on a small floral plate.

Many mornings I don't have the time or desire to sit down at the table and eat breakfast before I head out of the house. So these Blueberry Cherry Muffins make the perfect portable breakfast for me!

This Blueberry Cherry Muffin recipe is lower in sugar and fat and was inspired by this Lower Sugar Banana Crumb Muffin recipe!

[feast_advanced_jump_to]

Why You'll Love Blueberry Cherry Muffins

Healthier muffins: made with whole wheat flour and fresh fruit these muffins are also low in fat and not overly sweet!

Fresh flavors: the bites of fresh blueberry and cherry in each muffin offers up a fresh, sweet and tangy flavors.

Summer fruits: blueberries and cherries are sweet and delicious summer fruits that go together perfectly in a baked treat!

Ingredients

This recipe uses light sour cream, a small amount of coconut oil, and egg whites to keep the fat count low. It is low in sugar and packed with fresh blueberries and cherries. Below are the ingredients you will need to make this muffin recipe:

  • White whole wheat flour
  • Baking powder
  • Baking soda
  • Salt
  • Fresh blueberries
  • Fresh cherries 
  • Granulated sugar
  • Light sour cream
  • Large egg whites
  • Coconut oil
  • Vanilla extract

Please see recipe card below for ingredient amounts.

Instructions

  1. Preheat oven to 350 degrees.
  2. In a large mixing bowl, place flour, baking powder, baking soda and salt. Stir to combine.
  3. Add blueberries and cherries to flour mixture. Toss until coated with flour.
  4. In another mixing bowl, combine egg whites, sour cream, oil, and vanilla extract.
  5. Pour wet ingredients over top of dry ingredients an stir until just moistened.
  6. Scoop ¼ cup of dough into paper lined muffin tins.
  7. Bake at 350 for 15-18 minutes, until a toothpick inserted in the center of a muffin comes out clean.
Berry-Cherry Muffins

Equipment

  • Large bowl
  • Wooden spoon
  • Rubber scraper
  • ¼ cup sized scoop
  • Muffin liners - I highly recommend these parchment paper liners (affiliate link)!
  • Muffin pan
  • Cherry pitter (affiliate link)

Substitutions

Flour substitution: regular all-purpose flour can be substituted for the white whole wheat.

Yogurt muffins: low fat greek yogurt can be substituted for the light sour cream.

Sugar-free muffins: substitute your preferred sugar free sweetener for the sugar. My preference is the classic monkfruit or stevia. Be sure to follow package instructions for amount to substitute as each sweetener will vary.

Variations

Berry swap: swap out the blueberries for raspberries or black berries.

Berry Cherry Chip Muffins: add ½ cup white chocolate or dark chocolate chips to the muffin batter.

Nut addition: if you love the combination of fruit and nuts, add ½ cup of chopped pecans or walnuts to the muffin batter.

Berry-Cherry Muffins

Storage

Store muffins in an airtight container at room temperature up to 4 days or store in the freezer up to 3 months.

To reheat muffins, place thawed muffin in the air fryer or oven at 350 degrees for 5-7 minutes.

Top Tip

Use a cherry pitter (affiliate link) for quick and easy removal of the cherry pit! Just place the cherry in the pitter and use a cup to aim the pit into and prevent juice splatter.

More Muffin Recipes

  • Lemon Blueberry Muffins - light recipe
  • Featured image for Orange Blueberry Muffins
    Orange Blueberry Muffins
  • Buttermilk Blueberry Muffin in a ceramic loaf pan on a cooling rack.
    Buttermilk Blueberry Muffins
  • Featured image for blueberry muffins with sour cream.
    Blueberry Muffins with Sour Cream

When you make these Blueberry Cherry Muffins, please comment below and let me know what you think. I'd love it if you tag me on Instagram @grumpyshoneybunch or #grumpyshoneybunch so I can see your photos!

If you love this recipe, please leave a ⭐⭐⭐⭐⭐ rating

📖 Recipe

One blueberry cherry muffin on a floral saucer.

Blueberry Cherry Muffins

Shelby Law Ruttan
Enjoy a healthier take on a classic favorite with our blueberry cherry muffins, made with less fat and sugar! Bursting with juicy blueberries and cherries, these muffins offer a guilt-free treat that doesn't compromise on flavor.
5 from 1 vote
Print FREE recipe card with your email address Pin Recipe Save Go to Collections
Prep Time 10 minutes mins
Cook Time 18 minutes mins
Total Time 28 minutes mins
Course Breakfast
Cuisine American
Servings 18
Calories 151 kcal

Equipment

  • Muffin pan
  • Large bowl
  • Wooden spoon
  • cherry pitter
  • parchment cupcake liners
  • ¼ cup size cookie scoop

As an Amazon Associate I earn from qualifying purchases.

Ingredients
  

  • 1¾ cups white whole wheat flour
  • ½ teaspoon baking powder
  • ½ teaspoon baking soda
  • ½ teaspoon salt
  • 1½ cup fresh blueberries
  • 1½ cup fresh cherries quartered
  • ½ cup sugar
  • 1 cup light sour cream
  • 4 large egg whites
  • ½ cup canola oil
  • 1 teaspoon vanilla extract

Instructions
 

  • Preheat oven to 350 degrees.
  • In a large mixing bowl, place flour, baking powder, baking soda and salt. Stir to combine.
  • Add blueberries and cherries to flour mixture. Toss until coated with flour.
  • In another mixing bowl, combine egg whites, sour cream, oil, and vanilla extract.
  • Pour wet ingredients over top of dry ingredients an stir until just moistened.
  • Scoop ¼ cup of dough into paper lined muffin tins.
  • Bake at 350 for 15-18 minutes, until a toothpick inserted in the center of a muffin comes out clean.

Nutrition

Calories: 151kcalCarbohydrates: 18gProtein: 3gFat: 8gSaturated Fat: 1gPolyunsaturated Fat: 2gMonounsaturated Fat: 4gTrans Fat: 0.02gCholesterol: 4mgSodium: 130mgPotassium: 87mgFiber: 2gSugar: 8gVitamin A: 56IUVitamin C: 2mgCalcium: 35mgIron: 0.4mgNet Carbohydrates: 17g
Keyword Blueberry Cherry Muffins
Tried this recipe?Mention @grumpyshoneybunch or tag #grumpyshoneybunch!

Caramel Frosting - Boiled Brown Sugar Frosting

July 9, 2024 by Shelby Law Ruttan 4 Comments

Caramel Frosting drizzled over a bundt cake and decorated with sprinkles.

Rich and creamy with a fudge like texture, this Caramel Frosting made with butter, brown sugar, and cream is a delicious way to top your next batch of cupcakes or cake.

Also known as boiled brown sugar frosting or Penuche, this easy to make frosting is ready to spread or drizzle over your favorite cake or cupcake recipe in just 4 minutes!

Caramel Frosting drizzled over a bundt cake and decorated with sprinkles.

Caramel Frosting is a fudge frosting recipe that is so good, you may want to just eat it from a spoon! This candy like icing can be used as a drizzle over your favorite bundt cake or spread over cupcakes, you can't go wrong with this one!

If you like Caramel Fudge Frosting, you will love this family recipe for Brown Sugar Fudge that my Nanny would always make!

[feast_advanced_jump_to]

Why You'll Love Caramel Frosting

Easy to make: cooked on the stovetop just like regular fudge, it is ready in just 10 minutes!

Fudge like texture: fudge lovers will love the firm, yet creamy and smooth texture of this frosting on their favorite cake flavors.

Boiled brown sugar frosting on top of cupcakes.

What You Need To Make Caramel Frosting

  • Brown Sugar (you can use light or dark brown sugar, or a combination of both)
  • Butter
  • Half and Half
  • Confectioners Sugar

Ingredient amounts listed in the recipe card below.

Instructions

  1. In a large saucepan with a heavy bottom, melt butter over medium heat.
  2. Add the brown sugar and half and half to the melted butter and bring mixture to a boil.
  3. Cook at the boiling point for 1 minute, or until candy thermometer reaches the soft ball stage (234 degrees).
  4. Remove frosting from the heat and stir in vanilla extract and confectioners sugar.
  5. Pour quickly over baked cake or spoon over top of cupcakes.

Equipment

  • Large pot with a heavy bottom (this prevents scorching)
  • Candy thermometer
  • Wooden spoon

Substitutions

Butter: if using salted butter, eliminate the salt from the recipe.

Milk substitute: whole milk can be substituted for half and half.

Sugar swap: light brown sugar can be used in place of dark brown sugar. The flavor will be a little lighter but will still be delicious.

Top Tips

  • For a smooth frosting, sift powdered sugar before adding to the frosting.
  • For best results pour frosting over top of cake while frosting is still hot.
  • If the frosting seems to harden too quickly, add a little more half and half as needed.
  • If the frosting seems to be too loose, add a little more powdered sugar as needed.
  • Use a candy thermometer if you are nervous about over cooking the frosting. It should reach a temperature of 234 degrees.

Storage

It is recommended that this frosting is immediately used to frost any cake or cupcakes you plan to use it on. This frosting will harden after sitting and is not appropriate for refrigeration unless on the cake.

Related Recipes

  • Peanut Butter Frosting Recipe - Keto Version
  • Old Fashioned Peanut Butter Fudge
  • Featured image for Bourbon Fudge recipe.
    Layered Chocolate Praline Bourbon Fudge
  • Featured image for Caramel Popcorn Balls.
    Caramel Popcorn Balls

When you make this recipe, please comment below and let me know what you think. I'd love it if you tag me on Instagram @grumpyshoneybunch or #grumpyshoneybunch so I can see your photos!

If you love this recipe, please leave a ⭐⭐⭐⭐⭐ rating

📖 Recipe

Boiled brown sugar frosting on top of cupcakes.

Caramel Frosting

Shelby Law Ruttan
A delicious fudge frosting made with boiled brown sugar, butter, and heavy cream is a delicious candy like treat drizzled or spread over your favorite cake or cupcakes.
4.34 from 3 votes
Print FREE recipe card with your email address Pin Recipe Save Go to Collections
Prep Time 3 minutes mins
Cook Time 1 minute min
Total Time 4 minutes mins
Course Dessert
Cuisine American
Servings 12
Calories 140 kcal

Equipment

  • Large pot
  • Wooden spoon
  • Candy thermometer

As an Amazon Associate I earn from qualifying purchases.

Ingredients
  

  • 3 tablespoons butter
  • 6 tablespoons half and half
  • 1 cup dark brown sugar
  • 1½ cup confectioners sugar , sifted

Instructions
 

  • In a large saucepan with a heavy bottom, melt butter over medium heat.
  • Add the brown sugar and half and half to the melted butter and bring mixture to a boil.
  • Cook at the boiling point for 1 minute, or until candy thermometer reaches the soft ball stage (234 degrees).
  • Remove frosting from the heat and stir in vanilla extract and confectioners sugar.
  • Pour quickly over baked cake or spoon over top of cupcakes.

Nutrition

Calories: 140kcalCarbohydrates: 33gProtein: 1gFat: 1gSaturated Fat: 1gCholesterol: 3mgSodium: 12mgPotassium: 39mgSugar: 33gVitamin A: 33IUCalcium: 27mgIron: 1mg
Keyword Boiled Brown Sugar Frosting, Brown Sugar Frosting, Caramel Frosting
Tried this recipe?Mention @grumpyshoneybunch or tag #grumpyshoneybunch!

Applesauce Cookies

July 7, 2024 by Shelby Law Ruttan 24 Comments

Three Applesauce cookies with browned butter frosting in a seashell plate with a cooling rack full of cookies in the background.

Applesauce Cookies are a soft cookie recipe made with applesauce and frosted with a browned butter icing. They are a moist cookie spiced with cinnamon, cloves, and nutmeg and are the perfect fall treat.

A stack of 3 iced and baked cookies on a red plate.

Kids love these applesauce cookies and they make a great afternoon snack as well as a part of your holiday dessert table at Thanksgiving or Christmas!

[feast_advanced_jump_to]

Why You'll Love Applesauce Cookies

Fall flavors: full of apple flavor with warm spices like cinnamon and nutmeg.

Old fashioned cookie: soft and delicious, just like Grandma used to make.

Drop cookie: these soft applesauce cookies are scooped with a cookie scoop and dropped onto the baking sheet for an easy peasy recipe!

Ingredients

The ingredients for this applesauce cookie are ones you likely already have in your pantry. See below for the measurements and full instructions on the recipe card.

  • Unsalted butter
  • Light brown sugar
  • Dark brown sugar
  • Large eggs
  • Vanilla extract
  • Applesauce (feel free to use store bought or homemade applesauce)
  • All purpose flour
  • Salt
  • Baking soda
  • Ground cinnamon
  • Ground cloves
  • Ground nutmeg
  • Unsalted butter
  • Heavy cream
  • Powdered sugar

Instructions

  • Pre-heat oven to 350 degrees.
  • In a medium sized mixing bowl, cream together butter and sugars. Add vanilla and mix until combined. Add eggs, one at a time, mixing well after each addition. Add applesauce and mix until combined.
  • In a separate mixing bowl, combine flour, baking soda, spices, and salt.
  • Add flour mixture to applesauce mixture gradually stirring until combined.
  • Drop dough using small cookie scoop onto parchment paper lined cookie sheet.
  • Bake at 350 for 10-12 minutes or until cookies bounce back to the touch and no longer look wet.
  • To make frosting: in a heavy bottomed saucepan, melt butter over medium heat. Cook until particles start to turn brown.
  • Remove from heat and add vanilla, powdered sugar and heavy cream. Stir until creamy.
  • You may need to add a little more cream as you go along as this frosting will thicken more as it cools.
  • Frost cookies. Store in airtight container.
Applesauce Cookies with browned butter icing

Substitutions

Sometimes you may not have an ingredient on the list, but never fear! There is no reason you can't make the following substitutions with great results.

Sugar substitution: use all light brown sugar or all dark brown sugar. You can also substitute 1 cup of granulated sugar for 1 cup of the brown sugar.

Spice swap: use apple pie spice in place of the cinnamon, nutmeg, and cloves.

Flour swap: feel free to use white whole wheat flour in place of all purpose flour.

Variations

  • Add 1 cup raisins, chocolate chips, or cinnamon chips or a combination of all!
  • Dice up an apple and stir it into the batter.
  • Add a cup of chopped toasted walnuts.
  • Stir 1 teaspoon of cinnamon into the icing
Applesauce Drop Cookies with Browned Butter Icing pin image.

Top Tips

  • Strain the applesauce by placing the measured amount in a fine mesh sieve over a bowl for 10-15 minutes and allow the excess water to drip from the sauce.
  • Watch the butter carefully as it is browning. It doesn't take long for browned butter to become burnt butter.
  • Parchment paper or a silpat works best for preventing the cookies from sticking to your baking sheet.

Storage

Store cookies in an airtight container at room temperature up to 1 week. Cookies can be frozen up to 3 months.

Soft Cookie Recipes are the bomb!

We are huge fans of soft cookies. I grew up with my Grandmother making them on a regular basis! My very favorite soft cookie recipe is Soft Blueberry Cookies with Lemon Glaze. We also love Nanny's Pineapple Cookies with Orange Glaze!

Related Recipes

  • Three Oreo Brownie Cookies on a white plate.
    Oreo Brownie Cookies
  • Andes Chocolate Mint Cookies stacked on a white plate.
    Andes Mint Chocolate Cookies
  • White snowflake plate with 3 poinsettia cookie balls on the plate.
    Poinsettia Cookies
  • Baked pecan tassies on a striped red and green plate.
    Pecan Tassies

Don't forget to check out my Amazon storefront for some of my favorite products!

When you make this Applesauce Cookie recipe, please comment below and let me know what you think. I'd love it if you tag me on Instagram @grumpyshoneybunch or #grumpyshoneybunch so I can see your photos!

If you love this recipe, please leave a ⭐⭐⭐⭐⭐ rating

📖 Recipe

Three Applesauce cookies with browned butter frosting in a seashell plate with a cooling rack full of cookies in the background.

Applesauce Cookies

Shelby Law Ruttan
A soft applesauce cookie flavored with warm spices and frosted with a browned butter icing. This drop cookie has the flavors of fall and is perfect for snacking.
5 from 1 vote
Print FREE recipe card with your email address Pin Recipe Save Go to Collections
Prep Time 15 minutes mins
Cook Time 12 minutes mins
Total Time 27 minutes mins
Course Cookie Recipes
Cuisine American
Servings 48
Calories 148 kcal

As an Amazon Associate I earn from qualifying purchases.

Ingredients
  

For the Cookies

  • 1 cup unsalted butter softened
  • 1 cup light brown sugar
  • 1 cup dark brown sugar
  • 2 large eggs
  • 1 teaspoon vanilla extract
  • 2 cups strained applesauce (see notes)
  • 3½ cups flour
  • 1 teaspoon salt
  • 1 teaspoon baking soda
  • 1½ teaspoons ground cinnamon
  • ½ teaspoon cloves
  • ½ teaspoon nutmeg

For the icing

  • 5 tablespoons unsalted butter
  • 3 tablespoons heavy cream
  • 1½ teaspoon vanilla extract
  • 2½ cups powdered sugar

Instructions
 

  • Pre-heat oven to 350 degrees.
  • In a medium sized mixing bowl, cream together butter and sugars. Add vanilla and mix until combined. Add eggs, one at a time, mixing well after each addition. Add applesauce and mix until combined.
  • In a separate mixing bowl, combine flour, baking soda, spices, and salt.
  • Add flour mixture to applesauce mixture gradually stirring until combined.
  • Drop dough using small cookie scoop onto parchment paper lined cookie sheet.
  • Bake at 350 for 10-12 minutes or until cookies bounce back to the touch and no longer look wet.
  • To make frosting: in a heavy bottomed saucepan, melt butter over medium heat. Cook until particles start to turn brown.
  • Remove from heat and add vanilla, powdered sugar and heavy cream. Stir until creamy.
  • You may need to add a little more cream as you go along as this frosting will thicken more as it cools.
  • Frost cookies. Store in airtight container.

Notes

  • Strain the applesauce by placing the measured amount in a fine mesh sieve over a bowl for 10-15 minutes and allow the excess water to drip from the sauce.
  • Watch the butter carefully as it is browning. It doesn't take long for browned butter to become burnt butter.
  • Parchment paper or a silpat works best for preventing the cookies from sticking to your baking sheet.

Nutrition

Serving: 2cookiesCalories: 148kcalCarbohydrates: 23gProtein: 1gFat: 6gSaturated Fat: 3gPolyunsaturated Fat: 0.3gMonounsaturated Fat: 1gTrans Fat: 0.2gCholesterol: 22mgSodium: 78mgPotassium: 36mgFiber: 0.4gSugar: 16gVitamin A: 183IUVitamin C: 0.1mgCalcium: 13mgIron: 1mgNet Carbohydrates: 23g
Keyword Applesauce Cookies, Applesauce Drop Cookies
Tried this recipe?Mention @grumpyshoneybunch or tag #grumpyshoneybunch!

Triple Chocolate Biscotti with Almonds

July 7, 2024 by Shelby Law Ruttan 1 Comment

A parchment lined baking sheet with chocolate dipped biscotti studded with almonds and decorated with mini m&m's.

These Triple Chocolate Biscotti cookies are studded with slivered almonds, dipped in chocolate, and decorated with mini M&M candies. These crunchy cookies are perfect for dipping in a cup of hot tea, coffee, or glass of milk and make great a afternoon snack or after dinner dessert.

Upclose image of 3 chocolate dipped biscotti dotted with mini M&M's.

I love a crunchy, crumbly biscotti and I especially love one with a lot of chocolate flavor! These triple chocolate biscotti have chocolate in the dough, chocolate candies, and are dipped in chocolate for that intense chocolate flavor every chocolate lover adores!

This biscotti recipe was inspired by this brownie biscotti that I made for the brownie lovers in my home!

Why You'll Love Triple Chocolate Biscotti

Easy to make: these cookies have a double bake but the effort is small and end result is delicious!

Coffee treat: the combination of chocolate and almond is a delicious treat reminiscent of a candy bar that goes great with a cup of hot coffee.

Gift giving: biscotti make excellent food gifts to give to party hostesses or holiday cookie trays.

Ingredients

A biscotti cookie is an Italian cookie that is crispy and crumbly. It is a great accompaniment to a mug of coffee, tea, or frothy cappuccino. All you need to make this cookie recipe are basic pantry ingredients you likely already have on hand!

One bowl with whisked eggs and another bowl with biscotti batter topped with mini m&m's.
  • All-purpose flour
  • Granulated sugar
  • Cocoa powder
  • Baking soda
  • Salt
  • Large eggs
  • Large egg whites
  • Vanilla extract
  • Slivered almonds
  • Mini M&M's

Hint: to make mixing the dough together easier, once the wet and dry ingredients are mostly incorporated, turn the dough out onto a lightly floured countertop and knead it together with your hands like you would knead bread dough.

Unbaked biscotti logs on parchment lined baking sheet.

Instructions

  1. Preheat oven to 350 degrees F.
  2. In a large bowl, combine flour, sugar, cocoa powder, baking soda and salt.
  3. In a separate bowl, mix together eggs, egg whites and vanilla extract.
  4. Gradually add egg mixture to flour mixture blending as well as possible.
  5. Toss almonds with M&M's then add to flour mixture and blend just until combined.
  6. Divide dough in half and using a well floured surface roll each dough into 2 logs, 2 inches in diameter. Place on a greased sheet pan and brush with beaten egg.
  7. Bake until light golden brown, about 30-35 minutes. Allow biscotti logs to cool 15 minutes then cut into slices on the bias.
  8. Place biscotti slices back on baking sheet and bake in a 350 degree oven until toasted, about 15-20 minutes. Cool.
  9. If desired, melt ½ pound bar of dark chocolate according to package directions for melting chocolate. Dip end of biscotti in chocolate and set on parchment paper to cool. Decorate with mini M&M's.
One triple chocolate biscotti log partially baked on parchment lined baking sheet.

Equipment

  • Large bowls (2)
  • Wooden spoon
  • Large baking sheet
  • Parchment paper
  • Sharp knife

Variations

  • White chocolate version: substitute white chocolate candy melts for the chocolate dip.
  • Nut swap: use chopped pecan or walnuts in place of the slivered almonds.
  • Peanut butter version: use Reese's pieces (affiliate link) in place of the M&M candies.
Triple Chocolate Almond Biscotti

Storage

Store biscotti in an airtight container at room temperature up to 1 month. Can be stored in the freezer up to 3 months.

Top Tips

  • Be sure to cool the partially baked logs at least 15 minutes before cutting into slices as the hot dough can crumble and fall apart easily.
  • Cool biscotti completely before dipping in melted chocolate and sprinkle immediately with mini candies after dipping. Allow chocolate to dry completely before storing.
Triple Chocolate Biscotti resting on a large parchment paper lined baking sheet.

Things to know

Biscotti is so easy to make! There is no oil/butter or liquid. Only whole eggs, egg whites, and vanilla make up the "wet" part of the recipe. This can make it seem like the dough is too dry as you are combining the ingredients, but don't worry, keep stirring it in and your dough will come together.

Usually near the end of stirring the dough I will turn it out onto a countertop and knead it together. You will then divide the dough in half and shape it into two logs, then flatten out to about ½ inch thick.

After it is baked, you let the logs cool about 15 minutes, then cut them into slices to pop back into the oven and bake a little longer.

Triple Chocolate Almond Biscotti

How to Serve Triple Chocolate Biscotti

Dipping the biscotti in some dark chocolate and sprinkling with a few more mini M&M's is optional! Even though I am a coffee lover, I love to dip my biscotti in hot tea and if the biscotti is dipped in chocolate or plain, they are still pretty darn delicious.

Related recipes

  • Featured Image for Cappuccino Biscotti
    Cappuccino Biscotti with Hazelnuts and White Chocolate
  • Three Bailey's Biscotti dipped in white chocolate with sprinkles on a white plate.
    Bailey's Biscotti
  • Triple Chocolate Ricotta Cookies
  • One slice of triple chocolate mousse bundt cake on a white plate with a gold fork and fall themed napkin.
    Brownie Mousse Cake

Don't forget to check out my Amazon storefront for some of my favorite products!

When you make this Triple Chocolate Biscotti recipe, please comment below and let me know what you think. I'd love it if you tag me on Instagram @grumpyshoneybunch or #grumpyshoneybunch so I can see your photos!

If you love this recipe, please leave a ⭐⭐⭐⭐⭐ rating

📖 Recipe

A parchment lined baking sheet with chocolate dipped biscotti studded with almonds and decorated with mini m&m's.

Triple Chocolate Biscotti with Almonds

Shelby Law Ruttan
A chocolate biscotti cookie studded with chocolate M&M minis, slivered almonds, and dipped in chocolate candy coating. These Triple Chocolate Biscotti make the perfect ending to any meal or enjoy as a snack with a cup of hot coffee or tea.
No ratings yet
Print FREE recipe card with your email address Pin Recipe Save Go to Collections
Prep Time 15 minutes mins
Cook Time 45 minutes mins
Total Time 1 hour hr
Course Desserts
Cuisine Italian-American
Servings 24
Calories 120 kcal

Equipment

  • Large bowl
  • Wooden spoon
  • Large baking sheet
  • Parchment Paper
  • Sharp knife

As an Amazon Associate I earn from qualifying purchases.

Ingredients
  

  • 2 cups flour
  • 1 cup sugar
  • ⅓ cup cocoa powder
  • 1 teaspoon baking soda
  • ¼ teaspoon salt
  • 2 large eggs
  • 2 large egg whites
  • 1 teaspoon vanilla extract
  • ⅔ cup slivered almonds
  • ½ cup mini M&M's

Instructions
 

  • Preheat oven to 350 degrees F.
  • In a large bowl, combine flour, sugar, cocoa powder, baking soda and salt.
  • In a separate bowl, mix together eggs, egg whites and vanilla extract.
  • Gradually add egg mixture to flour mixture blending as well as possible.
  • Toss almonds with M&M's then add to flour mixture and blend just until combined.
  • Divide dough in half and using a well floured surface roll each dough into 2 logs, 2 inches in diameter. Place on a greased sheet pan and brush with beaten egg.
  • Bake until light golden brown, about 30-35 minutes. Allow biscotti logs to cool 15 minutes then cut into slices on the bias.
  • Place biscotti slices back on baking sheet and bake in a 350 degree oven until toasted, about 15-20 minutes. Cool.
  • If desired, melt ½ pound bar of dark chocolate according to package directions for melting chocolate. Dip end of biscotti in chocolate and set on parchment paper to cool. Decorate with mini M&M's.

Nutrition

Calories: 120kcalCarbohydrates: 21gProtein: 3gFat: 3gSaturated Fat: 1gPolyunsaturated Fat: 0.5gMonounsaturated Fat: 1gTrans Fat: 0.01gCholesterol: 16mgSodium: 84mgPotassium: 62mgFiber: 1gSugar: 11gVitamin A: 32IUVitamin C: 0.03mgCalcium: 19mgIron: 1mgNet Carbohydrates: 19g
Keyword Double Chocolate Biscotti
Tried this recipe?Mention @grumpyshoneybunch or tag #grumpyshoneybunch!

Baked Zucchini Chips with Cashew Breading

July 6, 2024 by Shelby Law Ruttan 4 Comments

A blue plate with breaded baked zucchini chips.

These Baked Zucchini Chips are a great way to enjoy zucchini in the summer! They make a delicious side dish that is crisp on the outside, tender and juicy on the inside, with a slightly sweet flavor from the cashew meal breading.

A blue plate filled with breaded baked zucchini chips.

I love zucchini chips. As a kid, I could eat them as fast as my mom could fry them in the skillet! The great thing about this oven baked zucchini recipe is it all cooks at once, so no waiting until all the chips come out of the skillet in batches!

With zucchini so plentiful in the summer, this recipe will come in handy for those nights when you are looking for an easy side dish!

This baked zucchini recipe pairs well with this amazing grilled chicken recipe.

[feast_advanced_jump_to]

Why You'll Love Baked Zucchini Chips

  • Keto friendly: this low carb version eliminates bread crumbs or flour for coating and uses cashew meal for the crispy coating.
  • Easy to make: no more frying and flipping in a greasy skillet, the sheet pan cooks the slices all at once without grease spatters.
  • Versatile: this recipe can be easily adapted to make egg free or nut free with a few simple swaps.

Ingredients

Just a few basic ingredients are needed to make this easy side dish recipe.

Ingredients for Breaded Baked Zucchini Chips recipe: Zucchini Slices, Cashew Meal, Egg Batter, Garlic Powder, and Salt.
  • Cashew meal (you can substitute almond flour if desired)
  • Large egg
  • Water
  • Salt
  • Garlic powder
  • Zucchini 
  • Cooking spray

See recipe card for quantities.

How to Make Baked Zucchini Chips

  1. Preheat oven to 400 degrees. Prepare baking sheet by lining with parchment paper and spray lightly with cooking spray.
  2. In a medium sized bowl, whisk together the egg and water until egg is well belnded. Set aside.
  3. In a large shallow bowl, combine the cashew meal, salt, and garlic powder.
  4. Dip zucchini chips in egg wash, then coat both sides with cashew meal. Place each chip in a single layer on foil lined sheet.  
  5. When finished battering all chips, spray top of chips with cooking spray, then place in oven to bake.
  6. Bake for 5 minutes or until bottom of chip has browned. Carefully flip the chip over and brown the opposite side, 7 more minutes and zucchini chips. Serve hot.

Substitutions

  • Nut free version - instead cashew flour, substitute panko crumbs to coat the zucchini.
  • Spice substitution: feel free to use onion powder or any of your favorite spices for the garlic powder.
  • Vegan version: eliminate the egg and water and use almond milk or cashew milk in place of the egg.

Variations

Change the recipe to make it spicy, cheesy, or kid friendly with the following suggestions:

  • Spicy - add chili pepper flakes while cooking to imbue heat into the dish, or banana peppers
  • Cheesy version - use half cashew meal and half Parmesan cheese
  • Kid friendly - crush some cheesy puffs or potato chips and use that as the breading for your zucchini chips.

See this air fryer version on my website!

Cashew Breaded Zucchini Chips on a blue plate.

Equipment

It is important to use a wide, shallow bowl (affiliate link) to hold the beaten egg and cashew meal.

Storage

Store leftover baked zucchini chips in an airtight container in the fridge up to 3 days. To reheat, place zucchini chips in a single layer on baking sheet and heat in a 400 degree oven for 7-10 minutes, until hot.

Freezing leftovers is not recommended.

Top Tip

  • You can make your own cashew meal by grinding raw cashews in a blender until they are fine crumbs.
  • Use a dinner fork to easily dip the zucchini slices into the egg and cashew meal, then to place on the baking sheet.

More Zucchini Recipes

Looking for other zucchini recipes? Try these:

  • chocolate zucchini cake roll
    Chocolate Zucchini Cake with Spiced Cream
  • Two golden brown Low Carb Zucchini Biscuits on a blue plate.
    Zucchini Cheddar Biscuits
  • Zucchini Chocolate Chip Cookies featured image.
    Zucchini Chocolate Chip Cookies
  • Sauteed Zucchini and Mushrooms featured image.
    Zucchini and Mushrooms

Serve with...

These are my favorite dishes to serve with baked zucchini chips:

Don't forget to check out my Amazon storefront for some of my favorite products!

When you make this baked zucchini chips recipe, please comment below and let me know what you think. I'd love it if you tag me on Instagram @grumpyshoneybunch or #grumpyshoneybunch so I can see your photos!

If you love this recipe, please leave a ⭐⭐⭐⭐⭐ rating

📖 Recipe

A blue plate with breaded baked zucchini chips.

Baked Zucchini Chips

Shelby Law Ruttan
Baking breaded zucchini chips on a sheet pan makes cooking this side dish quick and easy! The cashew meal coating adds flavor and texture without adding carbohydrates!
5 from 1 vote
Print FREE recipe card with your email address Pin Recipe Save Go to Collections
Prep Time 20 minutes mins
Cook Time 14 minutes mins
Total Time 34 minutes mins
Course Keto Side Dish, Side Dish
Cuisine American
Servings 4
Calories 132 kcal

Equipment

  • 2 Shallow bowls
  • Hand whisk , or fork
  • Fork , or tongs
  • Large baking sheet
  • Parchment Paper

As an Amazon Associate I earn from qualifying purchases.

Ingredients
  

  • ⅔ cup cashew meal
  • 1 large egg
  • 1 tablespoon water
  • ½ teaspoon salt
  • ½ teaspoon garlic powder
  • 2 small zucchini sliced into thin chips
  • cooking spray

Instructions
 

  • Preheat oven to 350 degrees. Prepare baking pan by lining with non stick foil and spray with cooking spray.
  • Whisk egg and water in medium sized bowl. Set aside. Stir together cashew meal, salt, and garlic powder in another medium sized bowl. Dip chips in egg wash, then coat both sides with cashew meal. Place each chip in a single layer on foil lined sheet.  
  • When finished battering all chips, spray top of chips with foil then place in oven to bake.
  • Bake for 7 minutes or until bottom of chip has browned. Carefully flip the chip over and brown the opposite side, 7 more minutes. Serve hot.

Nutrition

Calories: 132kcalCarbohydrates: 6gProtein: 6gFat: 10gSaturated Fat: 1gPolyunsaturated Fat: 1gMonounsaturated Fat: 1gTrans Fat: 1gCholesterol: 41mgSodium: 311mgPotassium: 174mgFiber: 3gSugar: 2gVitamin A: 177IUVitamin C: 11mgCalcium: 55mgIron: 1mg
Keyword Baked Zucchini Chips
Tried this recipe?Mention @grumpyshoneybunch or tag #grumpyshoneybunch!

Soy Burgers

June 29, 2024 by Shelby Law Ruttan 3 Comments

Two soy burgers stacked on a slider roll garnished with sriracha aioli and dill pickles.

I grew up eating these Soy Burgers also known as soy patties. These vegan burgers are the best way for non-meat eaters to add protein to their diet. 

One double stacked soy burger on a white roll with sriracha aioli and dill pickle slices.

When I attended elementary public school, the ground beef burger had added soy protein to them. I'm not sure the reason they did that other than to maybe save money, but in all honesty, I preferred the soy beef burger to the full beef burger!

I have never been much of a meat eater. So, when one of the ladies in our church brought these plant-based burgers to potluck, I fell in love with them. I loved the flavor and the crispy edges around the outside of the patties and have enjoyed this simple recipe for over 40 years now!

[feast_advanced_jump_to]

Why You'll Love Soy Burgers

Meat substitutes: these soybean burgers are an alternate way to get protein in your diet without animal protein.

Mealtime variety: If you are a meat eater, these meatless burgers are a great way to enjoy Meatless Monday.

Health benefits: soy beans are high in dietary fiber and protein, low in saturated fat, high in omega-3s.

🥘 Ingredients for Soy Burgers

This is an overview of the ingredients. See the recipe card below for amounts and instructions.

Measured ingredients: Whole oats, Soybeans, Soy Sauce, Olive oil, Spices, and Nutritional yeast.
  • Soybeans
  • Whole oats
  • Soy sauce
  • Olive oil
  • Nutritional yeast flakes
  • Italian seasoning
  • Onion powder
  • Garlic powder
  • Salt

Instructions

Whole soaked soybeans in a blender.
  1. Step 1: Grind soybeans, olive oil, soy sauce, seasonings, and nutritional yeast until well combined.
Soybean burger mixture in a large green mixing bowl.
  1. Step 2: Transfer soybean mixture to a bowl and add oatmeal. Allow to rest 15 minutes.
Soy Burgers frying in olive oil in a stainless steel frying pan.
  1. Step 3: Shape soybean mixture into patties and fry in hot oil over medium heat until golden brown.
Up close image of golden brown soy burger in a skillet.
  1. Step 4: Flip patties and continue to cook until mixture is cooked through and bottom side is golden.
  1. Place dried soybeans in a large bowl and cover with cold water. Set aside and allow beans to soak up to 6 hours. Drain water from soybeans and place soybeans in a heavy duty blender or food processor. Add the water, nutritional yeast, soy sauce, olive oil, onion powder, garlic powder, and Italian seasoning. 
  2. Grind soybean mixture until desired consistency, scraping the sides of the blender down periodically. Transfer soybean mixture to a large bowl and stir in oatmeal. Set for 15 minutes, allowing mixture to thicken.
  3. Heat olive oil in a large skillet over medium heat until hot. Scoop ¼ cup of soybean mixture into skillet and flatten out into a ½ inch thick patty.  Reduce heat to medium low and fry soy burgers until golden brown on the bottom and burger has begun to set on the top, about 10 minutes.
  4. Carefully flip burger patties over and continue to cook for 10 minutes, until patties are firm and golden brown on both sides.
A white roll spread withs sauce, topped with two patties and dill pickles.

📖 Variations and Substitutions

Bean substitutions: feel free to substitute other dried beans such as great northern, pinto, or black beans. If doing so, keep in mind, soybeans have higher protein counts than many other dried beans and your protein information will change.

Veggie additions: add some shredded carrot, diced red bell pepper, grated onion, or chopped mushrooms to the burger mixture.

Flavor boosters: use different flavorings like old bay seasoning, veggie bouillon, cajun seasoning, or taco seasoning.

🥫Storage

​Store any leftover soy burgers in an airtight container in the fridge up to 4 days or in the freezer up to 3 months.

Upclose image of Soy Burgers on a white roll.

Tip

  • If you like a little more texture to your soybean patties, when grinding the soybeans, use a food processor and just hit the pulse button until you reach the desired consistency. 

🙋 Things to Know

  • Oatmeal is a binder in this recipe. It works with the starch from the ground beans and water to thicken the burger mixture making it easy to hold its shape.
  • White or brown rice can not be substituted for oatmeal.
  • The soy sauce adds sodium to these patties. I recommend tasting the burger mixture before cooking to see i you need to add salt. I did need to add a teaspoon of salt to mine but it is optional.
  • If you want to boost the fiber count, stir in a couple tablespoons of ground flaxseed.
Bite shot of soy burger on a fork.

Baked Soy Burgers

If you prefer to not fry your soy burgers, you can bake them by doing the following:

  1. Preheat oven to 400 degrees F.
  2. Line baking sheet with a silpat (silicone baking mat) and place burger mixture on baking sheet, flattening the patty to burger shape and leaving the patty about ½ inch thick.
  3. Bake in oven for 15 minutes. Remove baking sheet and carefully flip soy burgers over. Return to oven and bake another 15-20 minutes, until patties are cooked through.
  4. Please note if baking, I do not recommend parchment paper for lining the baking sheet. The burger mixture is wet and will get the parchment paper wet as well, making them a mess to deal with in the oven.

Serve with...

Serve soy burgers with a side of vegetarian stuffed mushrooms and air fryer green beans.

📚 Related Recipes

  • Chickpea Patties topped with sour cream, salsa, and fresh thyme sprig.
    Chickpea and Corn Patties
  • Featured Image for Mom's Vegetarian Meatballs Recipe.
    Mom's Vegetarian Meatballs
  • Vegan Steak Recipe with Vital Wheat Gluten
  • Close up of a spicy black bean burger patty with visible corn and red bell pepper pieces, served on a sesame seed bun with fresh green leaf lettuce.
    Spicy Black Bean Burgers Recipe

Don't forget to check out my Amazon storefront for some of my favorite products!

When you make this soy burger recipe, please comment below and let me know what you think. I'd love it if you tag me on Instagram @grumpyshoneybunch or #grumpyshoneybunch so I can see your photos!

If you love this recipe, please leave a ⭐⭐⭐⭐⭐ rating

📖 Recipe

Two soy burgers stacked on a slider roll garnished with sriracha aioli and dill pickles.

Soy Burgers

Shelby Law Ruttan
If you are looking for a vegan burger recipe, then these soy veggie burgers are one you must try! With 15 grams of protein and 5 grams of fiber, this recipe is healthy and delicious!
4.50 from 2 votes
Print FREE recipe card with your email address Pin Recipe Save Go to Collections
Prep Time 10 minutes mins
Cook Time 20 minutes mins
Total Time 30 minutes mins
Course Main Course
Cuisine American
Servings 10
Calories 261 kcal

Equipment

  • Large bowl
  • Colendar
  • Blender , or food processor
  • Rubber scraper
  • Large skillet
  • Spatula

As an Amazon Associate I earn from qualifying purchases.

Ingredients
  

  • 2 cups dried soybeans
  • 1¼ cups whole oats
  • 1 cup water
  • ¼ cup nutritional yeast flakes
  • 2 tablespoons olive oil
  • 2 tablespoons soy sauce
  • 1 teaspoon Italian seasoning
  • ½ teaspoon garlic powder
  • ¼ teaspoon onion powder
  • 1 teaspoon salt optional (to taste)
  • Olive oil , for frying

Instructions
 

  • Place dried soybeans in a large bowl and cover with cold water. Set aside and allow beans to soak up to 6 hours.
  • Drain water from soybeans and place soybeans in a heavy duty blender or food processor. Add the water, nutritional yeast, soy sauce, olive oil, onion powder, garlic powder, and Italian seasoning.
  • Grind soybean mixture until desired consistency, scraping the sides of the blender down periodically. Transfer soybean mixture to a large bowl and stir in oatmeal. Set for 15 minutes, allowing mixture to thicken.
  • Heat olive oil in a large skillet over medium heat until hot. Scoop ¼ cup of soybean mixture into skillet and flatten out into a ½ inch thick patty.
  • Reduce heat to medium low and fry soy burgers until golden brown on the bottom and burger has begun to set on the top, about 10 minutes.
  • Carefully flip burger patties over and continue to cook for 10 minutes, until patties are firm and golden brown on both sides.

Nutrition

Calories: 261kcalCarbohydrates: 19gProtein: 16gFat: 14gSaturated Fat: 2gPolyunsaturated Fat: 5gMonounsaturated Fat: 6gSodium: 436mgPotassium: 740mgFiber: 5gSugar: 3gVitamin A: 12IUVitamin C: 2mgCalcium: 113mgIron: 7mgNet Carbohydrates: 14g
Keyword Soy Burgers
Tried this recipe?Mention @grumpyshoneybunch or tag #grumpyshoneybunch!

Buffalo Chicken Chili

June 26, 2024 by Shelby Law Ruttan Leave a Comment

Featured image for buffalo chicken chili.

This Buffalo Chicken Chili is a quick and easy stovetop packed with ground chicken, pinto, beans, and spicy buffalo flavor. Top the chili off with some shredded cheese and fresh cilantro and serve over top of rice or cauliflower rice.

A gold spoon with a bite of buffalo chicken chili on the spoon.

Chili recipes are perfect for the fall season. They warm you up with spicy heat and are a delicious part of gatherings and game day food line ups.

This was inspired by my love of buffalo chicken flavors on this site, and pairs well with this amazing jalapeno cornbread recipe or these sweet and savory maple cornbread muffins!

[feast_advanced_jump_to]

Why You'll Love Buffalo Chicken Chili

  • Chilly weather food: It is perfect for family dinner on chilly fall days.
  • Game day fare: perfect game day food with a side of Fritos scoops!
  • Hearty and filling: packed with protein, fiber and flavor.
  • Easy to make: ready in 30 minutes!

Ingredients

Ground chicken makes this buffalo chicken chili a quick and easy meal to put on your table fast. Pinto beans boost fiber and protein and it is complemented with all the flavors of buffalo chicken!

Chili ingredients: Ground chicken, chicken broth, diced tomatoes, pinto beans, garlic, onion, olive oil, celery, red hot sauce, cumin, oregano, and paprika.
  • Ground chicken
  • Pinto beans
  • Chicken broth
  • Canned diced tomatoes
  • Onion
  • Garlic
  • Celery
  • Olive oil
  • Ground cumin
  • Smoked paprika
  • Oregano
  • Hot sauce: I love Frank's Red Hot (affiliate)

See recipe card for quantities.

Instructions

In just a few short steps, you will have the most flavorful chili ready to serve your family!

Onions, Garlic, and celery sauteeing in a large pot.
  1. Step 1: In a large pot over medium-high heat, saute celery, onion, and garlic for 2 minutes.
Ground chicken being broken up with a meat chopper in the large pot with onion, celery, and garlic.
  1. Step 2: Add ground chicken to celery mixture and break meat up using a meat chopper.
Cooked ground chicken, celery, onion, and garlic in a large pot.
  1. Step 3: Cook ground chicken for 5 minutes, until pink color is gone.
Spices added to cooked ground chicken mixture.
  1. Step 4: Add spices to ground chicken mixture and stir to combine.
Chicken broth, diced tomatoes, hot sauce, and pinto beans added to ground chicken mixture in large pot.
  1. Step 5: Add the chicken broth, pinto beans, diced tomatoes, and red hot sauce.
Chili simmering in a large pot.
  1. Step 6: Simmer Buffalo Chicken Chili for 17-20 minutes, until sauce has reduced some.

Hint: this meat chopper (affiliate link) does an excellent job of breaking up the ground chicken allowing it to cook evenly.

Substitutions

  • Keto friendly - make this dish keto friendly by leaving out the pinto beans and add 2 cups of chopped cauliflower to the chili instead.
  • Extra spicy chili - increase the amount of hot sauce for a spicier chili or add some red hot chili seasoning (affiliate link) to taste.
Overhead image of cooked buffalo chicken chili in a large pot.

Variations

Below are a few ways to change this recipe to suit your tastes or needs:

  • Ground meat swap - no need to limit yourself to just ground chicken, feel free to substitute ground turkey for the chicken.
  • Leftover rotisserie chicken version - use 2 heaping cups of chopped rotisserie chicken in place of the ground chicken.
  • Fun toppings - add crushed tortilla chips to the toppings for added texture, crunch and flavor.

Check out this easy low carb version of Buffalo Chicken Casserole!

Equipment

  • Large pot: I love to use my cast iron pot.
  • Cutting board
  • Chef knife
  • Wooden spoon
One serving of Buffalo Chicken Chili topped with shredded cheese and cilantro in a brown bowl.

Storage

Store leftover Buffalo Chicken Chili in an airtight container in the fridge up to 4 days. You may also store in the freezer up to 3 months.

Reheat thawed chili in a small pot on the stove until heated through.

Top tip

Transfer the cooked buffalo chicken chili to a slow cooker for easy transportation and to keep it warm for game day parties.

Serve Buffalo Chicken Chili with...

Serve with shredded cheese and fresh cilantro. Other delicious topping ideas would be crumbly blue cheese, crushed tortilla chips, avocado slices, or a dollop of sour cream.

Side view of a dark brown bowl filled with chili topped with cheese and cilantro.

More Buffalo Style Recipes

Looking for other recipes like this? Try these:

  • Slow Cooker Buffalo Chicken
  • Featured image for Buffalo Chicken Pizza
    Buffalo Chicken Pizza Recipe
  • Stacked triangles of a buffalo chicken quesadilla.
    Low Carb Buffalo Chicken Quesadillas
  • Featured image for Buffalo Cauliflower Tacos.
    Buffalo Cauliflower Tacos

When you make this recipe, please comment below and let me know what you think. I'd love it if you tag me on Instagram @grumpyshoneybunch or #grumpyshoneybunch so I can see your photos!

If you love this recipe, please leave a ⭐⭐⭐⭐⭐ rating

📖 Recipe

Featured image for buffalo chicken chili.

Buffalo Chicken Chili

Shelby Law Ruttan
Create a zesty twist on classic chili with our Buffalo Chicken Chili recipe! Tender chicken, beans, and a kick of buffalo sauce come together for a hearty, flavorful dish perfect for any occasion.
No ratings yet
Print FREE recipe card with your email address Pin Recipe Save Go to Collections
Prep Time 10 minutes mins
Cook Time 20 minutes mins
Total Time 30 minutes mins
Course Main Dish
Cuisine American
Servings 4
Calories 363 kcal

Equipment

  • Large pot
  • cutting board
  • chef knife
  • Wooden spoon

As an Amazon Associate I earn from qualifying purchases.

Ingredients
  

  • 1 tablespoon olive oil
  • 1 pound ground chicken
  • 4 cloves fresh garlic , minced
  • 1 teaspoon paprika
  • ½ teaspoon oregano
  • 1½ teaspoons ground cumin
  • ¼ cup onion diced
  • ⅓ cup celery diced
  • 1 cup chicken broth
  • 15 ounces diced tomatoes
  • 15 ounces Kidney beans
  • ⅓ cup Franks Red Hot Sauce
  • Salt and Pepper to taste
  • 4 tablespoons cheddar cheese optional
  • 2 tablespoons diced cilantro optional

Instructions
 

  • Heat oil in a In a large pot over medium-high heat until hot. Add garlic, onion, and celery, to the ground chicken cook for 2 minutes, stirring occasionally.
  • Add ground chicken and cook for 7 minutes, using a meat chopper to break up the meat, until lightly browned.
  • Add paprika, oregano, and cumin to the chicken mixture and stir-fry another minute.
  • Add tomatoes, chicken broth, kidney beans, and Franks Hot Sauce, stirring to combine. Bring chili mixture to a boil.
  • Reduce heat to low and simmer chili for 17-20 minutes until sauce reduces some and thickens.
  • Garnish with fresh cilantro and shredded cheese (if using)

Notes


Nutrition

Calories: 363kcalCarbohydrates: 32gProtein: 31gFat: 14gSaturated Fat: 3gPolyunsaturated Fat: 2gMonounsaturated Fat: 7gTrans Fat: 0.1gCholesterol: 99mgSodium: 921mgPotassium: 1.299mgFiber: 10gSugar: 4gVitamin A: 216IUVitamin C: 15mgCalcium: 94mgIron: 6mgNet Carbohydrates: 22g
Keyword Buffalo Chicken Chili
Tried this recipe?Mention @grumpyshoneybunch or tag #grumpyshoneybunch!

Rhubarb Cookies with Lemon Glaze

June 25, 2024 by Shelby Law Ruttan 3 Comments

Featured image of a stack of three rhubarb cookies on a white plate.

If you love sweet and tart combinations, then you are going to love these Rhubarb Cookies! They are a soft cake like cookie studded with diced fresh rhubarb and finished off with a tangy lemon glaze for the ultimate in sweet tart flavors.

A stack of 3 baked rhubarb cookies topped with lemon glaze on a white plate.

Rhubarb recipes have always been a favorite of mine, I especially love this Rhubarb Custard Pie (it was the first pie I ever made!). The tart rhubarb has a flavor that is very distinct and it makes tasty sweet and tart desserts!

This rhubarb cookie recipe was inspired by my soft blueberry cookie recipe.

[feast_advanced_jump_to]

Why You'll Love Rhubarb Cookies

Soft cookie: fans of cake like cookies will love the soft thick cookie texture of this rhubarb cookie

Sweet Tart Flavors: these cookies have a sweet cake with a bite of tart from the diced rhubarb, complimented by the sweet and tangy lemon icing.

Great for parties or snacking: these cookies make a great addition to your afternoon tea, after school snacks, or served with a scoop of vanilla ice cream for after dinner dessert.

Ingredients

Use a clear shot of the ingredients for this recipe, prepped, and labeled if necessary. Add a paragraph of content describing why these ingredients were chosen. Insert the ingredients into the list below, omitting quantities.

Cookie ingredients: flour, sugar, rhubarb, oil, vanilla, egg, milk, baking powder soda, and salt.
  • All purpose flour
  • Granulated sugar
  • Fresh rhubarb
  • Vegetable oil
  • 2% milk
  • Large eggs
  • Vanilla extract
  • Baking powder
  • Baking soda
  • Salt

See recipe card for quantities.

How To Make Rhubarb Cookies

Use this section for process shots, alternating between the step and image showing the step. Users don't like seeing process shots cluttering up the recipe card, so include your process shots here

A bowl of rhubarb, a bowl of dry ingredients, and a bowl of wet ingredients.
  1. Step 1: Combine the dry ingredients and wet ingredients together in separate bowls.
Rhubarb cookie dough in a large bowl with a wooden spoon.
  1. Step 2: Mix the wet and dry ingredients, then stir in the rhubarb.
Cookie dough ball on parchment paper lined baking sheet.
  1. Step 3: scoop ¼ cup portions of dough onto a parchment lined baking sheet.
Flattening the cookie dough with a jar bottom.
  1. Step 4: flatten the cookies with the palm of your hand or a wide bottom ed glass jar.

Hint: if cookie dough seems too crumbly or dry, add a little bit of milk at a time until dough comes together and is scoop-able.

Substitutions

If you are following a dairy free or sugar free diet, feel free to make any of the substitutions below.

  • Dairy free - use your favorite nut milk or oat milk in place of regular milk.
  • Oil substitute - melted butter or coconut oil can be substituted for the oil.
  • Sugar-free - use truvia (stevia) brown sugar or granulated sugar.

If you are looking for a low carb and keto friendly rhubarb cookie, try these Strawberry Rhubarb Thumbprint Cookies!

A stack of three lemon glazed rhubarb cookies.

Variations

Sometimes a slight change or addition to a recipe can change its flavor and texture. Try some of the suggestions below for a slightly different version of this cookie.

  • Strawberry Rhubarb Cookies - substitute half of the rhubarb with diced fresh strawberries
  • Cream cheese frosting - frost the cookies with this cream cheese frosting instead of the lemon glaze.
  • Rhubarb Chip Cookies - add a cup of white chocolate chips to the cookie dough.

Equipment

  • Large bowl
  • Electric mixer
  • Rubber spatula
  • ¼ cup size cookie scoop
  • Large baking sheet
  • Parchment paper
  • Cookie spatula

Storage

Store cookies in an airtight container up to 4 days.

Rhubarb cookies can be stored in the freezer, but it is recommended you do so without the glaze. If frozen with the glaze, once thawed, the glaze becomes wet and absorbs into the cookie.

Top tips

  • Place a sheet of parchment paper or foil beneath the cooling rack so it can catch any icing drips after dipping the cookie into the glaze.
  • Be sure to air dry the cookies on the cooling rack until the glaze is no longer wet before storage.
One rhubarb cookie broken in half and stacked.

FAQ

Can I use frozen rhubarb in this recipe?

Yes, as long as the rhubarb has been diced before freezing and you add it to the cookies while still frozen. Do not thaw rhubarb before using.

Related

Looking for other rhubarb recipes? Try these:

  • Featured Image for Keto Rhubarb Dream Bars.
    Rhubarb Dream Bars - Keto Recipe
  • Featured image for rhubarb cheese danish.
    Rhubarb Cream Cheese Danish
  • Featured Image Rhubarb Crumb Muffins.
    Rhubarb Crumble Muffins
  • A parfait glass with Layered Strawberr Rhubarb Chia Pudding.
    Strawberry Rhubarb Chia Pudding - Keto Recipe
See more Rhubarb Recipes →

Don't forget to check out my Amazon storefront for some of my favorite products!

When you make this recipe, please comment below and let me know what you think. I'd love it if you tag me on Instagram @grumpyshoneybunch or #grumpyshoneybunch so I can see your photos!

If you love this recipe, please leave a ⭐⭐⭐⭐⭐ rating

📖 Recipe

Featured image of a stack of three rhubarb cookies on a white plate.

Rhubarb Cookies with Lemon Glaze

Shelby Law Ruttan
Make these delightful Rhubarb Cookies by incorporating diced rhubarb into a soft cookie dough, then finish with a zesty lemon glaze for a burst of flavor. Perfect for a refreshing springtime dessert or tea-time treat!
5 from 1 vote
Print FREE recipe card with your email address Pin Recipe Save Go to Collections
Prep Time 10 minutes mins
Cook Time 14 minutes mins
Total Time 24 minutes mins
Course Desserts
Cuisine American
Servings 24
Calories 156 kcal

Equipment

  • Large bowl
  • Electric mixer
  • rubber spatula
  • ¼ cup size cookie scoop
  • Large baking sheet
  • Parchment Paper
  • Cookie spatula

As an Amazon Associate I earn from qualifying purchases.

Ingredients
  

For the cookies

  • 1 cup granulated sugar
  • 1 large egg
  • ⅓ cup vegetable oil
  • 1 teaspoon vanilla extract
  • ½ cup 2% milk
  • 1 teaspoon baking powder
  • ¼ teaspoon baking soda
  • ¼ teaspoon salt
  • 3½ cups all-purpose flour
  • 2 cups diced rhubarb

For the glaze

  • 1 cup confectioner's sugar
  • 2 lemons , juiced

Instructions
 

  • Preheat oven to 350 degrees F. Line a large baking sheet with parchment paper and set aside.
  • In a large bowl, whisk together the flour, baking powder, baking soda, and salt. Set aside.
  • In another large bowl, using an electric hand mixer on medium speed, blend the sugar, egg, vegetable oil, vanilla extract, and milk until well combined.
  • Add the dry ingredients to the wet ingredients, stirring with a wooden spoon until all dry ingredients are incorporated.
  • Stir the rhubarb pieces into the cookie dough until combined.
  • Scoop ¼ cup portions of cookie dough onto prepared baking sheet. Flatten cookies with the palm of your hand or a wide bottom glass jar.
  • Bake for 10-12 minutes, until cookies are no longer wet on top and bounce back slightly when pressed in the center of the cookie. Remove cookies from baking sheet and cool on a wire wrack.
  • While the cookies are baking, mix together the confectioners sugar and lemon juice. Dip the tops of cookies in the glaze, then return to the baking sheet, allowing the glaze to dry completely before storing.

Nutrition

Calories: 156kcalCarbohydrates: 29gProtein: 2gFat: 4gSaturated Fat: 0.4gPolyunsaturated Fat: 1gMonounsaturated Fat: 2gTrans Fat: 0.02gCholesterol: 8mgSodium: 60mgPotassium: 72mgFiber: 1gSugar: 14gVitamin A: 29IUVitamin C: 6mgCalcium: 31mgIron: 1mgNet Carbohydrates: 28g
Keyword Rhubarb Cookies
Tried this recipe?Mention @grumpyshoneybunch or tag #grumpyshoneybunch!

Rhubarb Upside Down Cake

June 21, 2024 by Shelby Law Ruttan Leave a Comment

Rhubarb Upside Down Cake on a cake plate cooling in front of a window.

Rhubarb Upside Down Cake is a combination of sour rhubarb and sweet cake that gives this dessert recipe an explosion of flavors on the tongue. It is delicious served with a scoop of ice cream or a dollop of homemade whipped cream.

One slice rhubarb upside down cake on a white plate with a dollop of homemade whipped cream.

Rhubarb is one of my favorite spring fruits to cook with as you can note by the amount of rhubarb recipes I have here on my website!

This particular upside down cake was inspired by love of upside down cakes and I wanted to add another one to my growing list. You may also like this blackberry upside down cake, pineapple upside down cake, and cranberry upside down cake!

[feast_advanced_jump_to]

Why You'll Love Rhubarb Upside Down Cake

Versatile: while it's touted as a dessert, this upside down cake is perfect for brunch, or enjoy it with an afternoon tea.

Seasonal dessert: a great treat to make when it's rhubarb season!

Sweet & tangy: a sweet and tangy take on the classic pineapple upside down cake with fluffy cake and a generous amount of rhubarb topping.

Ingredients

This upside down cake recipe is made with two steps and two sets of ingredients (topping and cake). See below for ingredients needed.

Ingredients for rhubarb cake recipe in portioned bowls.
  • Fresh rhubarb
  • Granulated sugar
  • All purpose flour
  • Ground nutmeg
  • Butter
  • Large eggs
  • Baking powder
  • Ground nutmeg
  • 2% milk
  • Vanilla extract

See recipe card for quantities.

How To Make Rhubarb Upside Down Cake

It takes just a few simple steps to make this delicious dessert!

Raw diced rhubarb with flour, baking powder, salt, nutmeg and sugar on top of it.
  1. Step 1: Add diced rhubarb, flour, nutmeg, salt, and sugar to cast iron skillet.
Rhubarb mixture in a cast iron skillet.
  1. Step 2: Toss ingredients until rhubarb is coated with flour and sugar mixture.
Cake batter in mixing bowl.
  1. Step 3: in a large bowl cake ingredients until smooth.
Pouring cake batter on top of rhubarb mixture in skillet.
  1. Step 4: pour cake batter over top of rhubarb mixture.
Cake batter on top of rhubarb mixture in cast iron skillet.
  1. Step 5: spread cake batter over top of rhubarb mixture.
Baked Rhubarb Upside Down Cake in a cast iron skillet.
  1. Step 6: Bake in oven at 350 degrees for 30 minutes.
  1. Preheat oven to 350 degrees F. Place diced rhubarb, sugar, nutmeg, flour, and butter in a 9" cast iron skillet.
  2. Toss rhubarb mixture to coat completely.
  3. In a small bowl, whisk together the flour, baking powder, and nutmeg. Add egg, milk, and vanilla extract, whisking until batter is smooth.
  4. Pour cake batter over top of rhubarb mixture.
  5. Spread cake batter to cover rhubarb mixture to cover rhubarb completely.
  6. Bake for 30 minutes, until toothpick inserted into center of cake comes out clean.

Hint: use a butter knife to run around the edge of the skillet before inverting pan to prevent any of the cake from sticking to edges of the pan.

Substitutions

  • Sweetener - make this cake sugar free by substituting an all natural sweetener for the sugar.
  • Flavor swap - use almond or strawberry extract in place of vanilla extract.
  • Frozen rhubarb: you can substitute frozen rhubarb for fresh, do not thaw rhubarb before use.
Upclose image of whole Rhubarb Upside Down Cake.

Variations

  • Strawberry Rhubarb Upside Down Cake: substitute ½ of the diced rhubarb with sliced fresh strawberries.
  • Add texture - sprinkle the cake batter with slivered almonds before baking for added texture and flavor.
  • Caramel flavor - substitute brown sugar for the white sugar for a deep caramel flavor.

Equipment

I highly recommend using a cast iron skillet (affiliate link) to make this rhubarb upside down cake. It holds heat evenly and the rhubarb topping does not stick to the bottom of the pan.

You will also need the following:

  • Mixing bowls
  • Rubber scraper
  • Electric mixer
  • Large cake plate
A slice of Rhubarb Upside Down Cake on a cake server being removed from the cake plate.

Storage

Store leftover upside down cake in an airtight container in the fridge up to 4 days or in the freezer up to 2 months.

Top tip

For best results, if substituting frozen rhubarb, be sure that you do not thaw it first. Any water in the frozen rhubarb will evaporate as it cooks.

Related Recipes

Looking for other rhubarb recipes like this? Try these:

  • Featured image for Rhubarb Cheesecake recipe.
    Rhubarb Cheesecake
  • Featured image for strawberry rhubarb pudding cake.
    Strawberry Rhubarb Pudding Cake
  • Raspberry Rhubarb Sweet Rolls featured image.
    Raspberry Rhubarb Sweet Rolls
  • Featured Image Rhubarb Crumb Muffins.
    Rhubarb Crumble Muffins

Serve with..

Serve this Rhubarb Upside Down Cake with a dollop of whipped cream or a scoop of this Homemade Vanilla Bean Ice Cream or Rhubarb Ice Cream.

When you make this Rhubarb Upside Down Cake recipe, please comment below and let me know what you think. I'd love it if you tag me on Instagram @grumpyshoneybunch or #grumpyshoneybunch so I can see your photos!

If you love this recipe, please leave a ⭐⭐⭐⭐⭐ rating

📖 Recipe

Rhubarb Upside Down Cake on a cake plate cooling in front of a window.

Rhubarb Upside Down Cake

Shelby Law Ruttan
Create a luscious Rhubarb Upside Down Cake by layering sweet and tangy rhubarb over a rich, moist cake batter. Baked to perfection, it's a delightful twist on a classic dessert favorite!
No ratings yet
Print FREE recipe card with your email address Pin Recipe Save Go to Collections
Prep Time 10 minutes mins
Cook Time 30 minutes mins
Total Time 40 minutes mins
Course Desserts
Cuisine American
Servings 8
Calories 336 kcal

Equipment

  • Cast Iron Skillet
  • mixing bowls
  • Rubber scraper
  • Electric mixer

As an Amazon Associate I earn from qualifying purchases.

Ingredients
  

For the Rhubarb mixture:

  • 3 cups diced fresh rhubarb
  • 1 cup sugar
  • 2 tablespoons flour
  • ¼ teaspoon ground nutmeg
  • ¼ cup butter melted

For the Cake batter:

  • ¾ cup sugar
  • 1 large egg
  • 1½ cup flour
  • 2 teaspoons baking powder
  • ½ teaspoon ground nutmeg
  • ¼ teaspoon salt
  • ⅖ cup 2% milk

Instructions
 

  • Preheat oven to 350 degrees F. Place diced rhubarb, sugar, nutmeg, flour, and butter in a 9" cast iron skillet.
  • Toss rhubarb mixture to coat completely.
  • In a small bowl, whisk together the flour, baking powder, and nutmeg.
  • In large bowl, whisk together egg, milk, and vanilla extract. Add dry ingredients to wet ingredients and mix until batter is smooth.
  • Pour cake batter over top of rhubarb mixture. Spread cake batter to cover rhubarb mixture to cover rhubarb completely.
  • Bake for 30 minutes, until toothpick inserted into center of cake comes out clean.
  • Cool cake for 15 minutes. Invert cake onto a cake plate. Serve warm or cold.

Nutrition

Calories: 336kcalCarbohydrates: 66gProtein: 4gFat: 7gSaturated Fat: 4gPolyunsaturated Fat: 0.5gMonounsaturated Fat: 2gTrans Fat: 0.2gCholesterol: 37mgSodium: 240mgPotassium: 186mgFiber: 2gSugar: 45gVitamin A: 266IUVitamin C: 4mgCalcium: 122mgIron: 2mgNet Carbohydrates: 64g
Keyword Rhubarb Upside Down Cake
Tried this recipe?Mention @grumpyshoneybunch or tag #grumpyshoneybunch!

Grilled Asparagus Halloumi Salad

June 14, 2024 by Shelby Law Ruttan 13 Comments

Grilled asparagus topped with a slice of grilled halloumi cheese and drizzled with pistachio pesto.

Grilled Asparagus Halloumi Salad is served with a savory and delicious Pistachio Pesto for an easy spring recipe that compliments chicken, fish, or beef as a side dish, or enjoyed as a light lunch or dinner on it's own. This is also a keto friendly, lower carbohydrate recipe for those who are carb conscious!

Grilled Asparagus Halloumi Salad

Asparagus is one of our mutually favorite vegetables for Grumpy and I. We love to eat it roasted in the oven with some salt and pepper, drizzled with a little browned butter balsamic dressing. Now that we are into grilling weather, we love to cook it on the grill!

[feast_advanced_jump_to]

❤️ Why you'll love it

  • Simple ingredients: made with fresh and simple ingredients, this asparagus recipe gives you the best flavor.
  • Fresh flavors with great texture contrast: tender crisp marinated, grilled asparagus is paired with squeaky halloumi cheese for the best in flavor an texture.
  • Low-carb: naturally low in carb and high in fiber, this is a flavorful dish that is perfect for those following a low carb and/or keto diet.

🥘 Ingredients

Springtime recipes are normally reminiscent of light, bright flavors. This grilled asparagus recipe is the epitome of that description!  This recipe could not be any simpler! You make my recipe for Homemade Pistachio Pesto made ahead of time or you can serve this with a store bought pesto.

Slices of halloumi cheese on a neon green plate with fresh asparagus in the background.

Below are the ingredients you will need to make this side dish recipe:

  • Fresh asparagus
  • Lemons
  • Olive oil
  • Black pepper
  • Halloumi cheese
  • Pistachio pesto or basil pesto
Grilled Asparagus Halloumi Salad

🔪 Instructions

  1. Preheat grill to 350 degrees F.
  2. In a large bowl, whisk together lemon juice, olive oil, and pepper.
  3. Add asparagus and toss to coat.
  4. Grill asparagus until tender, about 5-7 minutes (depending on the thickness of the stalks), turning often.
  5. Brush halloumi cheese with marinade and grill on both sides to get grill marks and cheese is hot.
  6. Serve grilled asparagus with grilled halloumi cheese, pistachio pesto, and a drizzle of fresh lemon juice.

📖 Variation

  • Veggie swap: use your favorite garden veggie in place of asparagus. Zucchini sticks, eggplant slices, green beans are all excellent choices.
A bite shot of halloumi and asparagus on a fork.

🥫Storage

Store leftover asparagus and halloumi in separate airtight containers in the fridge up to 3 days. Reheat gently on the grill or in the air fryer until warmed through to serve.

Tips

  • To trim the asparagus, hold the spear in your hands with one at the tip and the other at the stalk. Bend the asparagus spear until it breaks. The tough part of the stalk will then be removed and can be discarded.

📚 Related Recipes

  • Featured image for Roasted Asparagus and Mushrooms.
    Roasted Asparagus and Mushrooms
  • Featured image for Creamy Pesto Pasta.
    Creamy Pesto Pasta
  • Featured Image for Pesto Pasta Salad.
    Pesto Pasta Salad with Homemade Pesto
  • Featured image for Roasted Asparagus.
    Roasted Asparagus with Balsamic Brown Butter

🍽 Serve with..

  • A stack of 3 S'more Brownies on a plage with a green floral napkin in the background.
    S'more Brownies
  • Two grilled peaches topped with cream sauce, blueberries, and mint.
    Grilled Peaches with Agave Lime Cream
  • Homemade soft white bread featured image.
    Homemade Soft White Bread Recipe
  • Grilled Vegetable Pizza

When you make this recipe, please comment below and let me know what you think. I'd love it if you tag me on Instagram @grumpyshoneybunch or #grumpyshoneybunch so I can see your photos!

If you love this recipe, please leave a ⭐⭐⭐⭐⭐ rating

📖 Recipe

Grilled Asparagus Salad

Grilled Asparagus Halloumi Salad

Shelby Law Ruttan
Grilled Asparagus Halloumi Salad served with Pistachio Pesto is a delicious spring recipe that compliments your chicken, fish, or beef as a side dish, or can be made larger as a light dinnertime meal!
5 from 1 vote
Print FREE recipe card with your email address Pin Recipe Save Go to Collections
Prep Time 5 minutes mins
Cook Time 7 minutes mins
Total Time 12 minutes mins
Course Side Dish
Cuisine American
Servings 2 servings
Calories 173 kcal

As an Amazon Associate I earn from qualifying purchases.

Ingredients
  

  • 1 pound fresh asparagus
  • 1 tablespoon lemon juice
  • 1 tablespoon olive oil
  • pepper to taste
  • 4 slices halloumi cheese
  • 2 tablespoons Pistachio Pesto

Instructions
 

  • Preheat grill to 350 degrees F.
  • In a large bowl, whisk together lemon juice, olive oil, and pepper.
  • Add asparagus and toss to coat.
  • Grill asparagus until tender, about 5-7 minutes (depending on the thickness of the stalks), turning often.
  • Brush halloumi cheese with marinade and grill on both sides to get grill marks and cheese is hot.
  • Serve grilled asparagus with grilled halloumi cheese, pistachio pesto, and a drizzle of fresh lemon juice.

Nutrition

Calories: 173kcalCarbohydrates: 11gProtein: 6gFat: 13gSaturated Fat: 2gPolyunsaturated Fat: 1gMonounsaturated Fat: 5gCholesterol: 1mgSodium: 169mgPotassium: 466mgFiber: 5gSugar: 5gVitamin A: 2.017IUVitamin C: 16mgCalcium: 99mgIron: 5mgNet Carbohydrates: 6g
Keyword Asparagus, Halloumi, pesto, Salad
Tried this recipe?Mention @grumpyshoneybunch or tag #grumpyshoneybunch!

Coconut Cream Pie

May 27, 2024 by Shelby Law Ruttan 30 Comments

Coconut cream pie slice on a white plate.

There is nothing more delicious than a Coconut Cream Pie covered with a homemade whipped cream topping and toasted coconut flakes. The creamy custard filling is flavored with coconut milk and coconut extract with sweetened shredded coconut flakes stirred into the pudding for the ultimate in coconut pie flavor!

One slice of coconut cream pie on a white plate.

Cream pies are my family's favorite type of pie recipe. This coconut cream pie is right at the top of the list and often requested for birthday's over cake! We also love this Strawberry Cream Pie for special occasions!

Why You'll Love Coconut Cream Pie

  • Comfort food classic: creamy pudding with sweet indulgent flavors makes this pie recipe the perfect comfort food.
  • Tropical flavors: the coconut flavor brings a taste of the tropics to this delicious dessert!
  • Celebration worthy: a great dessert for holiday celebrations or special occasions.
[feast_advanced_jump_to]

Ingredients

Use a clear shot of the ingredients for this recipe, prepped, and labeled if necessary. Add a paragraph of content describing why these ingredients were chosen. Insert the ingredients into the list below, omitting quantities.

Ingredients for coconut cream pie filling: coconut milk, milk, eggs, granulated sugar, cornstarch, coconut flakes, coconut extract, and butter.
  • Coconut milk (use coconut milk from a can)
  • 2% milk
  • Granulated sugar
  • Cornstarch
  • Large eggs
  • Coconut flakes
  • Salted butter
  • Coconut extract

See recipe card for quantities.

How to Make Coconut Cream Pie

You can make this coconut cream pie in just 6 easy steps! While it does need time to chill, you can make this ahead of time and have it cold and ready for dessert in just a few hours.

Milk, sugar, and cornstarch whisked together in a stainless steel saucepan.
  1. Step 1: Whisk together cornstarch, granulated sugar, milk, and coconut milk in a large saucepan.
Whisking the butter into the pudding.
  1. Step 2: Add the egg yolks and whisk. Cook over medium heat until pudding begins to thicken.
Thickened pudding with butter and coconut extract added.
  1. Step 3: Add the butter and coconut extract and whisk together until creamy.
Coconut on top of pudding in a saucepan.
  1. Step 4: Stir in the coconut until well incorporated.
Overhead image of coconut cream pie filling spread inside of baked crust.
  1. Step 5: Pour into prepared pie crust and cool completely.
Overhead image of whole coconut cream pie topped with whipped cream and toasted coconut flakes.
  1. Step 6: Top with whipped cream.
  1. In a large sauce pan, whisk together the sugar, cornstarch, coconut milk, and milk until smooth.
  2. Whisk in the egg yolks until fully incorporated into the milk mixture. Cook pudding mixture in a heavy bottomed pan over medium heat until mixture begins to boil. Boil for 1 minute, whisking constantly.
  3. Remove from heat and add the butter and coconut extract. Stirring until well combined.
  4. Stir in the sweetened coconut flakes.
  5. Pour coconut cream pudding into prepared pie crust. Cover and cool completely. Chill at least 2 hours before serving.
  6. To serve, top with homemade whipped topping and toasted coconut flakes.

Hint: Pre-bake the pie ahead of time giving it enough time to cool completely before adding the pie filling.

Substitutions

This coconut cream pie is very forgiving, if you find yourself in a pinch and need to make substitutions, check out the suggestions below:

  • Make it vegan - feel free to use all coconut milk or almond milk in place of the cow's milk and use vegan butter in place of the butter and coconut whipped cream for the topping.
  • Flavored extract - pure vanilla extract can be substituted for the coconut extract.
  • Graham cracker crust - substitute a graham cracker crust for the pie pastry.
Whole pie with a slice removed from the pie plate.

Variations

Sometimes a little variety adds more pizazz to your pie, check out the suggestions below for some different ways to make your coconut cream pie.

  • Toasted Coconut - stir toasted coconut into the pudding for more crispy and toasty texture.
  • Coconut-Pineapple Cream Pie - stir in 1 cup well drained crushed pineapple with the coconut. Garnish whipped topping with maraschino cherries.
  • Kid friendly - add crushed potato chips (ketchup chips!)

Equipment

You will need:

  • Sauce pan with a heavy bottom or a double boiler (to make the pudding).
  • Hand whisk
  • Rubber spatula

Storage

Store coconut cream pie in an airtight pie container (affiliate link) up to 3 days.

Freezer storage is not recommended.

Top tip

Pudding pie with plastic wrap on top to prevent a skin from forming on the pudding.
  • Place saran wrap over the top of the pie filling to prevent skin from forming. Cool and refrigerate.

More Pie Recipes

Looking for more pie recipes like this? Try these:

  • Coconut cream pie slice on a white plate.
    Coconut Cream Pie
  • Featured image for Strawberry Cream Pie.
    Strawberry Cream Pie
  • One slice of rhubarb pie on a plate.
    Rhubarb Custard Pie
  • Featured image for No Bake Peanut Butter Pie.
    No Bake Peanut Butter Pie

Don't forget to check out my Amazon storefront for some of my favorite products!

When you make this recipe, please comment below and let me know what you think. I'd love it if you tag me on Instagram @grumpyshoneybunch or #grumpyshoneybunch so I can see your photos!

If you love this recipe, please leave a ⭐⭐⭐⭐⭐ rating

📖 Recipe

Coconut cream pie slice on a white plate.

Coconut Cream Pie

Shelby Law Ruttan
Experience sweet indulgence with this homemade coconut cream pie recipe. Full of coconut flavor and sweetened coconut shreds, this pie is topped with whipped cream and garnished with toasted coconut for the ultimate in comfort food!
5 from 1 vote
Print FREE recipe card with your email address Pin Recipe Save Go to Collections
Prep Time 10 minutes mins
Cook Time 15 minutes mins
Total Time 25 minutes mins
Course Desserts
Cuisine American
Servings 8
Calories 354 kcal

Equipment

  • Hand whisk
  • rubber spatula
  • Large saucepan

As an Amazon Associate I earn from qualifying purchases.

Ingredients
  

  • 1 pre-baked pie crust shell
  • ½ cup granulated sugar
  • ¼ cup cornstarch
  • 1 cup 2% milk
  • 1 cup coconut milk
  • 4 large egg yolks , well beaten
  • 3 tablespoons butter
  • 1 teaspoon coconut extract
  • 1 cup shredded coconut

Instructions
 

  • In a large sauce pan, whisk together the sugar, cornstarch, coconut milk, and milk until smooth.
  • Whisk in the egg yolks until fully incorporated into the milk mixture. Cook pudding mixture in a heavy bottomed pan over medium heat until mixture begins to boil. Boil for 1 minute, whisking constantly.
  • Remove from heat and add the butter and coconut extract. Stirring until well combined.
  • Stir in the sweetened coconut flakes.
  • Pour coconut cream pudding into prepared pie crust. Cover and cool completely.
  • Before serving, top with homemade whipped topping and toasted coconut flakes.

Nutrition

Calories: 354kcalCarbohydrates: 34gProtein: 5gFat: 23gSaturated Fat: 14gPolyunsaturated Fat: 1gMonounsaturated Fat: 5gTrans Fat: 0.2gCholesterol: 105mgSodium: 172mgPotassium: 174mgFiber: 1gSugar: 19gVitamin A: 284IUVitamin C: 0.4mgCalcium: 59mgIron: 2mgNet Carbohydrates: 33g
Keyword Coconut Cream Pie
Tried this recipe?Mention @grumpyshoneybunch or tag #grumpyshoneybunch!

Bourbon Onion Bacon Dog

May 15, 2024 by Shelby Law Ruttan 13 Comments

Hot dog on a roll topped with bourbon glazed onions, bacon, and jalapeno slices.

This Bourbon Onion Bacon Dog is sinfully delicious!  A perfectly grilled snappy skin hot dog, covered with bourbon caramelized onions and crispy bacon topping is like a burst of flavor and texture in your mouth. A few slices of candied jalapeno adds a layer of heat for the perfect hot dog!

Bourbon Onion Bacon Dog

This is your not your average hotdog! No ketchup, no mustard, and no pickle relish here! This is a grown up version packing a punch of flavors adults love.

This amazing hot dog recipe was inspired by my Blue Cheese Burger with Bourbon Caramelized Onions and pairs well with these crispy french fries.

[feast_advanced_jump_to]

Ingredients

Raw hot dogs on a plate with hot dog rolls in the background.
  • Unsalted butter
  • Bourbon
  • Maple syrup
  • Onion
  • Crisp cooked bacon
  • Hot dogs
  • Hot dog rolls
  • Candied Jalapeno (optional)

See recipe card for quantities.

Instructions

This recipe is as easy as caramelizing the onions and air frying the hotdogs! Use pre-cooked bacon for convenience and you can have dinner ready in 20 minutes!

Cooked onions in skillet before adding root beer
  1. Step 1: Cook onions in skillet with butter until softened.
Caramelized Onions in a skillet.
  1. Step 2: Add bourbon and continue to cook until caramelized.
Grilled Hot Dogs in a paper lined basket.
  1. Step 3: Grill hot dogs (or air fry)
Bourbon Onion Bacon Dog
  1. Step 4: Place hot dog in roll and top with caramelized onion, crispy bacon, and jalapeno slices.
  1. In a large skillet over medium heat, melt butter until bubbly. Add onion slices and cook for 7-10 minutes over medium low heat, until onions soften and begin to brown.
  2. Add 1 tablespoon of maple syrup and stir into onions. Turn heat up and cook until onions begin to sizzle. Carefully add bourbon to the skillet. Cook and stir onions for 1 minute while the bourbon cooks down and glazes the onions. Remove from heat.
  3. Grill or air fry hot dogs according to package directions.
  4. Serve bourbon caramelized onions over hot dogs in buns and sprinkle with bacon and jalapeno slices (if using).

Hint: Caramelized onions can be made ahead of time and stored in the fridge up to 3 days. They can also be placed in the freezer for long term storage up to 3 months. Just thaw and warm before using.

Substitutions

Make this recipe lower carb by making a keto bun shaped like a hot dog roll.

  • Syrup swap - brown sugar can be used in place of the maple syrup.
  • Make it vegetarian - substitute plant-based bacon and plant-based hot dogs (affiliate links).
  • Meat swap - substitute chicken sausage links or use your favorite hot dog.

Love fancy hot dogs? You might also want to try this Thai Hot Dog recipe!

Variations

Giving the visitor ideas on how they can change this recipe to better suit their dinner guests, or their cultural cuisine, is a great way to increase the chances they make the recipe.

  • Spicy - stir a teaspoon or two of gochujang paste into the onions for a Korean flair.
  • Deluxe - use jumbo hot dogs for hearty appetites.
  • Jalapeno crunch - use french fried jalapeno pieces (affiliate link) instead of crispy bacon or jalapeno slices.

Equipment

A good heavy duty skillet is essential for making caramelized onions. I love to use my cast iron skillet (affiliate link) for even heat distribution, but a heavy bottomed staniless steel skillet works great as well.

Storage

Store leftovers in an airtight container in the fridge 3-4 days.

Top tip

If serving a crowd, be sure to double the onion recipe and store the cooked hot dogs on low in a crock pot to keep them warm.

Related

Looking for other recipes like this? Try these:

  • Featured image for Air Fryer Hot Dogs.
    Air Fried Hot Dogs
  • Featured Image Low Carb Chili Dog Casserole.
    Low Carb Chili Dog Casserole
  • Chili Cheese Dogs Featured Image.
    Chili Cheese Dogs
  • Featured Image for Thai Hot Dogs.
    Thai Style Hot Dogs

Pairing

These are my favorite dishes to serve with [this recipe]:

  • Pea Salad with Bacon and cheese
  • A bowl of BLT Pasta salad filled with bow tie pasta, chopped romaine lettuce, crispy bacon, grape tomatoes, red onion, and golden croutons, all tossed in a creamy dressing. A red and white striped towel is partially visible beside the bowl.
    Creamy BLT Pasta Salad with Bacon, Lettuce, and Tomato
  • Side view of a bowl of Tuna Macaroni Salad garnished with quartered hard boiled eggs.
    Tuna Macaroni Salad with Green Peas
  • Beer Grilled Chipotle Chicken thighs with visible grill marks served on a white plate.
    Chipotle Beer Grilled Chicken

Don't forget to check out my Amazon storefront for some of my favorite products!

When you make this Bourbon Onion Bacon Dog recipe, please comment below and let me know what you think. I'd love it if you tag me on Instagram @grumpyshoneybunch or #grumpyshoneybunch so I can see your photos!

If you love this recipe, please leave a ⭐⭐⭐⭐⭐ rating

📖 Recipe

Hot dog on a roll topped with bourbon glazed onions, bacon, and jalapeno slices.

Bourbon Onion Bacon Dog

Shelby Law Ruttan
This Bourbon Onion Bacon Dog is sinfully good!  A perfectly grilled snappy skin hot dog, covered with bourbon glazed onions and bacon topping is like heaven in your mouth. Finish off your hot dog with some thin slices of jalapeno pepper and you have that complete sweet heat deal going on!
4 from 3 votes
Print FREE recipe card with your email address Pin Recipe Save Go to Collections
Prep Time 10 minutes mins
Cook Time 15 minutes mins
Total Time 25 minutes mins
Course Main Dish
Cuisine American
Servings 4
Calories 317 kcal

As an Amazon Associate I earn from qualifying purchases.

Ingredients
  

  • 1 tablespoon unsalted butter
  • 1 tablespoon bourbon
  • 1 large large onion sliced
  • 4 slices cooked bacon crumbled (optional)
  • 4 hot dogs
  • 4 hot dog buns

Instructions
 

  • In a large skillet over medium heat, melt butter until bubbly. Add onion slices and cook for 7-10 minutes over medium low heat, until onions soften and begin to brown.
  • Add 1 tablespoon of maple syrup and stir into onions. Turn heat up and cook until onions begin to sizzle. Carefully add bourbon to the skillet. Cook and stir onions for 1 minute while the bourbon cooks down and glazes the onions. Remove from heat.
  • Grill or air fry hot dogs according to package directions.
  • Serve bourbon caramelized onions over hot dogs in buns and sprinkle with bacon and jalapeno slices (if using).

Nutrition

Serving: 1hotdog with 1 bun and ¼ toppingCalories: 317kcalCarbohydrates: 34gProtein: 12gFat: 14gSaturated Fat: 5gPolyunsaturated Fat: 2gMonounsaturated Fat: 5gTrans Fat: 0.1gCholesterol: 36mgSodium: 654mgPotassium: 218mgFiber: 1gSugar: 5gVitamin A: 92IUVitamin C: 3mgCalcium: 83mgIron: 3mgNet Carbohydrates: 32g
Keyword Bourbon Onion Bacon Dog
Tried this recipe?Mention @grumpyshoneybunch or tag #grumpyshoneybunch!

Low Carb Burger Bowls

May 14, 2024 by Shelby Law Ruttan 26 Comments

A burger bowl with lettuce, grilled burger, avocado, salsa, crispy pork belly and a sauce drizzled over top.

The Ultimate Burger Bowl is chock full of flavor and perfect for your low carb friends! Made juicy and delicious lean ground beef mixed with cheddar cheese, spices and topped with, crispy pork belly. The perfect way to enjoy a burger without the bun!

 Overhead image of a burger bowl filled with a grilled burger, lettuce, avocado, salsa, cilantro, and a drizzle of sauce over top.

When it comes to summertime grilling, there isn't much else better than a burger on the grill. These burger bowls are packing flavor and is the meat lovers salad worth creating year round!

If you love keto friendly burgers, be sure to try out my Butter Burgers or these Kimchi Burgers!

[feast_advanced_jump_to]

Why You'll Love Burger Bowls

  • Easy recipe: Not only are they easy to make, they are low carb and full of flavor!
  • Versatile: adaptable to your favorite toppings and flavors.
  • Moist and flavorful: the fresh salsa mixed into the burger adds moisture and flavor.

Ingredients

  • Lean ground beef
  • Sharp cheddar cheese
  • Salsa
  • Ground cumin
  • Chili powder
  • Salt
  • Black pepper
  • Pork belly
  • Avocado
  • Fresh cilantro

See recipe card for measurements.

How to Make a Burger Bowl

fresh salsa on a spoon
  1. Step 1: Make the fresh salsa.
A pair of hands mixing the ground beef
  1. Step 2: Mix together the burger ingredients.
A pair of hands shaping ground beef into hamburgers 2 formed burgers on a plate
  1. Step 3: shape burger mixture into patties.
Hamburgers on the grill
  1. Step 4: grill burgers until 160 degrees F.
Assembling the burger bowl.
  1. Step 5: assemble the burger bowl with your favorite toppings.
A pair of hands cutting the burger with a knife
  1. Step 6: serve and enjoy!

Substitutions

  • Ground meat: substitute ground chicken, turkey, or venison for the ground beef.
  • Pork swap: crispy cooked bacon can be substituted for the pork belly.
  • Cooking method: if you don't have a grill, use a grill pan or large skillet to cook the burgers.

Variations

  • Get eggy with it: top the burger bowl with a soft yolk fried egg.
  • Sauce it up: Brush the burger with your favorite barbecue sauce.
  • Make it vegetarian: substitute a grilled portobello for the burger and omit the pork belly.
Overhead image of an assembled burger bowl with dressing drizzled over top.

Top Tip

  • To grill perfectly tender burgers, be sure that you don't over mix the beef mixture! A moist, juicy burger is what makes your burger bowl the ultimate!
  • Use the leftover salsa to serve with a side of low carb tortilla chips (affiliate link).

Storage

Store leftover elements in separate airtight containers in the fridge up to 3 days.

Related Recipes

  • Upclose image of chicken artichoke portobello pizza on a stone baking sheet.
    Chicken Artichoke Portobello Pizza
  • One large mushroom stuffed with spinach, grape tomatoes, feta cheese, and black olives.
    Greek Stuffed Mushrooms
  • Featured Image Asian Lettuce Cups.
    Turkey Lettuce Wraps: Spicy Sweet Asian Flavors
  • A burger bowl with lettuce, grilled burger, avocado, salsa, crispy pork belly and a sauce drizzled over top.
    Low Carb Burger Bowls

Serve with...

  • Cauliflower steaks on a roasting pan topped with golden brown cheese being removed from the sheet with a cheese pull.
    Cauliflower Steaks with Cheese Topping
  • A blue plate with breaded baked zucchini chips.
    Baked Zucchini Chips with Cashew Breading
  • Grilled asparagus topped with a slice of grilled halloumi cheese and drizzled with pistachio pesto.
    Grilled Asparagus Halloumi Salad
  • Featured Image for Keto Chicken Noodle Soup.
    Keto Chicken Noodle Soup

When you make this recipe, please comment below and let me know what you think. I'd love it if you tag me on Instagram @grumpyshoneybunch or #grumpyshoneybunch so I can see your photos!

If you love this recipe, please leave a ⭐⭐⭐⭐⭐ rating

📖 Recipe

Featured Image for Ultimate Burger Bowl.

The Ultimate Burger Bowl

Shelby Law Ruttan
The Ultimate Burger Bowl made with a juicy burger, avocado, fresh salsa, and crispy pork belly!
5 from 11 votes
Print FREE recipe card with your email address Pin Recipe Save Go to Collections
Prep Time 20 minutes mins
Cook Time 15 minutes mins
Additional Time 10 minutes mins
Total Time 45 minutes mins
Course Main Course
Cuisine American
Servings 4 Burger Bowls
Calories 523 kcal

As an Amazon Associate I earn from qualifying purchases.

Ingredients
  

For the Salsa

  • 3 large ripe tomatoes diced
  • ⅓ cup onion finely diced
  • 1 large jalapeno pepper diced
  • 4 cloves garlic minced
  • 1 medium lime juiced
  • ½ teaspoon salt
  • 1 teaspoon apple cider vinegar
  • 2 tablespoon fresh cilantro chopped

For the Burgers

  • 1.33 lb Certified Angus Beef brand 80/20 ground beef
  • 4 ounces shredded sharp cheddar cheese
  • 2 tablespoon homemade salsa
  • ½ teaspoon ground cumin
  • 1 teaspoon chili powder
  • ¼ teaspoon salt
  • ¼ teaspoon ground black pepper
  • 2 ounces thinly sliced sharp cheddar cheese optional (for topping burgers)

Suggested additions

  • 4 cups mixed greens
  • 2 avocados halved and sliced
  • ½ cup pork belly crispy cooked
  • 2 tablespoons homemade salsa
  • 1 serving your favorite salad dressing

Instructions
 

To make salsa:

  • Toss together diced tomatoes, jalapeno, onion, garlic, salt, lime juice and apple cider vinegar. Set aside in refrigerator until ready to use.

To make the burgers

  • Gently mix together ground beef, cheddar cheese, cumin, chili powder, salt and pepper. 
  • Shape into 4 equal patties.
  • Preheat grill until hot. I make sure mine is at 450 degrees before adding my burgers. Cover grill and reduce heat to medium low. Cook about 4 min. Turn and cook another 6 -10 minutes until desired doneness. Your internal temperature should at least be 160 degrees. Add cheese slices the last minute of grilling (if desired).

Create the Ultimate Burger Bowl (Serving suggestions)

  • Place a base of lettuce in your bowl (about 1 cup - 2 cups depending on your preferred amount of greens). 
  • Place burger off to the side of the bowl. Arrange pork belly (or thick cut crispy bacon) next to the burger. Add more salsa and avocado. Drizzle with your favorite dressing. Serve.

Video

Notes

Nutrition information is for the grilled burger only. Additions you make should be taken into consideration. 
Nutrition information calculated using myfitnesspal is provided as a courtesy, but will vary depending on the specific brands of ingredients you use. Please consult with your doctor regarding specific health needs.

Nutrition

Calories: 523kcalCarbohydrates: 1gProtein: 36gFat: 44g
Keyword Best Angus Beef, Bowl, Burger Bowl, Certified Angus Beef, Grill, grilling, Ground Beef, homemade, keto recipe, low carb, low carbohydrate, Salsa, summer recipe
Tried this recipe?Mention @grumpyshoneybunch or tag #grumpyshoneybunch!

Blue Cheese Burgers with Bourbon Caramelized Onions

May 14, 2024 by Shelby Law Ruttan 11 Comments

Blue Cheese Burger with Caramelized Onions on a bun with lettuce and tomato.

If you are looking for a hearty burger with bold flavors, then these Blue Cheese Burgers with Bourbon Caramelized Onions is the one you need! The intense flavor of blue cheese is complimented by the sweet bourbon infused onions that will make your taste buds happy with every bite! 

Up close image of a grilled beef burger topped with blue cheese crumbles and bourbon caramelized onions in a sesame seed burger bun.

This is the perfect burger for summertime gatherings! Think Friday or Saturday night bonfires with a burger and beer!

This was inspired by my Bourbon Bacon Onion Hot Dog on this site, and pairs well with this delicious Amish Broccoli Cauliflower Salad recipe!

[feast_advanced_jump_to]

Why You'll Love Blue Cheese Burgers

Intense flavors: bourbon infused caramelized onions offer sweet flavors while the crispy bacon pieces add texture and salt with a touch of heat from the jalapeno.

Summer Cookouts: these burgers are perfect for weekend parties with friends! I promise you will be the star of the grill with this burger recipe!

Ingredients

Just a few ingredients pack a punch of flavor into this delicious grilled sandwich!

  • Lean ground beef
  • Butter
  • Brown sugar
  • Bourbon
  • Vidalia onion
  • Crumbly blue cheese
  • Worcestershire sauce
  • Salt Black Pepper
  • Hamburger buns

See recipe card for quantities.

How to Make Blue Cheese Burgers

Onions and garlic in a large skillet.
  1. Step 1: Cook onions with butter on low in a large skillet for 20 minutes
Overhead view of A white dish with  Caramelized Onions.
  1. Step 2: Add the bourbon and brown sugar to the onions. Simmer til most of the liquid is absorbed.
Grilled Reuben Burgers
  1. Step 3: Mix together beef, bourbon, Worcestershire sauce, salt and pepper. Shape into patties.
Burgers on grill with grill marks on burger.
  1. Step 4: Grill burgers to desired degree of doneness.
Grilled beef burgers topped with blue cheese crumbles.
  1. Step 5: Top burgers with blue cheese crumbles.
Up close image of a grilled beef burger topped with blue cheese crumbles and bourbon caramelized onions in a sesame seed burger bun.
  1. Step 6: Place burger on bun with lettuce, tomato, and bourbon caramelized onions.

Hint: let the grill run for 4-5 minutes to burn off any remnants, then clean it. I like to use this bristle-free barbecue brush (affiliate link) for cleaning the grill.

Substitutions

  • Protein swap - use ground chicken, turkey, or venison in place of the ground beef.
  • Cheese swap - use your favorite cheese in place of the blue cheese crumbles. Feta cheese would be a great one!
  • Make it keto - use truvia brown sugar (affiliate link) for the onions (or leave it out) and make these keto burger buns to serve the burgers on.

Variations

Change this recipe to your own liking or follow some of the variations below.

  • Bacon love - top the burgers with crispy cooked bacon.
  • Deluxe - add guacamole, crispy onions or crispy jalapenos
  • Kid friendly - omit the bourbon in the recipe.

Equipment

  • Large skillet
  • Cutting board
  • Sharp knife
  • Grill (Gas or Charcoal) OR a Grill pan to cook the burgers on the stove.
  • Large bowl
A female eating a burger.

Storage

Store the caramelized onions separately from the burgers and buns in the fridge, and reheat when ready. Good for 2-3 days.

Top Burger Tip

  • When shaping the burger patty, make a well in the center. This will allow an indentation that will hold the blue cheese crumbles without them falling off.
  • If you don't have a grill, a grill pan or skillet will do the job cooking the burgers.

Related Recipes

Looking for other recipes like this? Try these:

Serve with...

These are my favorite side dishes to serve with Blue Cheese Burgers:

  • Grilled Corn Avocado Salad over sliced grilled filet mignon.
    Grilled Corn Avocado Salad
  • Buffalo Chicken Pasta Salad featured image.
    Buffalo Chicken Pasta Salad
  • An orange and blue patterned bowl with spiral pasta mixed in a creamy dressing with asparagus, corn, and sun dried tomatoes.
    Parmesan Pasta Salad with Asparagus and Corn
  • RWB Potato Salad Featured image.
    Red White and Blue Potato Salad

When you make this recipe, please comment below and let me know what you think. I'd love it if you tag me on Instagram @grumpyshoneybunch or #grumpyshoneybunch so I can see your photos!

If you love this recipe, please leave a ⭐⭐⭐⭐⭐ rating

📖 Recipe

Blue Cheese Burger with Caramelized Onions on a bun with lettuce and tomato.

Blue Cheese Burgers with Bourbon Caramelized Onions

Shelby Law Ruttan
Delicious grilled beef burgers with the flavor of bourbon in the burger and the caramelized onions. The contrast of sharp and tangy blue cheese crumbles makes the perfect compliment to the sweet onion topping.
No ratings yet
Print FREE recipe card with your email address Pin Recipe Save Go to Collections
Prep Time 10 minutes mins
Cook Time 20 minutes mins
Total Time 30 minutes mins
Course Main Dish
Cuisine American
Servings 3
Calories 578 kcal

Equipment

  • grill
  • Grill spatula
  • Large bowl
  • Large skillet
  • cutting board
  • chef knife

As an Amazon Associate I earn from qualifying purchases.

Ingredients
  

For the Bourbon Caramelized Onions:

  • 1 tablespoon butter
  • ½ tablespoon brown sugar
  • ½ cup bourbon
  • 2 cups Vidalia onion slices
  • 6 tablespoons crumbly blue cheese

For the Burger

  • 1 pound lean ground beef
  • 2 tablespoons bourbon
  • 1 teaspoon Worcestershire sauce
  • Salt and Pepper , to taste
  • 3 Hamburger buns

Instructions
 

  • Melt butter in a large skillet over low heat until bubbly. Add onions and stir to coat with butter. Cook over low heat for 20 minutes, stirring occasionally.
  • Once onions are softened, add brown sugar and bourbon and simmer until liquid has evaporated. Set aside and use for burger topping upon assembly.
  • In a large bowl, gently mix the ground beef, bourbon, Worcestershire sauce, salt, and black pepper (if using) until combined. Shape into ⅓ pound patties and press a slight dent in the center of the beef.
  • Place shaped burgers on grill that has been preheated to 350 degrees. Place burgers on grill and lower lid. Cook burgers until just about ready to remove from the grill.
  • Place two tablespoons of crumbly blue cheese in well of burger. Lower lid and cook another 30 seconds to warm cheese on top of burger. Remove from grill and let set  10 minutes prior to serving.
  • Garnish burger with caramelized onions, lettuce and tomato if desired.

Nutrition

Calories: 578kcalCarbohydrates: 38gProtein: 40gFat: 17gSaturated Fat: 9gPolyunsaturated Fat: 1gMonounsaturated Fat: 6gTrans Fat: 1gCholesterol: 114mgSodium: 542mgPotassium: 822mgFiber: 2gSugar: 16gVitamin A: 227IUVitamin C: 6mgCalcium: 180mgIron: 6mgNet Carbohydrates: 36g
Keyword Blue Cheese Burgers
Tried this recipe?Mention @grumpyshoneybunch or tag #grumpyshoneybunch!

Food safety

  • Cook to a minimum temperature of 160 °F (71 °C)
  • Do not use the same utensils on cooked food, that previously touched raw meat
  • Wash hands after touching raw meat
  • Don't leave food sitting out at room temperature for extended periods
  • Never leave cooking food unattended
  • Use oils with high smoking point to avoid harmful compounds
  • Always have good ventilation when using a gas stove

See more guidelines at USDA.gov.

Garlic Chicken Pizza

May 12, 2024 by Shelby Law Ruttan 1 Comment

Featured image for Garlic Chicken Pizza.

This Garlic Chicken Pizza is full of garlic flavor topped with tender pieces of shredded chicken, bell peppers, grape tomatoes and fresh basil. This delicious pizza is easy to make and ready to enjoy in under 20 minutes!

Overhead image of garlic chicken pizza with fresh basil garnish on a wooden board.

Pizza is always a favorite in my home and it wouldn't be Friday night without pizza and these crispy baked sweet hot chicken wings on the table!

This pizza recipe is mainly for the topping and you can make your own homemade pizza dough or buy a pre made dough in the grocery store for convenience.

[feast_advanced_jump_to]

Why You'll Love Garlic Chicken Pizza

  • It's full of buttery garlic flavor infused into tender rotisserie chicken.
  • These single serving pizzas bake in just 10 minutes!
  • Family fun! Kids can help assemble their own pizza!

Ingredients

You will need a good pizza dough recipe or purchased dough, some leftover rotisserie chicken, and thin slices of garlic cloves are the stars of this flavorful pizza. Below are what you will need to make Garlic Chicken Pizza.

Topping ingredients: salted butter, peppers and onions, fresh basil, shredded chicken, fresh garlic, and grape tomatoes.
  • Pizza dough
  • Shredded chicken
  • Bell Peppers
  • Onion
  • Fresh garlic
  • Grape tomatoes
  • Fresh basil
  • Salted butter

See recipe card for quantities.

How to Make Garlic Chicken Pizza

To make the chicken topping:

Sauteed peppers and onions in olive oil in a staniless steel skillet.
  1. Step 1: Saute peppers and onion in olive oil.
Sauteed peppers and onions with thinly sliced garlic slices in a stainless steel skillet.
  1. Step 2: Add garlic slices and saute another 1-2 minutes.
Sauteed peppers, onions, and garlic slices in a skillet topped with shredded chicken and butter.
  1. Step 3: Add shredded chicken and butter, stir to combine, until butter is melted.
Pizza pan with a dab of olive oil, pizza dough, chicken and pepper mixture, mozzarella cheese, grape tomatoes, and fresh basil in portion bowls.
  1. Step 4: Use homemade pizza dough or store bought for the crust.

To assemble the pizza:

Pizza dough spread out in a single serve pizza pan.
  1. Step 1: Press dough out into a lightly oiled pizza pan.
Pizza dough in a pan sprinkled with grated parmesan cheese.
  1. Step 2: (optional) top dough with a sprinkling of parmesan cheese or a thin layer of ricotta cheese.
Shredded Mozzarella cheese on top of pizza dough.
  1. Step 3: top with shredded mozzarella cheese
Chicken, peppers, and tomato layer on top of mozzarella cheese.
  1. Step 4: add chicken and pepper mixture and top with sliced tomatoes.
Overhead image of baked garlic chicken pizza in the pizza pan.
  1. Step 5: Bake at 450 degrees for 8-10 minutes.
Overhead image of garlic chicken pizza with fresh basil garnish on a wooden board.
  1. Step 6: Sprinkle with fresh basil and serve.

Substitutions

  • Protein swap - this is also a great way to use leftover turkey, or ground meat!
  • Weight watcher friendly pizza dough - this 2 ingredient pizza dough is perfect for those who are watching their diets.
  • Vegetarian - substitute the meat with this plant-based chicken. (affiliate link)

Variations

  • Bacon Ranch - sprinkle the top of the pizza with diced crispy cooked bacon pieces and a drizzle of ranch dressing.
  • Barbecue - stir a couple tablespoons of your favorite barbecue sauce into the chicken mixture before topping the pizza.
  • Buffalo style - add a tablespoon or two of buffalo sauce to the chicken mixture.

Equipment

These 8 inch pizza pans or these (affiliate link) are perfect for making individual pizzas!

Storage

Store leftover pizza in an airtight container in the fridge up to 4 days. Reheat in the oven or toaster oven.

Top tip

You can make this as one large pizza instead of 8 individual pizzas. Just spread pizza dough out onto a pizza stone and top with toppings as instructed. Adjust cooking time accordingly.

Related

Looking for other recipes like this? Try these:

  • Easy Sausage Pizza
  • One Dish Pepperoni Pizza (7 WW Points Plus)
  • Featured image for Buffalo Chicken Pizza
    Buffalo Chicken Pizza Recipe
  • Chicken Sausage Pizza Featured Image.
    Chicken Sausage Pizza with Onions and Peppers

Pairing

These are my favorite dishes to serve with [this recipe]:

  • Sweet Chile Lime Chipotle Chicken Wings
    Sweet Chile Lime Chipotle Chicken Wings
  • Extra Crispy Maple Hot Wings - Double Crunch
  • Featured image for air fryer boneless wings.
    Boneless Chicken Wings in the Air Fryer
  • Featured Image for Pesto Pasta Salad.
    Pesto Pasta Salad with Homemade Pesto

When you make this Garlic Chicken Pizza recipe, please comment below and let me know what you think. I'd love it if you tag me on Instagram @grumpyshoneybunch or #grumpyshoneybunch so I can see your photos!

If you love this recipe, please leave a ⭐⭐⭐⭐⭐ rating

📖 Recipe

Featured image for Garlic Chicken Pizza.

Garlic Chicken Pizza

Shelby Law Ruttan
Ready in just 20 minutes, Garlic Chicken Pizza makes a quick and easy meal that is full or garlic flavor!
5 from 1 vote
Print FREE recipe card with your email address Pin Recipe Save Go to Collections
Prep Time 10 minutes mins
Cook Time 10 minutes mins
Total Time 20 minutes mins
Course Main Dish
Cuisine American
Servings 8
Calories 377 kcal

Equipment

  • 8-inch pizza pans
  • Sharp knife
  • cutting board

As an Amazon Associate I earn from qualifying purchases.

Ingredients
  

  • 1 tablespoon olive oil
  • ¾ cup bell pepper
  • ¼ cup onion slices
  • 3 extra large garlic cloves thinly sliced
  • 4 cups shredded chicken
  • 2 tablespoons butter
  • ½ teaspoon salt
  • 2 cups part skim mozzarella cheese
  • ½ cup sliced grape tomatoes
  • 1 tablespoon basil leaves torn
  • 1 pound pizza dough

Instructions
 

  • Heat the olive oil In a medium skillet over medium heat until hot.
  • Add the pepper and onions and saute for 2 minutes, until peppers begin to soften. Stir in the sliced garlic and cook, stirring often, for 2 minutes.
  • Add the shredded chicken and butter to the pepper mixture and stir until butter is melted and mixture is warm. Remove from heat.
  • Portion dough into 8 equal pieces. Form each portion into an individual round circle and place on pizza pan.
  • Once the pizzas are formed, assemble pizzas as follows: parmesan cheese (optional), mozzarella cheese, chicken mixture, sliced tomatoes.
  • Bake at 450 degrees for 8-10 minutes, or until dough is golden and cheese is browned.
  • Remove pizzas from oven and sprinkle with fresh basil.

Nutrition

Calories: 377kcalCarbohydrates: 30gProtein: 29gFat: 16gSaturated Fat: 7gPolyunsaturated Fat: 2gMonounsaturated Fat: 5gTrans Fat: 0.1gCholesterol: 78mgSodium: 805mgPotassium: 249mgFiber: 1gSugar: 5gVitamin A: 779IUVitamin C: 20mgCalcium: 234mgIron: 3mgNet Carbohydrates: 29g
Keyword Garlic Chicken Pizza
Tried this recipe?Mention @grumpyshoneybunch or tag #grumpyshoneybunch!

Chickpea and Spinach Curry

May 9, 2024 by Shelby Law Ruttan 4 Comments

A serving of chickpea, spinach and tomato curry on a silver spoon.

Packed with Indian flavors, this Chickpea and Spinach Curry is a great addition to your meal and is ready in just 15 minutes! It makes a great portable lunch or a side dish for your main meal.

Chickpea and Spinach Curry in a brown bowl.

I love to serve this chickpea curry year round. It is quick and easy to make and not only is full of flavor but is packed with nutrition!

This was inspired by my love for curry flavors makes a great lunch on it's own or as a side to this air fryer rotisserie chicken recipe!

[feast_advanced_jump_to]

Why You'll Love Chickpea and Spinach Curry

  • It's made with ingredients you may already have in your pantry.
  • Chickpea and Spinach Curry is packed with flavor and nutrition.
  • Ready in just 15 minutes for a quick and easy main or side dish recipe.

Ingredients

I love that this recipe is made with fresh and nutritious veggies and a punch of protein added with the canned chickpeas. A little bit of sugar is added to balance out the flavors.

Recipe ingredients in bowls: spinach, tomatoes, curry paste, ginger, garlic, onion, salt, and chickpeas.
  • Olive oil
  • Canned chickpeas
  • Tomatoes
  • Onion
  • Ginger root
  • Red curry paste
  • Granulated sugar
  • Salt

See recipe card for quantities.

Instructions

So easy to make in just 6 simple steps, this Chickpea Spinach Curry is ready in only 15 minutes!

Onions, garlic, and ginger sautéing in oil.
  1. Step 1: Saute onion, and ginger in olive oil until onion begins to soften.
Curry and salt added to sauted onion mixture.
  1. Step 2: Add curry paste, sugar, and salt.
Onion and red curry mixture in a stainless steel skillet.
  1. Step 3: Saute onion mixture with curry paste for 2 minutes.
Chickpeas and tomatoes in skillet.
  1. Step 4: Stir in tomatoes and chickpeas and bring to a boil.
Spinach added to chickpea and tomato mixture in skillet.
  1. Step 5: Add spinach and reduce heat to simmer.
Chickpea and Spinach Curry in skillet.
  1. Step 6: Simmer 3-4 minutes, until spinach is wilted.
  1. Heat the oil over medium high heat in a large non-stick skillet until hot. Add the onion and ginger and saute for 2 -3 minutes, until onions start to soften..
  2. Stir in the curry powder, sugar, and salt.
  3. Cook over medium-low heat, stirring constantly for 3 minutes, or until the onion has softened.
  4. Stir in the chickpeas and diced tomatoes and bring to a boil.
  5. Reduce heat, add spinach.  
  6. Simmer chickpea and spinach curry for 1 minute, or until spinach wilts.

Hint: allowing the spices to cook on low heat with the onions infuses great flavor in this dish so be sure to follow the cooking instructions here. Add a little bit of water if mixture seems too dry while cooking.

Substitutions

Keep this sugar-free by using stevia or monk fruit in place of the granulated sugar.

  • Green swap - substitute baby kale for the spinach.
  • Bean swap - substitute cannellini beans for the garbanzos.
  • Protein boost - add cubed extra firm tofu for a protein boost.

Variations

Want to boost flavors or bulk the recipe up some? Follow the suggestions below:

  • Spice it up - add chili pepper flakes while cooking to up the spice level of this dish.
  • Bulk it up - add 2 cups of cubed cooked potatoes or chopped cauliflower.
  • Make it creamy - stir in ½ cup of canned coconut milk.

See this coconut milk tofu curry on my website!

Equipment

Make sure you have a skillet large enough to hold the curry, one with tall sides and a large circumference is best. This deep frying pan (affiliate link) is perfect for the job!

Storage

Store leftover curry in an airtight container in the fridge up to 4 days.

Top tip

When cooking the onion and garlic mixture, start with the onion until it begins to sweat, then add the garlic to prevent the garlic from burning.

Related

Looking for other recipes like this? Try these:

  • oven roasted chickpeas in a gold serving dish
    Oven Roasted Chickpeas with Umami Seasoning
  • Featured image for Coconut Milk Shrimp Curry.
    Coconut Milk Shrimp Curry
  • Upclose image of a sausage burger on a slider roll topped with cheddar cheese, jalapeno slices and sriracha aioli.
    Cheddar Jalapeno Burgers
  • Thai shrimp Curry with zoodles featured image.
    Thai Shrimp Curry with Zoodles

Pairing

These are my favorite dishes to serve with Chickpea and Spinach Curry:

  • Featured image for Air Fryer Ribeye Steak.
    Air Fryer Ribeye Steak
  • Featured Image for Garlic Butter Chicken Bites.
    Garlic Butter Chicken Bites
  • Featured Image for Air Fryer Pork Chops.
    Air Fryer Pork Chops Recipe
  • Featured image keto coconut shrimp.
    Keto Coconut Shrimp

When you make this recipe, please comment below and let me know what you think. I'd love it if you tag me on Instagram @grumpyshoneybunch or #grumpyshoneybunch so I can see your photos!

If you love this recipe, please leave a ⭐⭐⭐⭐⭐ rating

📖 Recipe

A serving of chickpea, spinach and tomato curry on a silver spoon.

Chickpea Spinach Curry

Shelby Law Ruttan
A delicious blend of aromatics, chickpeas and spinach in a flavor packed curry sauce, Chickpeas and Spinach Curry makes a great addition to your dinner table.
5 from 1 vote
Print FREE recipe card with your email address Pin Recipe Save Go to Collections
Prep Time 5 minutes mins
Cook Time 10 minutes mins
Total Time 15 minutes mins
Course Main Dish
Cuisine Indian
Servings 4
Calories 278 kcal

Equipment

  • Large deep skillet
  • chef knife
  • Wooden spoon
  • cutting board

As an Amazon Associate I earn from qualifying purchases.

Ingredients
  

  • ½ medium onion , chopped
  • 1 tablespoon minced ginger
  • 1 teaspoon olive oil
  • 2 teaspoons granulated sugar
  • 2 tablespoons red curry powder
  • 19 ounces chickpeas , drained
  • 14 ounces diced tomatoes , undrained
  • 4 cups fresh spinach , washed and trimmed
  • ½ cup water
  • ¼ teaspoon salt

Instructions
 

  • Heat the oil over medium high heat in a large non-stick skillet until hot. Add the onion and ginger and saute for 2 -3 minutes, until onions start to soften..
  • Stir in the curry powder, sugar, and salt.
  • Cook over medium-low heat, stirring constantly for 3 minutes, or until the onion has softened.
  • Stir in the chickpeas and diced tomatoes and bring to a boil.
  • Reduce heat, add spinach.
  • Simmer chickpea and spinach curry for 1 minute, or until spinach wilts.

Nutrition

Serving: 1.33cupCalories: 278kcalCarbohydrates: 47gProtein: 14gFat: 5gSaturated Fat: 1gPolyunsaturated Fat: 2gMonounsaturated Fat: 2gSodium: 192mgPotassium: 820mgFiber: 13gSugar: 12gVitamin A: 2995IUVitamin C: 21mgCalcium: 145mgIron: 7mgNet Carbohydrates: 34g
Keyword Chickpea Spinach Curry
Tried this recipe?Mention @grumpyshoneybunch or tag #grumpyshoneybunch!

Sage Brown Butter Chicken

April 12, 2024 by Shelby Law Ruttan 17 Comments

Sage Brown Butter Chicken on a black plate.

If you are looking for a new dinner idea packed with flavor, this sauteed Sage Brown Butter Chicken is the one for you. This easy recipe is the perfect way to make dinner any day of the week in under 30 minutes!

Golden brown chicken topped with a sage brown butter sauce and crispy fried sage leaves.

Chicken is dredged in almond flour and fried until golden brown and topped off with a lemony brown butter sauce and fried fresh sage leaves. This saucy chicken dish is great any time of year and makes a quick and easy weeknight chicken dish for two.

Keep this delicious chicken recipe low carb by serving with this flavor packed Garlic Mashed Cauliflower as a side dish. Dinner is ready in under 30 minutes and the clean up is minimal, making it easy for the tired cook!

[feast_advanced_jump_to]

Why You'll Love Sage Browned Butter Chicken

Nutty Flavor: Sage-infused browned butter creates a deep, savory richness that perfectly complements the tender chicken, adding layers of flavor that elevate the dish.

Simple Yet Gourmet: This dish is quick and easy to prepare, yet its sophisticated combination of flavors makes it feel like a restaurant-quality meal right at home.

Versatile Pairing: Sage browned butter pairs wonderfully with a variety of sides, from mashed potatoes, acorn squash, or mashed cauliflower, making it a versatile and crowd-pleasing main course.

Ingredients

You need just a few pantry staples and fresh chicken thighs for a rich, flavorful chicken dinner in under 30 minutes.

Ingredients for chicken recipe: raw chicken, almond flour, salt, pepper, onion, butter, sage, and lemons.
  • Skinless, boneless chicken breasts or thighs
  • Salt
  • Black pepper
  • Olive oil: for frying the chicken
  • Almond flour: a coating for the outside of the chicken that gives a nutty compliment to the sage sauce.
  • Butter: the most important component for the sage sauce, it absorbs the flavor of fresh sage as it fries and browns to nutty deliciousness.
  • Fresh sage leaves: choose fresh fragrant sprigs with medium sized leaves.
  • Onion: white or yellow onions works best.
  • Fresh thyme: cooked with the onions for another level of flavor.
  • Lemon juice

How To Make Sage Browned Butter Chicken

Chicken between plastic wrap being pounded out with a meat mallet.

Using a meat mallet, pound chicken into thin cutlets.

Almond flour crusted chicken frying in a skillet.

Dredge chicken in almond flour and fry until golden brown.

Fresh sage leaves frying in butter.

Fry sage leaves in butter.

Diced onions frying in brown butter.

Remove sage and cook onions in browned butter.

  1. Sprinkle the pounded chicken breasts with salt and pepper. Place almond flour in a shallow dish; dredge chicken in almond flour.
  2. Heat olive oil in a large skillet over medium-high heat. Add breaded chicken to hot skillet and sauté for 4 minutes on each side or until internal temperature of thickest part of the chicken reaches 165 degrees F. Remove chicken from the skillet and wipe the skillet clean.
  3. Add butter to the skillet and melt until bubbly. Place sage leaves in the butter and fry medium heat until butter browns and sage is crispy. Remove the sage from the skillet and set aside.
  4. Add onions and thyme to the browned butter and cook for 1 minute, until onions have softened. Stir in the lemon juice the brown butter mixture and simmer for 30 seconds. Serve sage sauce over top of fried chicken. Garnish with crispy sage and lemon zest
Sauteed Chicken Thighs topped with sage browned butter sauce, crispy sage leaves on a black plate with a sliced lemon on the side

Substitutions

  • Breadcrumbs or panko - If gluten free or low carb is not your goal, you can use seasoned breadcrumbs or panko to coat the chicken.
  • Fresh Herbs - use your favorite aromatic herbs in place of sage, try basil or thyme leaves.

Variations

While this is a recipe for two, you can easily adjust the number of servings in the recipe card below to cater to a larger group of people.

  • Spicy - add red pepper flakes while cooking the onion mixture to add heat into the dish.
  • Extra veggies - add halved cherry tomatoes and/or fresh spinach to the onion mixture.

​Try this Creamy Rosemary Chicken Tenders on my website!

Equipment

The most important equipment needed for this recipe is a meat mallet (affiliate link). To quickly cook the chicken, you will need to pound it out thin. I like to place the chicken between plastic wrap to prevent chicken juice spatters.

You will also want a large skillet, my preferred skillet is cast-iron (affiliate link) but a good stainless steel skillet will work great as well.

Storage

Refrigerate: store any leftover chicken in an airtight container up to 3 days.

Reheat: warm leftovers in a skillet or the microwave until heated through.

Upclose image of fried chicken topped with fried sage leaves and sage sauce.

Top Tips

  • For best results, be sure to not overcrowd the pan with chicken while cooking allowing air circulation helps keep the chicken crispy.
  • Brown the butter on a medium-low heat and keep a close eye on it as it browns to be sure it doesn't burn.

FAQ

Can I use margarine to make browned butter?

When making browned butter, it is the milk particles that brown, giving a nutty flavor. Because margarine is made with vegetable oils, you will not get the same flavor if substituted.

Related Recipes

  • Thanksgiving Turkey Burger Bites.
    Thanksgiving Turkey Burger Bites
  • Simple Sauteed Mushrooms
  • Browned Butter Banana Muffins
  • Butternut Squash Tarts with Caramelized Onions and Crispy Sage

Serve with...

  • Featured image for Roasted Asparagus and Mushrooms.
    Roasted Asparagus and Mushrooms
  • Featured image for Air Fryer Frozen Green Beans.
    Air Fryer Frozen Green Beans
  • Air Fryer Baked potatoes featured image.
    Air Fryer Baked Potatoes
  • Featured image for Garlic Mashed Cauliflower.
    Garlic Mashed Cauliflower with Browned Butter

When you make this recipe, please comment below and let me know what you think. I'd love it if you tag me on Instagram @grumpyshoneybunch or #grumpyshoneybunch so I can see your photos!

If you love this recipe, please leave a ⭐⭐⭐⭐⭐ rating

📖 Recipe

Sage Brown Butter Chicken

Shelby Law Ruttan
A simple yet elegant dish with tender chicken breaded with almond flour and cooked in a sage-infused brown butter. The nutty flavors of the brown butter complement the savory chicken, creating a comforting meal that's easy to prepare and full of favor in less than 30 minutes.
5 from 1 vote
Print FREE recipe card with your email address Pin Recipe Save Go to Collections
Prep Time 10 minutes mins
Cook Time 10 minutes mins
Total Time 20 minutes mins
Course Main Dish
Cuisine American
Servings 2
Calories 395 kcal

Equipment

  • Meat mallet
  • Large skillet
  • cutting board
  • Sharp knife

As an Amazon Associate I earn from qualifying purchases.

Ingredients
  

  • 12 ounces skinless, boneless chicken thighs , pounded thin
  • ½ teaspoon salt
  • ¼ teaspoon black pepper
  • Cooking spray
  • ¼ cup almond flour
  • 2 tablespoons butter
  • ½ cup sage leaves loosely packed
  • 2 tablespoons minced onion
  • 1 teaspoon chopped fresh thyme
  • 2 tablespoons lemon juice

Instructions
 

  • Sprinkle the pounded chicken breasts with salt and pepper. Place almond flour in a shallow dish; dredge chicken in almond flour.
  • Heat olive oil in a large skillet over medium-high heat. Add breaded chicken to hot skillet and sauté for 4 minutes on each side or until internal temperature of thickest part of the chicken reaches 165 degrees F. Remove chicken from the skillet and wipe the skillet clean.
  • Add butter to the skillet and melt until bubbly. Place sage leaves in the butter and fry medium heat until butter browns and sage is crispy. Remove the sage from the skillet and set aside.
  • Add onions and thyme to the browned butter and cook for 1 minute, until onions have softened. Stir in the lemon juice the brown butter mixture and simmer for 30 seconds. Serve sage sauce over top of fried chicken. Garnish with crispy sage and lemon zest..

Nutrition

Serving: 1gCalories: 395kcalCarbohydrates: 6gProtein: 36gFat: 25gSaturated Fat: 10gPolyunsaturated Fat: 2gMonounsaturated Fat: 5gTrans Fat: 0.5gCholesterol: 192mgSodium: 824mgPotassium: 467mgFiber: 2gSugar: 1gVitamin A: 393IUVitamin C: 7mgCalcium: 74mgIron: 2mgNet Carbohydrates: 4g
Keyword sage brown butter chicken, Sauteed Chicken with Sage Browned Butter
Tried this recipe?Mention @grumpyshoneybunch or tag #grumpyshoneybunch!

Cinnamon Sugar Donut Muffins

April 9, 2024 by Shelby Law Ruttan 25 Comments

Cinnamon Sugar Donut Muffin in a white paper liner.

If you are looking for an easy muffin recipe, then look no further than these Cinnamon Sugar Donut Muffins! Baked in a mini muffin pan, the tops of the muffins are dipped in butter, then coated in a sweet cinnamon sugar mixture.  

The best part about these cinnamon donut muffins is they taste as just as good as a donut, but are really easy to make without deep frying donuts!

Cinnamon Sugar Donut Muffin in a white paper liner.

This is a great weekday recipe to make and have on hand for weekday morning before sending the family off to work or school. And, they make a great addition to lunch boxes!

If you are looking for a deep fried treat, these Apple Fritter Donut Bites have a cinnamon sugar coating and they pair well with this delicious Salted Caramel Mocha Latte!

[feast_advanced_jump_to]

Cinnamon Sugar Donut Muffins

You will need just a few simple ingredients to make this easy muffin recipe. As you will see, these pantry ingredients will come together to make a tasty morning treat!

This is an overview of the ingredients. See the recipe card below for amounts and instructions.

Ingredients

Muffin ingredients: baking powder, granulated sugar, eggs, flour, baking soda, salt, greek yogurt, butter, cinnamon, and vanilla.
  • All-purpose flour
  • Granulated sugar
  • Baking powder
  • Baking soda
  • Salt
  • Vanilla extract
  • Greek yogurt
  • Butter
  • Ground cinnamon

Instructions

Use this section for process shots, alternating between the step and image showing the step. Users don't like seeing process shots cluttering up the recipe card, so include your process shots here.

Dry ingredients being sifted in a mixing bowl.

Sift dry ingredients into a large bowl.

Dry ingredients on top of wet ingredients in white mixing bowl.

Mix together wet ingredients, then add dry ingredients and stir to combine.

Muffin batter in 12 cup muffin pan.

Fill paper liners with muffin batter and bake.

Up close image of Cinnamon Sugar Donut Muffin.

Remove from oven and coat tops of muffins with butter and cinnamon sugar.

  1. Preheat oven to 350 degrees F. Line a standard 12 cup muffin pan with muffin liners. In a large bowl, whisk together all purpose flour, baking powder, baking soda, salt, and cinnamon.
  2. In a separate bowl, whisk together eggs, yogurt, sugar, oil, and vanilla extract. Add flour mixture to wet ingredients and mix with light strokes until the dry ingredients are just moistened. 
  3. Divide muffin batter among the paper liners and bake for 12-15 minutes, until a toothpick inserted in one or two of the muffins come out clean.
  4. While the muffins are baking, melt butter and place in a bowl just large enough to hold a muffin. In a small bowl, combine granulated sugar and ground cinnamon. Dip top of the muffins one at a time in the melted butter and then roll in the sugar mixture. Set on wire rack to dry.

Hint: dip the tops of muffins in the melted butter and cinnamon sugar mixture while the muffins are still warm.

Substitutions

This is a pretty basic recipe with simple ingredieints that you likely have in your pantry. Below are some substitutions for ingredients that can be made without affecting the out come of the recipe.

  • Sour cream - instead of greek yogurt
  • Smart Balance Margarine - if trying to keep healthy fats in your diet, use this in place of butter.
  • Pumpkin spice - substitute pumpkin pie spice for the cinnamon.

Variations

Try these different ways of changing up this muffin recipe to your own liking!

  • Mini muffins - use a mini muffin pan to make mini donuts coated in buttery cinnamon sugar!
  • Apple filled - partially fill the muffin cup with muffin batter then add a tablespoon of apple pie filling before topping the muffin cup off.
  • Cinnamon chip - stir a cup of cinnamon chips into the muffin batter before baking.

See this Coffee Cake Muffins Recipe filled with a cinnamon streusel mixture on my website!

Equipment

You will need mixing bowls, mixing spoons, rubber scraper, and a 12 cup pluse 6 cup muffin pan. (this recipe made 15 muffins for me). Parchment paper liners work great for this recipe a the muffin does not stick to the liner.

I highly recommend using ¼ cup scoop works great for equal portioning of the muffin batter into the muffin tin.

Storage

Room temperature: store the homemade muffins in an airtight container up to 4 days.

Freezer: baked muffins can be stored in a freezer safe container up to 3 months.

Reheat: warm thawed muffins in the in the oven at 350 degrees or for a few seconds in the microwave until warmed through.

Top tip

For a muffin bursting with cinnamon sugar flavor, make these mini doughnut style and bake in a mini muffin pan without paper liners. Toss warm mini muffins in the melted butter then coat entire muffin with cinnamon sugar mixture.

More Muffin Recipes

Looking for other recipes like this? Try these:

  • Cinnamon Sugar Donut Muffin in a white paper liner.
    Cinnamon Sugar Donut Muffins
  • Featured image for date muffins.
    Date Muffins: Healthy Indulgence with Less Sugar and Fat
  • One Keto Raspberry Muffin cut in half on a white plate.
    The Best Keto Raspberry Muffins: Low Carb and Gluten Free
  • Featured image for rhubarb walnut muffins.
    Rhubarb Walnut Muffins: An easy breakfast recipe

Pairing

Other than serving with a hot cup of morning coffee, below are some other great ways to serve these cinnamon sugar donut muffins!

  • A clear crystal glass with iced coffee and pieces of ice floating on the top.
    Homemade Iced Coffee - 2 ingredient recipe
  • Blue coffee mug filled with creamy Bailey's Irish Cream Coffee.
    Bailey's Irish Cream Coffee
  • Banana Coffee Smoothie - Easy Frosty Drink
  • Salted Caramel Mocha Latte

Don't forget to check out my Amazon storefront for some of my favorite products!

When you make this recipe, please comment below and let me know what you think. I'd love it if you tag me on Instagram @grumpyshoneybunch or #grumpyshoneybunch so I can see your photos!

If you love this recipe, please leave a ⭐⭐⭐⭐⭐ rating

📖 Recipe

Cinnamon Sugar Donut Muffin in a white paper liner.

Cinnamon Sugar Donut Muffins

Shelby Law Ruttan
Indulge in the delightful aroma and flavor of our cinnamon sugar muffins: moist vanilla muffins dipped in melted butter and generously coated with a sweet cinnamon sugar blend. A perfect treat for breakfast or snack time, sure to satisfy your cravings with every bite!
No ratings yet
Print FREE recipe card with your email address Pin Recipe Save Go to Collections
Prep Time 10 minutes mins
Cook Time 15 minutes mins
Total Time 25 minutes mins
Course Breakfast, Snack
Cuisine American
Servings 15
Calories 196 kcal

Equipment

  • mixing bowls
  • Muffin pan
  • Rubber scraper
  • Mixing spoon
  • Wire rack

As an Amazon Associate I earn from qualifying purchases.

Ingredients
  

For the Muffin Batter

  • 2 cups flour
  • 1 tablespoon baking powder
  • ½ teaspoon baking soda
  • ½ teaspoon salt
  • 1 teaspoon cinnamon
  • 2 large eggs
  • 1 cup plain yogurt
  • ⅔ cup packed brown sugar
  • 4 teaspoons vegetable oil
  • 1 teaspoon vanilla
  • ½ cup unsalted butter , melted
  • ¼ cup granulated sugar
  • ½ teaspoon ground cinnamon

Instructions
 

  • Preheat oven to 350 degrees F. Line a standard 12 cup muffin pan with muffin liners. In a large bowl, whisk together all purpose flour, baking powder, baking soda, salt, and cinnamon.
  • In a separate bowl, whisk together eggs, yogurt, sugar, oil, and vanilla extract. Add flour mixture to wet ingredients and mix with light strokes until the dry ingredients are just moistened.
  • Divide muffin batter among the prepared muffin cups and bake for 12-15 minutes, until a toothpick inserted in one or two of the muffins come out clean.
  • While the muffins are baking, melt butter and place in a bowl just large enough to hold a muffin. In a small bowl, combine granulated sugar and ground cinnamon. Dip top of the muffins one at a time in the melted butter and then roll in the sugar mixture. Set on wire rack to dry.

Nutrition

Calories: 196kcalCarbohydrates: 27gProtein: 3gFat: 9gSaturated Fat: 5gPolyunsaturated Fat: 1gMonounsaturated Fat: 3gTrans Fat: 0.3gCholesterol: 43mgSodium: 220mgPotassium: 69mgFiber: 1gSugar: 14gVitamin A: 242IUVitamin C: 0.1mgCalcium: 85mgIron: 1mgNet Carbohydrates: 26g
Keyword Cinnamon Sugar Donut Muffins
Tried this recipe?Mention @grumpyshoneybunch or tag #grumpyshoneybunch!

Sourdough Doughnuts with Vanilla Glaze

April 8, 2024 by Shelby Law Ruttan Leave a Comment

A stack of 4 glazed sourdough doughnuts on a wood board with 1 doughnut leaning up against the stack.

There is nothing more enticing than the aroma of freshly made sourdough doughnuts fresh out of the deep fryer! These golden brown rings of dough are immersed in a light vanilla glaze for a sweet contrast to the tang of sourdough.

Save this recipe by clicking on the ❤️ heart on the left-hand side of the screen or in the recipe card.

A stack of 4 glazed sourdough doughnuts on a wood board with 1 doughnut leaning up against the stack.

I love making sourdough recipes, There is something so fulfilling about watching that active sourdough starter bubble up and grow! These sourdough donuts are a great way to use some of that starter!

These homemade donuts are such a great recipe. I grew up with my Mom's Buttermilk Donuts and they are still a favorite of mine. However, I've been playing a lot with sourdough lately and these Sourdough Doughnuts are so fluffy, light, and delicious with a nice thick vanilla glaze (or no glaze!)

[feast_advanced_jump_to]

Ingredients

I made my own sourdough starter to make this recipe. Its quite easy to make and is the most important element of making these sourdough doughnuts. You only need a few basic ingredients to make this very simple doughnut recipe. Below is an image and list of what is needed.

Ingredients mis en place: powdered sugar, eggs, vanilla, granulated sugar, milk, starter, salt, flour, and butter.

This is an overview of the ingredients. See the recipe card below for amounts and instructions.

To make this recipe you will need:

  • All-purpose flour: feel free to substitute white whole wheat flour if desired.
  • Granulated sugar: you will use just enough to sweeten the doughnut.
  • Large eggs: these should be brought to room temperature before adding to the sourdough mixture.
  • Salt: balances out the flavor in the doughnuts.
  • Butter: adds flavor to the doughnuts. 
  • Active sour dough starter: gives these doughnuts their unique flavor.
  • Powdered sugar: used to make the glaze.
  • Vanilla extract: adds flavor to the vanilla glaze.
  • Whole milk: feel free to substitute reduced fat milk or non-dairy milk if desired.

How to Make Sourdough Doughnuts

Sourdough starter, eggs, milk, and oil in a white mixing bowl.
1) Mix together warmed milk mixture with the eggs and sourdough starter.
Wet donut ingredients with dry ingredients on top of wet in a white mixing bowl.
2) Dry Ingredients added to wet ingredients.
Donut dough resting in a glass bowl.
3) Shape dough ball and set to rise in a warm place.
A large bowl with proofed sourdough doughnut dough
4) Fully proofed sourdough donut dough
Doughnut dough rolled out onto a floured surface.
5) Roll out the donut dough.
Donut dough cutouts on a floured surface.
6) Donut dough cut-outs.
Sourdough doughnut cutouts rising on parchment paper.
7) Allow the donut cut-outs to rest before frying
Fried sourdough doughnuts on a wire rack.
8) Fry doughnuts and place on wire rack to glaze.
Fried and vanilla glazed sourdough doughnuts on a wire rack with parchment paper below the rack.
9) Allow glazed doughnuts to fully dry before storing.
  1. In a large saucepan over low heat, warm milk, sugar, and butter until butter has just begun to melt. Ensure mixture is warm, not hot, when mixed with sourdough starter to avoid destroying natural yeast. In a large bowl combine milk mixture, sourdough starter, salt, and eggs. Using an electric mixer on medium speed, blend until ingredients are combined.
  2. Add 2½ cups flour to the sourdough batter and then mix until a tacky dough forms. Allow donut dough to rest for 10 minutes. Add a tablespoon or so of flour and knead for another 4-5 minutes. 
  3. Transfer donut dough to a lightly floured surface, kneading by hand until no longer sticky, forming a smooth elastic ball.  Place donut dough in greased bowl, covering with a damp kitchen towel or plastic wrap.  Let dough rise in a warm place (room temperature ~ 70 degrees F) for 3-6 hours, or until doubled in size. 
  4. Punch out fully proofed dough and transfer to a lightly floured surface, using a rolling pin.
  5. Roll dough out until approximately 1 inch thick. Using a donut cutter dipped in flour, cut out donuts and donut holes. Place donut cut outs on a lightly floured surface, letting rest for 1 hour to become slightly puffy. 
  6. Preheat oil in a deep dutch oven to 350ºF. Gauge the oil temperature by using a candy thermometer. While the oil is pre-heating, make the vanilla glaze. In a medium bowl, mix together the confectioner's sugar, whole milk, and vanilla extract until smooth. Set aside.
  7. Once oil has reached desired temperature, gently place doughnut cut-outs and doughnut holes in hot oil and fry for 1½ minutes per side then using a slotted spoon, remove doughnuts from the oil and place on paper towels to drain. Once drained, transfer to a wire rack over a sheet pan lined with parchment paper. 
  8. Cool donuts for 5 minutes, then dip donut in glaze, immersing it completely to coat. Place glazed donuts on cooling rack to dry.

Hint: I love to use this sturdy doughnut cutter that will cut both the ring and donut hole at the same time!

A stack of 4 glazed sourdough doughnuts on a wood board with 1 doughnut leaning up against the stack.

Sourdough Doughnut Variations

There are several ways you can enjoy different flavors with this sourdough doughnut recipe. Below are just a few ideas!

  • Cinnamon sugar doughnuts: skip the vanilla glaze and place hot doughnuts in a paper bag with ½ cup granulated sugar and 1-2 teaspoons ground cinnamon. Shake the bag to coat the doughnuts and store as directed.
  • Powdered sugar doughnuts: place 1-½ cups powdered sugar in a paper bag. Place warm doughnuts in bag and seal. Shake to coat doughnuts with sugar and store as directed.
  • Maple Glazed: substitute maple syrup for the milk in the glaze ingredieints.

Check out these Apple Cider Glazed doughnuts and give these Sourdough Doughnuts the cider glaze!

Equipment

When making sourdough doughnuts it is important to have a good doughnut cutter. I prefer this stainless steel cutter made by Winco. And, a good deep fry thermometer is important to keep the oil at the correct temperature during frying.

A cooling rack and parchment paper are handy for glazing and catching any drips from the vanilla glaze.

Storage

Store the wet ingredients (lettuce, tomato, onion) separately from the dry ingredients (buns) in the fridge, and recombine when ready. Good for 2-3 days.

These ingredients do/don't stand up well to freezing for X days/weeks/months.

One sourdough glazed doughnut broken in half to show the inside of the doughnut.

Top Tips

I recommend using solid vegetable shortening for frying and don't add the doughnut dough to the oil until it has reached the 350 degree temperature. Adding before the shortening has reached temp can cause the doughnuts to be heavy and grease soaked.

Once you have used the shortening once, you can save it to use one more time for doughnut making. Just store in an airtight container on a shelf in your pantry.

FAQ

Can I use the discard to make sourdough discard donuts?

While active sourdough starter is preferable for optimal flavor and rise, you can certainly use discard starter. Just note that the flavor may be less pronounced, and you may need to adjust the rising time accordingly.

Do I need to add commercial yeast to my sourdough?

As long as you are using active starter, you should not need to use yeast. 

Can I bake these doughnuts instead of frying?

While frying yields the classic crispy exterior, you can bake these doughnuts at 375°F (190°C) for 10-12 minutes until golden brown. Brush them with melted butter before baking for added flavor.

Can I freeze sourdough doughnuts?

Yes, you can freeze the doughnuts, but do so without the glaze. When ready to consume, warm the doughnuts slightly and then dip in the vanilla glaze as instructed.

Related

Looking for other recipes like this? Try these other donut recipes:

  • Featured image for chocolate doughnuts.
    Chocolate Doughnuts
  • Homemade Apple Fritters FI.
    Apple Fritters Donut with Canned Pie Filling
  • Featured image for weight watchers donut recipe.
    Weight Watchers Chocolate Pumpkin Donuts
  • Featured image for strawberry baked donuts.
    Baked Strawberry Donuts

Pairing

These are my favorite dishes to serve with Sourdough Doughnuts:

  • Blue coffee mug filled with creamy Bailey's Irish Cream Coffee.
    Bailey's Irish Cream Coffee
  • Vanilla Bean Frappuccino in a tall glass side view.
    Vanilla Bean Frappuccino: Starbucks Copycat Recipe
  • Featured image for Vanilla Bean Ice Cream.
    Homemade Vanilla Bean Ice Cream
  • Featured image for pina colada smoothie.
    Pina Colada Smoothie

Don't forget to check out my Amazon storefront for some of my favorite products!

When you make these sourdough doughnuts, please comment below and let me know what you think. I'd love it if you tag me on Instagram @grumpyshoneybunch or #grumpyshoneybunch so I can see your photos!

If you love this recipe, please leave a ⭐⭐⭐⭐⭐ rating

📖 Recipe

A stack of 4 glazed sourdough doughnuts on a wood board with 1 doughnut leaning up against the stack.

Sourdough Doughnuts with Vanilla Glaze

Shelby Law Ruttan
If you love the flavor of sourdough, then you will be obsessed with this Sourdough Doughnut recipe! Fluffy and delicious, with a sweet vanilla glaze, they are the perfect addition to your cup of coffee.
No ratings yet
Print FREE recipe card with your email address Pin Recipe Save Go to Collections
Prep Time 30 minutes mins
Cook Time 3 minutes mins
Proof time 6 hours hrs
Total Time 6 hours hrs 33 minutes mins
Course Desserts
Cuisine American
Servings 20
Calories 227 kcal

Equipment

  • Sourdough whisk
  • Large bowl
  • Electric mixer
  • Large saucepan
  • Measuring cups
  • Rolling Pin
  • Baking Sheet
  • Cooling Rack
  • Parchment Paper
  • Doughnut cutter

As an Amazon Associate I earn from qualifying purchases.

Ingredients
  

Doughnut batter

  • ¼ cup milk
  • ¼ cup sugar
  • 4 tablespoons butter
  • ⅔ cup active bubbly sourdough starter
  • 1 teaspoon salt
  • 2 large eggs , room temperature
  • 3 cups all-purpose flour
  • 6 cups solid vegetable shortening , for frying

Glaze

  • 4 tablespoons butter
  • 2 cups powdered sugar
  • 2 teaspoons vanilla extract
  • 2 tablespoons whole milk

Instructions
 

  • In a large saucepan over low heat, warm milk, sugar, and butter until butter has just begun to melt. Ensure mixture is warm, not hot, when mixed with sourdough starter to avoid destroying natural yeast.
  • In a large bowl combine milk mixture, sourdough starter, salt, and eggs. Using an electric mixer on medium speed, blend until ingredients are combined.
  • Add 2½ cups flour to the sourdough batter and then mix until a tacky dough forms.
  • Allow donut dough to rest for 10 minutes. Add a tablespoon or so of flour and knead for another 4-5 minutes.
  • Transfer donut dough to a lightly floured surface, kneading by hand until no longer sticky, forming a smooth elastic ball.
  • Place donut dough in greased bowl, covering with a damp kitchen towel or plastic wrap. Let dough rise in a warm place (room temperature ~ 70 degrees F) for 3-6 hours, or until doubled in size.
  • Punch out dough and transfer to a lightly floured surface, using a rolling pin. Roll dough out until approximately 1 inch thick. Usinig a donut cutter dipped in flour, cut out donuts and donut holes.
  • Place donut cut outs on a lightly floured surface, letting rest for 1 hour to become slightly puffy.
  • Preheat oil in a deep dutch oven to 350ºF. Gauge the oil temperature by using a candy thermometer.
  • While the oil is pre-heating, make the vanilla glaze. In a medium bowl, mix together the confectioner's sugar, whole milk, and vanilla extract until smooth. Set aside
  • Once oil has reached desired temperature, gently place doughnut cut-outs and doughnut holes in hot oil and fry for 1½ minutes per side then using a slotted spoon, remove doughnuts from the oil and place on paper towels to drain. Once drained, transfer to a wire rack over a sheet pan lined with parchment paper.
  • Cool donuts for 5 minutes, then dip donut in glaze, immersing it completely to coat. Place glazed donuts on cooling rack to dry.

Notes

Note: cook time is approximately 3 minutes for each batch of doughnuts. I typically can cook 6 doughnuts at a time.

Nutrition

Calories: 227kcalCarbohydrates: 31gProtein: 3gFat: 10gSaturated Fat: 4gPolyunsaturated Fat: 2gMonounsaturated Fat: 3gTrans Fat: 1gCholesterol: 31mgSodium: 162mgPotassium: 36mgFiber: 1gSugar: 15gVitamin A: 174IUCalcium: 13mgIron: 1mgNet Carbohydrates: 30g
Keyword Sourdough Doughnuts
Tried this recipe?Mention @grumpyshoneybunch or tag #grumpyshoneybunch!

Chorizo Stuffed Jalapenos

March 27, 2024 by Shelby Law Ruttan 17 Comments

Up close image of jalapeno pepper stuffed with chorizo and cheese filling.

Chorizo Stuffed Jalapenos are the perfect appetizer for your next party. Savory and delicious chorizo sausage is mixed into a cream cheese mixture making a cheesy filling that is irresistibly delicious!

Overhead image of three Chorizo Stuffed Jalapenos.

Save this recipe by clicking on the ❤️ heart on the left-hand side of the screen or in the recipe card.

Chorizo Stuffed Jalapenos

I love jalapeño poppers.  You know, those deep fried jalapeño peppers with cheddar cheese or cream cheese in them?  I just don't love the calories and carbs that come with that outside breading. So, I decided to make this lower carb version packed with flavor and its now one of my favorite ways to make a stuffed jalapeño.

These are great for summer picnics and make great game day appetizers and they are extremely versatile. You could use any type of ground meat you like in place of the chorizo. These were definitely worth heating the kitchen up for however you could cook them on the outdoor grill also.   

Jalapenos that have been sliced in half and seeded

🥘 Ingredients

This is an overview of the ingredients. See the recipe card below for amounts and instructions.

You will need jalapeno peppers, Mexican chorizo, cremini mushrooms, onion, cream cheese and shredded cheddar cheese or a Mexican cheese blend.

🔪 Instructions

  1. Preheat oven to 400 degrees. Spray a large baking sheet with cooking spray and set aside.
  2. Prep the jalapeno peppers by slicing them in half lengthwise and removing the seeds and membranes.
  3. In a large skillet over medium heat, cook the chorizo stirring with a wooden spoon, until oils begin to release and sausage starts to crisp up.  
  4. Remove chorizo from skillet and place on a paper towel to absorb excess grease.  
  5. Place diced mushrooms and onions in skillet and saute until water releases from the mushrooms and onions become transparent.  
  6. Return chorizo to skillet and stir to combine.  Remove from heat.
  7. Add cream cheese and cheddar cheese to chorizo mixture, stirring to combine.  
  8. Stuff each pepper half with a spoonful of the cheese mixture and bake 15 minutes.
Up close image of jalapeno pepper stuffed with chorizo and cheese filling.

📖 Variations

Bacon wrapped: wrap a slice of partially cooked bacon around the stuffed jalapeno and secure it with a toothpick before baking.

Spanish chorizo version: substitute Spanish chorizo, which does not have heat like Mexican chorizo does for a less spicy version.

Meat swap: substitute sweet Italian sausage or ground beef for the chorizo for a milder heat factor.

🥫Storage

​Refrigerate: store leftover stuffed jalapenos in an airtight container up to 4 days.

Reheat: warm in the air fryer or oven at 350 degrees until warmed through.

💭 Tips

  • Double the recipe and freeze half of the unbaked poppers in a freezer safe container up to 3 months. To bake remove from freezer and bake as instructed until hot.

🙋 Things to Know

Jalapeno peppers vary in spice factor. You may have some that are super spicy and some that are not spicy at all. If you are fearful of too spicy of a pepper, be sure to remove all seeds and membrane from the pepper and choose a less spicy meat to mix in.

📚 Related Recipes

If you love the spicy flavor of Mexican Chorizo, then you will want to try this air fryer Potato Puffs recipe with diced jalapeno and chorizo.

This Italian Style Air Fryer Stuffed Peppers recipe is a hearty and delicious meal.

These burgers stuffed with cheese, bacon and onion then cooked on the grill are juicy and delicious!

Another great cheesy and spicy air fryer recipe is this Jalapeno Popper Stuffed Chicken.

🍽 Serve with..

Serve these Chorizo Stuffed Jalapenos as an appetizer at your next gathering or as a side to your next meal.

📖 Recipe

Up close image of jalapeno pepper stuffed with chorizo and cheese filling.

Chorizo Stuffed Jalapenos

Shelby Law Ruttan
Deliciously spicy and creamy, these Chorizo Stuffed Jalapenos are meaty bites that make great finger food for game day parties, holiday gatherings, and even summer picnics (cook them on the grill!)
5 from 1 vote
Print FREE recipe card with your email address Pin Recipe Save Go to Collections
Prep Time 15 minutes mins
Cook Time 15 minutes mins
Total Time 30 minutes mins
Course Appetizers
Cuisine American
Servings 8
Calories 126 kcal

Equipment

  • Large skillet
  • Baking Sheet
  • Wooden spoon

As an Amazon Associate I earn from qualifying purchases.

Ingredients
  

  • 4 oz. fresh Mexican Chorizo casings removed and crumbled
  • 1 cup cremini mushrooms diced
  • ¼ onion minced
  • ½ cup shredded Monterey Jack Cheese
  • ½ cup whipped cream cheese
  • Salt and black pepper to taste
  • 12 Jalapeno Peppers split in half and seeds removed

Instructions
 

  • Preheat oven to 400 degrees.
  • Cook the chorizo over medium heat, stirring with a wooden spoon, until oils begin to release and sausage starts to crisp up. Remove chorizo from skillet.
  • Place mushrooms and onions in skillet and saute until waters release and onions become transparent. Return chorizo to skillet and stir to combine. Remove from heat.
  • Measure out cheeses and add sausage mixture, stirring to combine. Stuff each pepper with a spoonful of the cheese mixture and bake 15 minutes.
  • See note section for air fryer instruction.

Notes

If using the air fryer, cook peppers for 7 minutes, or until cheese is bubbly and pepper is cooked.

Nutrition

Calories: 126kcalCarbohydrates: 3gProtein: 5gFat: 11gSaturated Fat: 6gPolyunsaturated Fat: 0.4gMonounsaturated Fat: 2gCholesterol: 29mgSodium: 609mgPotassium: 113mgFiber: 1gSugar: 1gVitamin A: 678IUVitamin C: 3mgCalcium: 74mgIron: 1mgNet Carbohydrates: 2g
Keyword Chorizo Stuffed Jalapenos, Stuffed Jalapenos
Tried this recipe?Mention @grumpyshoneybunch or tag #grumpyshoneybunch!

Air Fryer Potato Puffs with Jalapeno and Chorizo

March 26, 2024 by Shelby Law Ruttan 9 Comments

A white plate with 3 golden brown potato puffs topped with a chipotle sour cream sauce and cilantro.

Air Fryer Potato Puffs bring bold flavor to your appetizer table with spicy bites of chorizo and jalapeno giving these crispy potato puffs a delicious flavor boost.  Air fried until golden brown and dipped in a chipotle sour cream sauce, these tater puffs make meal time extra fun and delicious! 

Chorizo Jalapeno Potato Puffs

Save this recipe by clicking on the ❤️ heart on the left-hand side of the screen or in the recipe card.

[feast_advanced_jump_to]

Air Fryer Potato Puffs

What I love about this air fryer recipe is it is a great way to use any leftover mashed potatoes you have on hand. It is super versatile and you can change up the add ins to your favorite items.

It's a great way to use any leftover ham from Easter dinner and makes the perfect side dish to a juicy burger. Its much easier than deep frying and you get the same delicious results with only a little oil.

If you are new to using the air fryer, no worries, this recipe is easy to navigate and if you want more in depth info, you can check out my post on How To Use an Air Fryer. I share the different style of air fryer as well as my favorite kind of air fryer that I use in my home!

Three potato appetizers on a plate topped with sour cream topping and chopped cilantro.

🗝️ Key Recipe Notes

  • This is an excellent way make a new potato side dish with leftovers.
  • Use premade mashed potatoes from the freezer section or use instant mashed potatoes if you want a shortcut and don't have any leftovers on hand.
  • This is the quickest way to get a crispy outer layer on the potato puff with a tender flavorful interior.
  • The air fryer is the best way to get the desired results with a short cook time.

🥘 Ingredients

Recipe ingredients: Mashed potatoes, diced chorizo, large eggs, and cheddar cheese.

This is an overview of the ingredients. See the recipe card at the bottom of this post for amounts and instructions.

For the basic recipe you will need mashed potatoes, cheddar cheese, and large eggs. If adding in chorizo and jalapeno you will also need those ingredients. If making the chipotle sour cream you will need sour cream, chipotle chili powder, and salt.

🔪 How to make Air Fryer Potato Puffs

  1. Place mashed potatoes in large bowl. Add shredded cheese, diced jalapeno pepper, minced chorizo, and eggs, stirring until well combined.
  2. Using a small cookie scoop, scoop 1-½ tablespoons of the potato mixture onto parchment lined air fryer basket or in a round accessory dish that has been well oiled with either olive oil or cooking spray. Leave some space between each potato puff and line them in a single layer in the pan.
  3. Air fry at 400 degrees F for 10 minutes, until potato puffs are golden brown and crispy on the outside.
  4. While the potato puffs are cooking, make the chipotle sauce. In a small bowl, combine the sour cream, chipotle powder, and salt. 
  5. Serve with sauce and garnish with cilantro.

🎛️ How to Bake Potato Puffs in the Oven

Using the oven will increase the cooking time for the potato puffs, but it can be done with delicious golden brown crispy potato puff results!

  1. To bake in regular oven, place potato puffs on a well oiled baking sheet.
  2. Bake at 375 degrees F for 30 minutes. 
Air Fryer Potato Puffs in an accessory baking pan for the air fryer.

📖 Variations

Flavor swap: skip the chipotle powder and season with ½ teaspoon each of garlic and onion powder.

Meat swap: substitute chopped crispy cooked bacon or diced ham for the chorizo.

🥫Storage

Refrigerate: Store leftover potato puffs in an airtight container in up to 3 days.

Freezer: For longer storage, freeze individual puffs on a baking sheet. Once frozen, transfer to an airtight freezer bag.

To reheat the potato puffs: place frozen puffs in the air fryer on 350 degrees for 7-10 minutes, or in the oven for 20-25 minutes, until warmed through.

💭 Tips

  • Brick cheese: for best flavor use brick cheese and shred it yourself using a box grater. 
  • Perfectly portions potato puffs: ​use a 1 tablespoon sized cookie scoop and portion a generous scoop of potato mixture for equally sized portions.
Three baked puffs on a white plate topped with sour cream and cilantro.

🙋 Things to Know

The type of mashed potato you use will make a difference in texture. If using frozen mashed potatoes, or instant mashed potatoes, make them ahead of time and allow them to come to room temperature and thicken up before mixing. If you are using leftover mashed potatoes you made yourself, the mixture may need to be warmed up to room temperature before mixing the ingredients. 

📚 Related Recipes

Air Fryer Frozen French Fries are golden brown crispy bites of deliciousness ready in just minutes!

I love this oven baked Spiral Spicy Sweet Potato Fries!

Try this delicious low carb keto friendly cheese puffs recipe with sweet black pepper bacon.

These Stuffed Jalapenos have a savory chorizo filling that is so good I could eat the filling from a spoon!

Try these Cream Puff Bites filled with a sweet and boozy Chocolate Irish Cream Pudding.

Made with puff pastry, this Blueberry Tart with Almond Cream Filling is sweet, fresh, and delicious.

🍽 Serve with..

Serve with the chipotle sauce, barbecue sauce, or your favorite dipping sauce. 


Don't forget to check out my Amazon storefront for some of my favorite products!

When you make these Air Fryer Potato Puffs, please comment below and let me know what you think. I'd love it if you tag me on Instagram @grumpyshoneybunch or #grumpyshoneybunch so I can see your photos!

If you love this recipe, please leave a ⭐⭐⭐⭐⭐ rating

Save this recipe by clicking on the ❤️ heart on the left-hand side of the screen or in the recipe card.

📖 Recipe

A white plate with 3 golden brown potato puffs topped with a chipotle sour cream sauce and cilantro.

Air Fryer Potato Puffs with Chorizo and Jalapeno

Shelby Law Ruttan
Chorizo Jalapeno Potato Puff Bites are made with fresh ingredients and bring bold flavor to your appetizer tray! These baked or air fried potato puffs make party time extra fun and delicious! Each bite is accompanied by a chipotle sour cream sauce that sets the bite off to perfection!
5 from 1 vote
Print FREE recipe card with your email address Pin Recipe Save Go to Collections
Prep Time 15 minutes mins
Cook Time 30 minutes mins
Total Time 45 minutes mins
Course Appetizers
Cuisine American
Servings 7
Calories 194 kcal

Equipment

  • Air Fryer
  • Large bowl
  • Cookie scoop
  • Mixing spoon

As an Amazon Associate I earn from qualifying purchases.

Ingredients
  

For potato puffs

  • 2 cups mashed potatoes
  • 1 cup cheddar cheese , shredded
  • 1 small jalapeno pepper , seeded and diced
  • 2 large eggs
  • 2 ounces Chorizo , diced

For Chipotle Sour Cream

  • ½ cup sour cream
  • 1 teaspoon chipotle chili powder
  • ¼ teaspoon salt
  • 1 tablespoon fresh cilantro , chopped (optional)

Instructions
 

  • Place mashed potatoes in large bowl. Add shredded cheese, diced jalapeno pepper, minced chorizo, and eggs, stirring until well combined.
  • Using a small cookie scoop, scoop 1-½ tablespoons of the potato mixture onto parchment lined air fryer basket or in a round accessory dish that has been well oiled with either olive oil or cooking spray. Leave some space between each potato puff and line them in a single layer in the pan.
  • Air fry at 400 degrees F for 10 minutes, until potato puffs are golden brown and crispy on the outside.
  • While the potato puffs are cooking, make the chipotle sauce. In a small bowl, combine the sour cream, chipotle powder, and salt.
  • Serve with sauce and garnish with cilantro.

Nutrition

Serving: 2puffsCalories: 194kcalCarbohydrates: 16gProtein: 9gFat: 11gSaturated Fat: 5gPolyunsaturated Fat: 1gMonounsaturated Fat: 2gTrans Fat: 0.01gCholesterol: 80mgSodium: 245mgPotassium: 266mgFiber: 1gSugar: 1gVitamin A: 434IUVitamin C: 16mgCalcium: 151mgIron: 1mgNet Carbohydrates: 15g
Keyword airy fryer recipe, appetizers, Chorizo Potato Recipe, Jalapeno Potato Appetizer, potato appetizer, Potato Puffs
Tried this recipe?Mention @grumpyshoneybunch or tag #grumpyshoneybunch!

Coconut Milk Tofu Curry

March 22, 2024 by Shelby Law Ruttan 5 Comments

Upclose image of Coconut Milk Tofu Curry Bowl.

Coconut Milk Tofu Curry Bowl is a vegan curry recipe that brings pleasure to all of your senses! Crispy tofu, roasted garbanzos and green peas adds flavor and texture as it tops a veggie stew in a creamy curry sauce. 

Coconut Milk Tofu Curry Stew in a white bowl

Save this recipe by clicking on the ❤️ heart on the left-hand side of the screen or in the recipe card.

[feast_advanced_jump_to]

If you love easy recipes with a lot of flavor and texture, then this vegan coconut curry is for you! It's the perfect meal to serve your family for for dinner and is easily portable giving you an option for healthy lunches.

I love vegan recipes and this tofu coconut curry is a favorite recipe of mine. It makes meal prep easy and you can easily make this ahead of time and assemble together in the bowl later when you are ready for your dinner.

tofu cubes in mixing bowl sprinkled with spices
A baking sheet with drained chickpeas on top.
sauteed onions in stockpot
Stew toppingsL crushed peanuts, roasted tofu, roasted green peas and roasted chickpeas.

🔪 Make this Tofu Curry Recipe

  1. Toss tofu cubes with ground spices, olive oil, and maple syrup.
  2. In a single layer, Place chickpeas on cookie sheet and drizzle with oil and stir. Move to one side of sheet pan and on other half of sheet pan place tofu mixture. Roast in oven 15 minutes, stirring occasionally. Add frozen green peas to chickpea side and stir. Place back in oven and roast until peas are toasty and tofu is golden brown, about 15 minutes.
  3. Make the stew while peas and tofu are roasting. Heat a large dutch oven over medium-high heat until hot. Add olive oil, diced onion, and minced garlic. Turn burner to medium heat and sauté 1-2 minutes, until onions are soft. Add curry powder, flour, salt, and pepper. Stir and cook with onion mixture for 1 minute. Gradually whisk in vegetable broth. Add squash and cauliflower. Cover and simmer 20 minutes or until squash is fork tender. Stir in coconut milk. Turn off heat and let sit for 10 minutes.
  4. To serve, place 1-½ cups of stew in bowl. Top with tofu, green peas, chickpeas, fresh cilantro, peanuts, lime wedges, and jalapeño slices (if desired).

📖 Variations

  • Sweet potatoes can be used in place of the squash.
  • Green beans and red bell pepper can be added to the stew.
  • Stir 4 cups baby spinach into hot stew at end of cooking time.
  • You can use full-fat coconut milk or light coconut milk.
  • Coconut oil can be used in place of olive oil.
Up close photo of coconut curry tofu in a white serving bowl

🥫Storage

Store leftovers in an airtight container in the refrigerator up to 4 days. Reheat stew on the stove top or microwave until warmed through. Tofu and pea toppings can be reheated in the oven or air fryer.

💭 Top Tips

  • Prep all the ingredients prior to cooking to make each step easy to complete.
  • Use a tofu press to squeeze out excess water in the tofu.

🙋 Things to Know

  • The stew is made of cauliflower and squash that is simmered in the curry broth while you’re prepping the ingredients to be roasted. The chickpeas, green peas, and tofu are roasted in the same pan at a very high heat to crisp them up. 
  • To serve, the stew is placed in the bottom of your bowl then topped off with the crispy tofu, roasted chickpeas and green peas, fresh cilantro, and chopped peanuts. You can add fresh slices of jalapeño on top if desired. The crispy toppings blended with the creamy, slightly spicy stew makes this comfort food at it’s best!
Fully assembled Coconut Curry Tofu stew in serving bowl

📚 Tofu Recipes to Try

I grew up with my Mom's Scrambled Tofu and its still a personal favorite.  

This Marinated Tofu Salad is so delicious and the marinated tofu part has a "feta" cheese like flavor and texture.

Shrimp curry lovers will love this low carb Coconut Milk Shrimp Curry.

These Tofu Burgers are requested often by my family, they are easy to make and so delicious!

Chickpea and Spinach Curry has great flavors and makes a delicious lunch!

🍽 Serve with..

While this vegan tofu curry is delicious served just as is, feel free to serve it with a side of  basmati rice or the lower carb version of cauliflower rice. This is also a great meal to serve with naan bread to soak up any of the leftover sauces in your dish!


Don't forget to check out my Amazon storefront for some of my favorite products!

When you this Coconut Milk Tofu Curry recipe, please comment below and let me know what you think. I'd love it if you tag me on Instagram @grumpyshoneybunch or #grumpyshoneybunch so I can see your photos!

If you love this recipe, please leave a ⭐⭐⭐⭐⭐ rating

📖 Recipe

Upclose image of Coconut Milk Tofu Curry Bowl.

Coconut Milk Tofu Curry

Shelby Law Ruttan
This Coconut Milk Tofu Curry is a healthful and delicious vegan curry. The combination textures from the roasted toppings to the creamy stew makes this a large bowl of comfort food your whole family will love.
5 from 4 votes
Print FREE recipe card with your email address Pin Recipe Save Go to Collections
Prep Time 10 minutes mins
Cook Time 30 minutes mins
Total Time 40 minutes mins
Course Main Dish
Cuisine Asian
Servings 6 servings
Calories 382 kcal

As an Amazon Associate I earn from qualifying purchases.

Ingredients
  

For the Peas:

  • 15 ounces chickpeas rinsed, drained, and patted dry
  • 1 cup frozen green peas
  • ½ tablespoon olive oil

For the Tofu:

  • 16 ounces extra firm tofu , pressed and cubed
  • 1 teaspoon ground cumin
  • 1 teaspoon paprika
  • 1 teaspoon ground coriander
  • 1 tablespoon maple syrup
  • ½ teaspoon salt

For the Stew:

  • 3 cups vegetable broth
  • 2 cups butternut squash , cubed
  • 2 cups fresh cauliflower florets
  • ½ cup onion , diced
  • 2 cloves fresh garlic , minced
  • 1 tablespoon olive oil
  • 1½ tablespoons curry powder
  • 3 tablespoons flour
  • ½ teaspoon salt
  • 1 dash black pepper
  • 1 cup light coconut milk

For the topping:

  • ½ cup chopped Cilantro
  • ½ cup chopped Peanuts
  • 1 Lime , cut into 6 wedges
  • Jalapeño slices (optional)

Instructions
 

  • Pre-heat oven to 450ºF.
  • In a medium-sized mixing bowl, toss together tofu cubes, 1 tablespoon olive oil, cumin, paprika, ground coriander, salt, and maple syrup.
  • Place chickpeas on 1 side of a large baking sheet. Drizzle with ½ tablespoon olive oil and stir. Place tofu mixture on other side of large baking sheet. Roast in hot oven about 15 minutes, stirring occasionally.
  • Add frozen green peas to chickpeas and stir. Place back in oven until chickpeas and peas are toasty, about 15 minutes.
  • Make the stew while peas and tofu are roasting. Heat a large dutch oven until hot. Add olive oil, diced onion, and minced garlic. Turn heat to medium and sauté 1-2 minutes, until onions are soft. Add curry powder, flour, salt, and pepper. Stir and cook with onion mixture for 1 minute.
  • Gradually whisk in vegetable broth. Add squash and cauliflower. Cover and simmer 20 minutes or until squash is fork tender. Stir in coconut milk. Turn off heat and let sit for 10 minutes.
  • To serve, place 1-½ cups of stew in bowl. Top with tofu, green peas, chickpeas, chopped cilantro, peanuts, lime, and jalapeño slices (if desired).

Nutrition

Calories: 382kcalCarbohydrates: 45gProtein: 19gFat: 16gSaturated Fat: 4gPolyunsaturated Fat: 4gMonounsaturated Fat: 6gSodium: 1007mgPotassium: 829mgFiber: 11gSugar: 11gVitamin A: 5556IUVitamin C: 43mgCalcium: 133mgIron: 5mgNet Carbohydrates: 35g
Keyword Coconut Milk Tofu Curry
Tried this recipe?Mention @grumpyshoneybunch or tag #grumpyshoneybunch!

Clam Dip: Easy Creamy Dip Recipe

March 19, 2024 by Shelby Law Ruttan 3 Comments

A bowl of creamy clam dip with chive and pimento topping and a whole wheat cracker in the top of the dip.

This classic creamy Clam Dip recipe is full of clam flavor and delicious served with your favorite chip or buttery crackers. Bring this creamy dip to your family get togethers, summer bbq. or Game day party! 

Clam Dip in a white bowl with red pimento and green chive top garnish

Save this recipe by clicking on the ❤️ heart on the left-hand side of the screen or in the recipe card

[feast_advanced_jump_to]

I have a love affair with seafood and this classic clam dip recipe is one of my favorite things to throw together when in need of an easy recipe to make for a gathering.

Why You'll Love This Clam Dip

Easy dip: no bake and so easy - just mix and store until it's time to serve!

Simple ingredients: made with pantry ingredients you likely have on hand.

Savory flavors: this delicious dip has great flavor and is perfect for gatherings.

Key Ingredients

Cream cheese: you can use regular or reduced fat cream cheese.

Canned clams: I buy minced clams

Hot sauce: feel free to use your favorite sauce, I like to add a few drops of tabasco or franks red hot. If you don't have hot sauce, use cayenne pepper to taste.

Worcestershire sauce: this gives the clam dip it's umami flavors.

Black pepper: compliments the other ingredients in the dip recipe

Lemon juice: just a squeeze of fresh lemon juice adds the needed acid to this recipe.

Fresh chives: optional garnish and adds flavor.

Pimento: optional garnish

How to Store

Refrigerate: store clam dip in an airtight container up to 3 days.

Freezing is not recommended.

A bowl of dip with chives and pimento topping.

Variations

Old Bay version: add old bay seasoning to taste.

Salmon dip: substitute chopped smoked salmon for the minced clams

Shrimp dip: use a can of small shrimp in place of the minced clams.

Top Tips

  • If possible, for the best flavor, steam and mince fresh clams to use in this classic dip!
  • Add a few tablespoons of sour cream or greek yogurt to the dip to make it extra creamy.

Related Recipes

This Slow Cooker Clam Chowder is a must make for clam lovers.

Clams Casino with Pancetta are packed with delicious flavor!

Try this Seafood Pasta with clams and a delicious pinot grigio sauce for your next seafood craving!

To Serve Clam Dip...

Serve this delicious clam dip with bread chips, tortilla chips, your favorite cracker and your favorite raw vegetables for dipping.

If you love this recipe, please leave a ⭐⭐⭐⭐⭐ rating

If you click on the number of servings in the recipe card you can adjust the measurements up or down for the exact number of servings you need.

📖 Recipe

A bowl of creamy clam dip with chive and pimento topping and a whole wheat cracker in the top of the dip.

Creamy Clam Dip

Shelby Law Ruttan
This easy clam dip is an easy dip recipe made with pantry staples and is the perfect party appetizer!
5 from 1 vote
Print FREE recipe card with your email address Pin Recipe Save Go to Collections
Prep Time 10 minutes mins
Total Time 10 minutes mins
Course Appetizers
Cuisine American
Servings 12
Calories 69 kcal

Equipment

  • Medium bowl
  • Wooden spoon

As an Amazon Associate I earn from qualifying purchases.

Ingredients
  

  • 8 ounces cream cheese , softened
  • 6½ ounce can minced clams , drained with juice reserved
  • 1 teaspoon hot sauce
  • ½ teaspoon Worcestershire sauce
  • 1 dash ground black pepper
  • 1 teaspoon lemon juice
  • 1 teaspoon chopped chives , optional
  • 1 tablespoon chopped pimento , optional

Instructions
 

  • In a medium bowl, mix the cream cheese, minced clams, hot sauce, Worcestershire sauce, and black pepper until mixture is smooth.
  • Blend in the reserved clam juice a few drops at a time, until the dip reaches the desired consistency.
  • Refrigerate in an airtight container until ready to serve.

Notes

2 tablespoons equals 1 serving

Nutrition

Calories: 69kcalCarbohydrates: 1gProtein: 2gFat: 7gSaturated Fat: 4gPolyunsaturated Fat: 0.3gMonounsaturated Fat: 2gCholesterol: 20mgSodium: 73mgPotassium: 32mgFiber: 0.04gSugar: 1gVitamin A: 298IUVitamin C: 2mgCalcium: 20mgIron: 0.1mgNet Carbohydrates: 1g
Keyword Creamy Clam Dip
Tried this recipe?Mention @grumpyshoneybunch or tag #grumpyshoneybunch!

Pimento Cheese Tea Sandwiches: Best Finger Sandwich

March 18, 2024 by Shelby Law Ruttan 7 Comments

Pimento Cheese Tea Sandwiches cut into triangle shaped quarters on a plate with sliced cucumbers and tomatoes.

As a southern transplant, I got a taste of real pimento cheese spread and immediately fell in love with this southern staple! Pimento cheese sandwiches have become a standby lunch or snack favorite and I love their portability! 

Thes finger sandwiches are perfect for elegant tea parties, spring gatherings, or any occasion where you want to impress with a touch of Southern charm!

Pimento Cheese Tea Sandwiches cut into triangle shapes with a side of cherry tomatoes and sliced cucumbers.

Save this recipe by clicking on the ❤️ heart on the left-hand side of the screen or in the recipe card

[feast_advanced_jump_to]

🗝️ Key takeaways

  • Easy to make sandwich filling
  • Tangy and full of flavor
  • Versatile and customizable

As a child, my dad would buy the jarred pimento cheese and eat it as a snack on saltine crackers. While I enjoyed that treat back then, now days, my only and favorite way to enjoy pimento cheese today is to have the real thing!

🥘 Pimento Cheese Tea Sandwiches Ingredients List

This is an overview of the ingredients. See the recipe card below for amounts and instructions.

Pimento peppers: these are a variety of sweet red pepper and give the sandwich filling it's distinct flavor.

​Fresh shallots: shallots have a flavor that is similar to onion and garlic combined. Grating them brings out the most flavor.

Mayonnaise: adds flavor and creaminess to the pimento cheese spread.

Seasoned rice vinegar: just a touch adds tang and sweetness.

Black pepper: adds a contrast of flavor.

Shredded sharp cheddar cheese: I recommend buying the brick of cheese and using a reduced fat version.

Parmesan cheese: to keep this vegetarian, choose a parmesan made with vegetable rennet or skip the parmesan and use more cheddar cheese.

Whole wheat bread: I used a light whole wheat bread I purchased, but this would be excellent on my homemade maple oatmeal bread slices!

🥄 Equipment

Medium bowl

Microplane zester

Rubber scraper

Cheese grater

Butter knife

🥫Storage

Store sandwiches in an airtight container until ready to serve. Can be made up to 2 days in advance.

📖 Variations

Go low carb: spread the cheese filling on celery sticks instead of bread slices.

Spicy Pimento cheese sandwiches: add a dash or two of hot sauce or cayenne pepper to the cheese spread.

Substitution for shallots: use finely diced green onion in place of the shallot.

💭 Tips

Can't find jarred pimentos in the grocery store? You can easily substitute diced roasted red peppers or pick out the pimentos from a jar of green olives!

🙋 Things to Know

If making pimento cheese to serve as a spread at a party, you usually will use cream cheese as a base that makes the sandwich creamy and smooth. For this recipe, we are just making two sandwiches, so I skipped the cream cheese here. You can still add a couple tablespoons of cream cheese if desired (this will change the nutrition information).

Pimento tea sandwiches are a southern favorite that are great to serve at tea parties, wedding showers or your next baby shower!

👩‍🍳 FAQs

Can I freeze these sandwiches?

While it's possible to freeze these sandwiches, the texture of the bread may become slightly soggy upon thawing. It's best to enjoy them fresh or store them in the refrigerator for short-term storage.

Can I use store-bought pimento cheese spread instead of making it from scratch?

Absolutely! Using store-bought pimento cheese spread can save you time and effort. Just make sure to choose a high-quality brand for the best flavor.

Pin image for tea sandwiches filled with a cheese filling made with pimentos, mayonnaise and cheeses.

🍽 Serve with..

Serve these Pimento Cheese Tea Sandwiches with a side of salty chips or pita chips.

📚 Related Recipes

Fans of southern recipes will love this Southern Sweet Potato Pie.

This recipe for Pimento Cheese Burgers is not only low carb but absolutely delicious and easy to make!

Mom's Easy Cheese Ball Recipe is a great way to enjoy a cheese spread during the holidays.

Venison Meatballs are easy to make and full of flavor, perfect for your next Italian night!

Breakfast Quesadillas have a delicious pimento cheese spread that takes these quesadillas over the top!

Jalapeno Pimento Cheese Spread is a spiced version of a southern favorite!


Don't forget to check out my Amazon storefront for some of my favorite products!

When you make recipe for Pimento Cheese Tea Sandwiches, please comment below and let me know what you think. I'd love it if you tag me on Instagram @grumpyshoneybunch or #grumpyshoneybunch so I can see your photos!

If you love this recipe, please leave a ⭐⭐⭐⭐⭐ rating

If you click on the number of servings in the recipe card you can adjust the measurements up or down for the exact number of servings you need.

📖 Recipe

Pimento Cheese Tea Sandwiches cut into triangle shaped quarters on a plate with sliced cucumbers and tomatoes.

Pimento Cheese Tea Sandwiches

Shelby Law Ruttan
Pimento Cheese Tea Sandwiches are a southern classic perfect afternoon tea or as a snack on the go. You will love the tangy cheese filling in these finger sandwiches as they pack a punch of flavor that's sure to tantalize your taste buds!
5 from 1 vote
Print FREE recipe card with your email address Pin Recipe Save Go to Collections
Prep Time 10 minutes mins
Total Time 10 minutes mins
Course lunch
Cuisine American
Servings 2
Calories 299 kcal

As an Amazon Associate I earn from qualifying purchases.

Ingredients
  

  • 1 tablespoon bottled diced pimentos , drained
  • ½ tablespoon grated peeled shallots
  • 1 tablespoon mayonnaise
  • ½ teaspoon seasoned rice vinegar
  • ⅛ teaspoon ground black pepper
  • 2 ounces 75% reduced fat cheddar cheese
  • ¾ ounce freshly grated Parmesan cheese
  • 4 slices light whole wheat bread

Instructions
 

  • In a medium bowl, combine pimentos, shallot, mayonnaise, rice vinegar, pepper, cheddar cheese, and parmesan cheese.
  • Divide cheese filling in half and spread each on 2 of the bread slices. Top with remaining bread slices. Trim crusts and cut sandwich in half diagonally from both sides. You will get 4 quarters per sandwich.

Nutrition

Calories: 299kcalCarbohydrates: 29gProtein: 16gFat: 13gSaturated Fat: 4gPolyunsaturated Fat: 4gMonounsaturated Fat: 3gTrans Fat: 0.03gCholesterol: 18mgSodium: 671mgPotassium: 143mgFiber: 3gSugar: 4gVitamin A: 356IUVitamin C: 8mgCalcium: 284mgIron: 2mgNet Carbohydrates: 27g
Keyword Pimento Cheese Tea Sandwiches
Tried this recipe?Mention @grumpyshoneybunch or tag #grumpyshoneybunch!

Hummingbird Bundt Cake with Cream Cheese Frosting

March 18, 2024 by Shelby Law Ruttan Leave a Comment

A slice of freshly baked hummingbird bundt cake smothered in rich cream cheese frosting topped with toasted pecans.

A Hummingbird Bundt cake is a version of the southern classic hummingbird cake. Chock full of banana flavor studded with pineapple and coconut and topped with a delicious cream cheese frosting, this moist cake is perfect for Easter dessert, birthdays, potlucks, and more!

Homemade Hummingbird Bundt Cake with a sweet white icing and chopped pecans.
[feast_advanced_jump_to]

❤️ Why you'll love it

Tropical flavors: a combination of fresh flavors from banana, pineapple, and coconut.

Tender moist cake: mashed banana and pineapple make this a very tender moist cake recipe!

Cream cheese frosting: is creamy and delicious and adds another layer of sweetness on the cake.

What Is A Hummingbird Cake

The hummingbird cake originated in Jamaica and was a cake named after the island's national bird called the doctor bird (aka hummingbird). This cake became popular in the southern states in the 1970's when a recipe for it was published in an issue of Southern Living magazine and has since become known as a southern favorite cake recipe in the United States.

A hummingbird cake is a dense cake typically a 2-3 layer cake made with banana, pineapple, and coconut and frosted with a cream cheese frosting. This Hummingbird Bundt Cake Recipe is a take on the original recipe.

Ripe bananas, flour, eggs, and other ingredients for hummingbird bundt cake arranged neatly on a wooden table.

🥘 Hummingbird Bundt Cake Ingredients

All purpose flour

Ground cinnamon

Ground allspice

Baking soda

Salt

Overripe bananas

Crushed Pineapple 

Shredded coconut

Granulated sugar

Brown sugar

Large eggs

Unsalted butter

Vanilla extract

Cream cheese

Confectioners' sugar

Toasted pecans 

Baking spray

A clear glass bowl full of flour topped with cinnamon and baking powder.
A white bowl full of butter, granulated sugar, and brown sugar.
A bowl filled with mashed banana, eggs, and vanilla extract.
A bowl of flour on a wooden surface, ready for baking.

🔪 Instructions

  1. Preheat oven to 350F and generously coat an 8’’-10’’ Bundt pan with baking spray.
  2. In a medium bowl, combine the flour, cinnamon, baking soda, salt, and allspice, set it aside.
  3. In a large bowl, using an electric mixer, combine the butter, brown sugar, and granulated sugar until smooth and creamy.
  4. Mash the bananas in a separate bowl. Stir the crushed pineapple into the mashed bananas 
  5. Add the banana mixture to the creamed sugar mixture, mixing on medium-high speed until all the ingredients are well combined.
  6. Using a large rubber scraper, gradually fold in the dry ingredients to the wet ingredients until they are just combined. 
  7. Pour cake batter into the prepared pan, ensuring that it is ⅔ to ¾ full.
  8. Bake for 50 minutes, or until a long cake tester inserted into the center of the cake comes out mostly clean.
  9. Remove bundt cake from the oven and cool cake in the pan on a wire rack for 10 minutes. 
  10. Add the softened cream cheese to a mixing bowl and add the powdered sugar gradually until desired thickness is achieved.
  11. You can spoon the frosting to the cake or you can add it to a piping bag with a large hole cut for thicker frosting. Slowly add the frosting to the crown of the cake allowing for a variety of drips to form. 
  12. Top the frosting with the chopped pecans. 
Cake batter in a white mixing bowl on a wooden board.
Mix until dry ingredients are just combined
Cake batter in bundt pan on a wooden board.
Pour cake batter in bundt pan
Baked cake in bundt pan on wooden board.
Bake up to 1 hour
A white bowl with filled with softened cream cheese and powdered sugar.
Mix cream cheese and powdered sugar
A white bowl full of cream cheese frosting.
Mix frosting until creamy
Up close image of baked bundt cake with cream cheese frosting.
Pour frosting over cooled cake

🥄 Equipment

12-cup bundt pan (a 14-cup bunt pan can be used as well)

Large bowl

Medium bowl

Electric mixer

Fork (to mash banana)

Rubber scraper

Cake tester

Wire rack

🥫Storage

Room temperature: Store leftover cake in an airtight container up to 2 days

Refrigerator: Store cake in a freezer safe container up to 5 days.

Overhead image of hummingbird bundt cake covered with cream cheese frosting and topped with toasted pecans.

📖 Variations

Cherry version: add ½ cup chopped maraschino cherries to the cake batter.

Mini bundt cakes: use mini bundt pans to make a smaller scaled version of the bundt cake making sure to adjust baking time (should take less time for smaller bundt pans).

Pina Colada Hummingbird Bundt Cake: substitute rum extract for the vanilla extract.

💭 Tips

  • Vegetable oil or coconut oil can be substituted for the melted butter.
  • If you only have pineapple chunks, process the entire can (including juice) in a food processor until the pineapple has shredded (5-6 pulses).
Freshly baked hummingbird bundt cake smothered in decadent cream cheese frosting and toasted pecan topping.

📚 Related Recipes

If you love rich dark chocolate, then you will love this Chocolate Bundt Cake witn Peanut Butter Caramel Drizzle!

This Chocolate Chip Bundt Cake is a lower calorie bundt that won't bust the diet.

Carrot Cake Bundt Cake is another delicious bundt cake recipe perfect for Easter!

Irish Cream Pound Cake is a great way to use any Bailey's you may have on hand!

Fans of German Chocolate Cake will love this German Chocolate Bundt Cake version.

This Lemon Pound Cake is not only gluten free, it's sugar free, low carb, and keto friendly!

🍽 Serve Hummingbird Bundt Cake with..

Serve hummingbird bundt cake with a scoop of vanilla ice cream or a cup of hot coffee or tea. It is perfect for birthday's and potlucks.

A slice of hummingbird bundt cake with thick cream cheese frosting and chopped pecans.

Don't forget to check out my Amazon storefront for some of my favorite products!

When you make this hummingbird bundt cake, please comment below and let me know what you think. I'd love it if you tag me on Instagram @grumpyshoneybunch or #grumpyshoneybunch so I can see your photos!

If you love this recipe, please leave a ⭐⭐⭐⭐⭐ rating

📖 Recipe

A slice of freshly baked hummingbird bundt cake smothered in rich cream cheese frosting topped with toasted pecans.

Hummingbird Bundt Cake with Cream Cheese Frosting

Shelby Law Ruttan
A delicious take on a Southern favorite cake recipe, the Hummingbird Bundt Cake is a banana cake with tropical flavors that is the perfect cake for birthdays and large gatherings!
No ratings yet
Print FREE recipe card with your email address Pin Recipe Save Go to Collections
Prep Time 15 minutes mins
Cook Time 1 hour hr
Total Time 1 hour hr 15 minutes mins
Course Desserts
Cuisine Jamacian
Servings 16
Calories 448 kcal

As an Amazon Associate I earn from qualifying purchases.

Ingredients
  

Hummingbird Bundt Cake:

  • 3 cups all purpose flour
  • 2 teaspoons ground cinnamon
  • 1 teaspoon baking soda
  • 1 teaspoon salt
  • ½ teaspoon ground allspice
  • 4 bananas , slightly overripe
  • 1 cup crushed pineapple with juices
  • ½ cup shredded coconut
  • ½ cup granulated sugar
  • 1 cup brown sugar
  • 3 large eggs beaten
  • 1 cup unsalted butter
  • 1 tablespoon vanilla extract

Cream Cheese Frosting

  • 8 ounces cream cheese , softened
  • 2 cups powdered sugar
  • ¼ cup chopped toasted pecans , for garnish

Instructions
 

Make the bundt cake

  • Preheat oven to 350F and generously coat an 8’’-10’’ Bundt pan with baking spray.
  • In a medium bowl, combine the flour, cinnamon, baking soda, salt, and allspice, set it aside.
  • In a large bowl, using an electric mixer, combine the butter, brown sugar, and granulated sugar until smooth and creamy.
  • Mash the bananas in a separate bowl. Stir the crushed pineapple into the mashed bananas
  • Add the banana mixture to the creamed sugar mixture, mixing on medium-high speed until all the ingredients are well combined.
  • Using a large rubber scraper, gradually fold in the dry ingredients to the wet ingredients until they are just combined.
  • Pour cake batter into the prepared pan, ensuring that it is ⅔ to ¾ full.
  • Bake for 50 minutes, or until a long cake tester inserted into the center of the cake comes out mostly clean.
  • Remove bundt cake from the oven and cool cake in the pan on a wire rack for 10 minutes.

Make the cream cheese frosting

  • Add the softened cream cheese to a mixing bowl and add the powdered sugar gradually until desired thickness is achieved.
  • You can spoon the frosting to the cake or you can add it to a piping bag with a large hole cut for thicker frosting. Slowly add the frosting to the crown of the cake allowing for a variety of drips to form.
  • Top the frosting with the chopped pecans.

Nutrition

Calories: 448kcalCarbohydrates: 64gProtein: 5gFat: 20gSaturated Fat: 11gPolyunsaturated Fat: 1gMonounsaturated Fat: 5gTrans Fat: 0.5gCholesterol: 80mgSodium: 286mgPotassium: 222mgFiber: 2gSugar: 42gVitamin A: 624IUVitamin C: 4mgCalcium: 46mgIron: 2mgNet Carbohydrates: 62g
Keyword Hummingbird Bundt Cake
Tried this recipe?Mention @grumpyshoneybunch or tag #grumpyshoneybunch!

Shrimp Deviled Eggs with Bacon

March 18, 2024 by Shelby Law Ruttan 9 Comments

Shrimp Deviled Eggs with bacon and green onion garnish.

This Shrimp Deviled Eggs recipe is packed with protein and flavor. This delicious spin on the traditional deviled egg recipe is the perfect finger food to serve for Easter brunch, or, as an appetizer to any special occasion.

Shrimp deviled eggs arranged on an egg plate.
[feast_advanced_jump_to]

❤️ Why You'll Love Shrimp Deviled Eggs

High protein: adding shrimp to your deviled egg filling is an easy twist and genius way to add extra protein to your snack!

Twist on the traditional: chock full of succulent shrimp this is the deviled egg recipe for seafood fans!

Favorite appetizer: fans of shrimp and deviled eggs alike will love these tasty deviled eggs!

🥘 Shrimp Deviled Egg Ingredients

As an Amazon Associate I earn from qualifying purchases.

Hard boiled Large eggs 

Mayonnaise

Fresh chives

Mustard: I have used sweet and spicy mustard and dijon mustard.

Salt

Black pepper

Red pepper

Pre-cooked shrimp: I like to use a medium or small shrimp

Crispy cooked bacon

Green onions

A bowl with hard boiled eggs, shells removed.

🔪 Instructions

  1. Cut hard boiled eggs in half lengthwise and remove egg yolks, placing egg yolks in a medium bowl and egg white halves on a egg plate. Set egg whites aside.
  2. Mash yolks using a fork, until yolks are fine crumbles. Add mayonnaise, shrimp and chives to mashed yolks.
  3. Using a tablespoon, fill egg white halves with approximately 1 tablespoon of egg yolk mixture. 
  4. Sprinkle the tops of the deviled eggs with bacon pieces and a little more chive if desired.

🥄 Equipment

Cutting board

Sharp knife

Medium bowl

Fork

Wooden spoon

Tablespoon

A bowl with mashed egg yolks and a fork sitting in the bowl.

🥫Storage

Refrigerate: store leftover eggs in an airtight container in the fridge up to 3 days.

📖 Deviled Egg Variations

Cajun Shrimp Deviled Eggs: add a few dashes of cajun seasoning or hot sauce to the egg yolk mixture.

Old Bay Shrimp Deviled Eggs: add a teaspoon of old bay seasoning to the egg yolk mixture.

Seafood substitution: substitute imitation crabmeat for the cooked shrimp.

💭 Tips

  • Add more flavor and cook raw shrimp and in a skillet with hot oil and a sprinkle of old bay seasoning until shrimp are pink. Allow shrimp to cool completely before adding to egg yolk mixture.
  • For perfect hard-boiled eggs, place the eggs in cold water, bring to a hard boil, then turn the burner off and cover the pot. Set a time for 15 minutes, transfer eggs to a bowl of ice water to cool quickly. The egg yolks will be beautifully yellow with no green tint around the outside of the yolk.
  • Add a fresher flavor and light the deviled egg recipe up the recipe by substituting sour cream or greek yogurt for the mayonnaise.
  • If using a piping bag to fill the egg white halves, be sure to cut a hole large enough for the pieces of shrimp to pass through easily.
Shrimp Deviled Eggs Pin image.

📚 Related Recipes

Egg Salad with Olives is delicious served with saltines or as a sandwich.

Deviled Eggs with Pickled Onions are tangy eggs with a touch of sweet and sour flavors.

Mom's Italian Deviled Eggs have a tangy bite that is irresistibly delicious!

Buffalo Style Stuffed Eggs made with Frank's Red Hot and blue cheese crumbles, the perfect deviled egg for buffalo fans.

Bacon Deviled Eggs are studded and garnished with bacon and a sweet and spicy egg yolk filling.

Sour Cream and Onion Deviled Eggs are a take on the traditional deviled eggs with a surprising secret ingredient!

🍽 Serve with..

Serve shrimp deviled eggs on a serving platter as an appetizer to your meal or as a side dish with your meal.


Don't forget to check out my Amazon storefront for some of my favorite products!

When you make shrimp deviled eggs, please comment below and let me know what you think. I'd love it if you tag me on Instagram @grumpyshoneybunch or #grumpyshoneybunch so I can see your photos!

If you love this recipe, please leave a ⭐⭐⭐⭐⭐ rating

📖 Recipe

Shrimp Deviled Eggs with bacon and green onion garnish.

Shrimp Deviled Eggs

Shelby Law Ruttan
The perfect deviled egg packed with protein! Shrimp Deviled Eggs are keto friendly and naturally low carb, packed with delicious flavor.
5 from 3 votes
Print FREE recipe card with your email address Pin Recipe Save Go to Collections
Prep Time 20 minutes mins
Total Time 20 minutes mins
Course Appetizers
Cuisine American
Servings 16 servings
Calories 97 kcal

Equipment

  • cutting board
  • Sharp knife
  • Medium bowl
  • Fork
  • Wooden spoon
  • Tablespoon

As an Amazon Associate I earn from qualifying purchases.

Ingredients
  

  • 8 large eggs , hard boiled and shells removed
  • ½ cup mayonnaise
  • 1 tablespoon chopped fresh chives
  • 2 teaspoons spicy mustard
  • ¼ teaspoon salt
  • ⅛ teaspoon ground pepper
  • ⅙ teaspoon red pepper
  • ½ cup cooked medium shrimp , peeled and chopped
  • 3 slices center cut bacon , cooked and crumbled

Instructions
 

  • Cut hard boiled eggs in half lengthwise and remove egg yolks, placing egg yolks in a medium bowl and egg white halves on a egg plate. Set egg whites aside.
  • Mash yolks using a fork, until yolks are fine crumbles. Add mayonnaise, shrimp and chives to mashed yolks.
  • Using a tablespoon, fill egg white halves with approximately 1 tablespoon of egg yolk mixture.
  • Sprinkle the tops of the deviled eggs with bacon pieces and a little more chive if desired.

Nutrition

Serving: 1egg halfCalories: 97kcalCarbohydrates: 0.3gProtein: 5gFat: 8gSaturated Fat: 2gPolyunsaturated Fat: 4gMonounsaturated Fat: 2gTrans Fat: 0.02gCholesterol: 109mgSodium: 157mgPotassium: 65mgFiber: 0.04gSugar: 0.1gVitamin A: 150IUVitamin C: 0.2mgCalcium: 20mgIron: 1mgNet Carbohydrates: 0.3g
Keyword Shrimp Deviled Eggs
Tried this recipe?Mention @grumpyshoneybunch or tag #grumpyshoneybunch!

Sour Cream and Onion Deviled Eggs: A Classic With A Twist

March 12, 2024 by Shelby Law Ruttan Leave a Comment

An egg shaped yellow plate with sour cream and onion deviled eggs garnished with green onion tops.

These Sour Cream and Onion Deviled Eggs are not your traditional deviled egg recipe and have a surprising secret ingredient! This deviled eggs recipe is a party favorite you will want to serve at your next summer cookout, Easter brunch, or holiday party!

An egg shaped yellow plate with sour cream and onion deviled eggs garnished with green onion tops.

❤️ Why you'll love Sour Cream and Onion Deviled Eggs

Great party appetizers: everyone loves deviled eggs and they make a great appetizer for holidays and a great way to use eggs leftover from Easter!

Unique flavor technique: If you love new recipes, you will love the unique way of infusing flavor into this deviled egg recipe!

Great texture: the ground potato chips are rehydrated in the egg yolk mixture and you still have a nice creamy texture with this recipe.

A can of pringles and hard boiled eggs on a paper towel.
Halved hard boiled eggs on a paper towel with two whole hard boiled eggs in the background.

🥘 Ingredients

Large eggs

Pringles Sour Cream and Onion Potato Chips

Sour Cream

Mayonnaise

Green onions

Crushing pringles potato chips in a ziploc bag with a mallet.

🔪 Making Sour Cream and Onion Deviled Eggs

  1. Place eggs in a medium pot and fill the pot with cold water to cover the eggs.
  2. Place on a burner over medium heat and bring eggs to a hard boil. Immediately turn off the heat and cover pot with lid. Set timer for 15 minutes, to allow eggs to finish cooking in the hot water off the burner.
  3. After 15 minutes, drain water from the pot and fill with cold water and 2 cups of ice to chill the hard-boiled eggs quickly.
  4. Peel eggs and discard the shells. Using a sharp knife, cut each egg in half and remove the egg yolk from the egg white halves. 
  5. Place egg white halves on a serving tray and set aside. Place reserved egg yolks in a medium bowl using a fork, smash the yolks until fine crumbles.
  6. Add the finely crushed potato chips to the egg yolk and stir to combine.
  7. Stir the sour cream, mayonnaise, and white part of the green onion into the egg yolk mixture until combined and creamy.
  8. Using a piping bag or tablespoon, scoop the egg yolk filling into the egg whites. Sprinkle with the green part the green onion to garnish. 
  9. Refrigerate up to 2 hours before serving. Store leftovers in an airtight container in the fridge up to 3 days.
Mashed yolk with crushed pringles potato chips.
Mashed egg yolk with mayo, sour cream, and green onion.
First combine the crushed Pringles with the yolks then add the wet ingredients.

🥄 Equipment

Medium pot

Sharp knife

Cutting board

Egg tray

Ziploc bag

Mallet

Medium bowl

Piping bag

🥫Storage

Refrigerate: ​store leftover eggs in an airtight container up to 3 days.

An egg shaped yellow plate with sour cream and onion deviled eggs garnished with green onion tops.

📖 Variations

Cheddar Cheese Deviled Eggs: use cheddar cheese flavored Pringles potato chips and sprinkle the top of the eggs with some shredded cheddar.

Caramelized Onion Deviled Eggs: add ¼ cup caramelized onions to the egg yolk mixture.

Smokey Bacon Flavor: garnish the sour cream and onion deviled eggs with crispy cooked salty bacon pieces.

💭 Tips

Ice Bath: giving the hard boiled eggs an ice bath causes them to quickly cook and prevents a greenish hue to the egg yolk.

Onion swap: Chopped chives can be substituted for the green onion.

Flavor boost: if you want even more onion flavor, add ½ to 1 teaspoon onion powder to the egg yolk mixture.

Pin image for sour cream and onion deviled eggs.

📚 Related Recipes

This Egg Salad Recipe is the way my mom would make it and is so delicious!

This recipe for Mom's Italian Style Deviled Eggs is a classic favorite.

Buffalo flavor fans will love these Buffalo Style Stuffed Eggs.

Bacon makes everything better and its a proven fact with these Bacon Deviled Eggs.

I love these Cajun Deviled Eggs!

Have you ever wondered what the difference was with Free Range vs Regular Eggs?

🍽 Serve with..

Serve Sour Cream and Onion Deviled Eggs as an appetizer to your next family dinner, holiday party, or as an afternoon snack pick me up.


Don't forget to check out my Amazon storefront for some of my favorite products!

When you make this deviled eggs recipe, please comment below and let me know what you think. I'd love it if you tag me on Instagram @grumpyshoneybunch or #grumpyshoneybunch so I can see your photos!

If you love this recipe, please leave a ⭐⭐⭐⭐⭐ rating

📖 Recipe

An egg shaped yellow plate with sour cream and onion deviled eggs garnished with green onion tops.

Sour Cream and Onion Deviled Eggs

Shelby Law Ruttan
If you are looking for a delicious way to use your leftover Easter Eggs, then this Sour Cream and Onion Deviled Egg recipe is one you must try! A step from the traditional way of making deviled eggs, this recipe features crushed Pringles potato chips in the mix and are surprisingly delicious!
5 from 1 vote
Print FREE recipe card with your email address Pin Recipe Save Go to Collections
Prep Time 10 minutes mins
Cook Time 15 minutes mins
Total Time 25 minutes mins
Course Appetizers
Cuisine American
Servings 6
Calories 161 kcal

Equipment

  • Medium pot
  • Sharp knife
  • cutting board
  • Egg tray
  • Ziploc bag
  • Mallet
  • Medium bowl
  • Piping bag

As an Amazon Associate I earn from qualifying purchases.

Ingredients
  

  • 6 large eggs
  • 2 ounces pringles sour cream and onion potato chips , crushed (30 chips)
  • 2 tablespoons sour cream
  • 2 tablespoons mayonnaise
  • 3 green onions , sliced, white and green parts separated.

Instructions
 

  • Place eggs in a medium pot and fill the pot with cold water to cover the eggs.
  • Place on a burner over medium heat and bring eggs to a hard boil. Immediately turn off the heat and cover pot with lid. Set timer for 15 minutes, to allow eggs to finish cooking in the hot water off the burner.
  • After 15 minutes, drain water from the pot and fill with cold water and 2 cups of ice to chill the hard-boiled eggs quickly.
  • Peel eggs and discard the shells. Using a sharp knife, cut each egg in half and remove the egg yolk from the egg white halves.
  • Place egg white halves on a serving tray and set aside. Place reserved egg yolks in a medium bowl using a fork, smash the yolks until fine crumbles.
  • Add the finely crushed potato chips to the egg yolk and stir to combine.
  • Stir the sour cream, mayonnaise, and white part of the green onion into the egg yolk mixture until combined and creamy.
  • Using a piping bag or tablespoon, scoop the egg yolk filling into the egg whites. Sprinkle with the green part the green onion to garnish.
  • Refrigerate up to 2 hours before serving. Store leftovers in an airtight container in the fridge up to 3 days.

Nutrition

Calories: 161kcalCarbohydrates: 6gProtein: 7gFat: 12gSaturated Fat: 2gPolyunsaturated Fat: 3gMonounsaturated Fat: 3gTrans Fat: 0.03gCholesterol: 189mgSodium: 158mgPotassium: 95mgFiber: 0.2gSugar: 0.4gVitamin A: 346IUVitamin C: 1mgCalcium: 38mgIron: 1mgNet Carbohydrates: 1g
Keyword Sour Cream and Onion Deviled Eggs
Tried this recipe?Mention @grumpyshoneybunch or tag #grumpyshoneybunch!

Oven Roasted Pork Chops with Garlic and Thyme

March 11, 2024 by Shelby Law Ruttan Leave a Comment

Oven Roasted Pork Chops with Garlic and Thyme.

This recipe for flavorful Oven Roasted Pork Chops a quick and easy dinner recipe for busy weeknights! Bone in pork chops are seared in a hot cast iron skillet then oven roasted with garlic and fresh thyme to finish.

Hero Image for Garlic Roasted Pork Chops.
[feast_advanced_jump_to]

❤️ Why you'll love it

Tender pork chops: juicy pork chops that are fork tender make the best dinner

Easy pork recipe: this tasty recipe made with just 4 ingredients and a short cooking time, is an easy way to add variety to your meals without a lot of work.

Naturally low carb: made with simple ingredients, this pork chop recipe is perfect for keto low carb and paleo diets.

Bone-in pork chops in packaging.

🥘 Oven Roasted Pork Chops Ingredient List

Bone-In Pork Chops: I used thin chops. If using thick pork chops, be sure to adjust time accordingly and use the meat thermometer to gauge the internal temperature for donesness.

Unsalted butter: if using salted butter, omit the salt from the recipe.

Salt

Black pepper

Fresh garlic cloves

Fresh Thyme sprigs

🍽 Equipment

Cast Iron Skillet: this produces the best results as the cast iron pan provides even heat for cooking. 

Instant-Read Thermometer

Tongs

Cutting Board

Sharp knife

Overhead image of cooked chop in skillet.

🔪 How to make Oven Roasted Pork Chops

Prep time: 5 minutes

Baking time: 12 minutes

  1. Preheat oven to 400 degrees F.
  2. Heat a cast iron skillet over medium high heat until hot. 
  3. Place 1 tablespoon butter in the skillet to melt.
  4. Season pork chops on both sides with salt and black pepper. 
  5. Place the pork chops in the hot skillet and sear in the melted butter for 2 minutes on each side. 
  6. Remove from heat. 
  7. Add the remaining butter, crushed garlic cloves, and thyme sprigs to the hot skillet and transfer to the oven. 
  8. Roast pork chops in the oven for 12 minutes, until the meat thermometer registers an internal temperature of the pork chops is 145 degrees F.
  9. Transfer oven roasted pork chops to serving platter and spoon 1 teaspoon of garlic thyme sauce over top of pork. 
  10. Allow pork chops to rest for 3 minutes.
A spoon pouring the sauce over a oven roasted pork chop.

💭 Top Tips

  • Sear the pork chops in a hot skillet to ensure a good browning on the meat.
  • Be sure to allow the chops to rest for at least 3 minutes before serving.
  • I do not recommend thick boneless pork chops for this recipe as the thicker the cut the longer cooking time you need and less tender the outcome.

📖 Variations

  • Use ghee or olive oil in place of butter.
  • Substitute 1 teaspoon of garlic powder for the garlic cloves and add to the salt and pepper mixture when doing so.

Side Dishes to Serve with Pork Chops

Garlic Mashed Cauliflower with Browned Butter

Cauliflower Fried Rice

Roasted Acorn Squash with Maple Browned Butter

Oven Roasted Radishes

Mashed Cauliflower with Garlic and Chives

Chickpea and Corn Patties

More Pork Recipes

This recipe for Grilled Pork Chops with Cilantro Lime Topping is another quick and easy meal.

Check out this round up of my Favorite Pork Chop Recipes!

This Air Fryer Pork Chops Recipe is a must try!

Pork Chops with Apples and Onions are the perfect combination of flavors.

Honey Garlic Pork Chops are another skillet recipe that is bursting with sweet and savory flavors.


Don't forget to check out my Amazon storefront for some of my favorite products!

When you make these oven roasted pork chops, please comment below and let me know what you think. I'd love it if you tag me on Instagram @grumpyshoneybunch or #grumpyshoneybunch so I can see your photos!

If you love this recipe, please leave a ⭐⭐⭐⭐⭐ rating

📖 Recipe

Oven Roasted Pork Chops with Garlic and Thyme.

Garlic Roasted Pork Chops

Shelby Law Ruttan
A 4-ingredient oven roasted pork chop recipe is an easy dinner recipe that versatile enough for those busy weeknights when you don't have a lot of time to spend making dinner.
5 from 1 vote
Print FREE recipe card with your email address Pin Recipe Save Go to Collections
Prep Time 5 minutes mins
Cook Time 12 minutes mins
Total Time 17 minutes mins
Course Main Dish
Cuisine American
Servings 2
Calories 399 kcal

Equipment

  • Cast Iron Skillet
  • Instant read thermometer
  • Tongs
  • cutting board
  • Sharp knife

As an Amazon Associate I earn from qualifying purchases.

Ingredients
  

  • 1 pound Fresh Pork Bone-In Chops , thin cut
  • 2 tablespoons butter , divided
  • 4 cloves garlic , crushed
  • 2 sprigs fresh thyme
  • salt , to taste
  • black pepper , to taste

Instructions
 

  • Preheat oven to 400 degrees F.
  • Heat a cast iron skillet over medium high heat until hot.
  • Place 1 tablespoon butter in the skillet to melt.
  • Season pork chops on both sides with salt and black pepper.
  • Place the pork chops in the hot skillet and sear in the melted butter for 2 minutes on each side.
  • Remove from heat.
  • Add the remaining butter, crushed garlic cloves, and thyme sprigs to the hot skillet and transfer to the oven.
  • Roast pork chops in the oven for 12 minutes, until the meat thermometer registers an internal temperature of the pork chops is 145 degrees F.
  • Transfer oven roasted pork chops to serving platter and spoon 1 teaspoon of garlic thyme sauce over top of pork.
  • Allow pork chops to rest for 3 minutes.

Notes

Tips and Substitutions

  • Sear the pork chops in a hot skillet to ensure a good browning on the meat.
  • Cook the chops to an internal temperature of 145 degrees F for the best flavor.
  • Be sure to allow the chops to rest for at least 3 minutes before serving.
  • Use butter in place of ghee.
  • If you are out of fresh garlic, sprinkle the pork chops with 1 teaspoon of garlic powder at the same time you season with salt and pepper.
  • Be sure to baste the pork chops with melted ghee when serving for a super delicious, moist, pork chop.
  • Be sure you only crush the garlic and not mince it. As the garlic roasts in the oven it will caramelize and soften. It will be absolutely delicious with the pork chop.

Nutrition

Serving: 1gCalories: 399kcalCarbohydrates: 2gProtein: 36gFat: 27gSaturated Fat: 12gPolyunsaturated Fat: 2gMonounsaturated Fat: 9gTrans Fat: 1gCholesterol: 147mgSodium: 185mgPotassium: 617mgFiber: 0.3gSugar: 0.1gVitamin A: 408IUVitamin C: 3mgCalcium: 51mgIron: 1mgNet Carbohydrates: 2g
Keyword Oven Roasted Pork Chops
Tried this recipe?Mention @grumpyshoneybunch or tag #grumpyshoneybunch!

Sriracha Turkey Meatballs

March 10, 2024 by Shelby Law Ruttan 39 Comments

Featured image for Sriracha Turkey Meatballs on a bed of cauliflower bean puree.

Sriracha Turkey Meatballs are tender meatballs coated in a sweet and spicy sriracha sauce and served over a cauliflower bean puree. These homemade meatballs are pure comfort food that makes an easy weeknight dinner with so much flavor!

Up close image of Sriracha Turkey Meatballs on a bed of pureed cauliflower and beans sprinkled with fresh cilantro.
[feast_advanced_jump_to]

❤️ Why you'll love Sriracha Turkey Meatballs

Lower carb: these spicy meatballs skip the bread crumbs in the meatball and the swap of cauliflower rice and bean polenta makes a healthier version of grits.

Flavorful dish: sesame oil, sweet hoisin sauce, and sriracha enhances the delicious flavors and gives the meatballs a distinctive flavor profile.

Quick dinner: ready in just a little over 30 minutes, this meatball recipe lends well to meal prep and reheating for later in the week.

Sesame oil bottle next to a mixing bowl with ground turkey.

🥘 Meatball Ingredients

Lean ground turkey

Dark sesame oil

Cooking spray

Ketchup

Sriracha sauce

Hoisin sauce

Worcestershire sauce

Chicken stock

Cauliflower florets

Cannellini beans 

Garlic clove 

Onion

White corn meal

Salt

Olive oil

Fresh cilantro

Mini Turkey Meatballs on parchment lined baking sheet.

🔪 Instructions

For the Turkey Meatballs

  1. In a large bowl, mix together ground turkey and sesame oil until combined. Shape turkey mixture into 1" round meatballs. 
  2. Heat a large skillet coated with cooking spray over medium heat. Cook for 5-7 minutes, until  cooking spray until turkey is browned on all sides. 
  3. Remove meatballs from skillet and place on a paper towel lined plate. Set aside.
  4. In a small bowl, using a hand whisk, mix water, ketchup, sriracha, hoisin sauce and Worcestershire sauce together until combined. 
  5. Stir sauce mixture into skillet that meatballs were cooked in and bring to boil. Immediately turn heat to low and simmer for 3 minutes. Return meatballs to skillet and toss to coat with sauce. Simmer for 7-10 minutes longer

For the Cauliflower Puree

  1. Heat olive oil in large skillet over medium heat until hot.
  2. Add onion and garlic and saute 5 minutes, until onion has softened. 
  3. Stir in chicken stock, mashed beans, cauliflower, milk, cornmeal and salt. Bring cauliflower mixture to boil, reduce heat to low and simmer 20 minutes or until cauliflower is tender.
  4. Serve meatballs and sauce over top of cauliflower puree. Garnish with fresh cilantro (if using).
Sriracha Turkey Meatballs in a cast iron skillet on the stove top.

🥄 Equipment

Large bowl

Small bowl

Large skillet

Hand whisk

Wooden spoon

🥫Storage

Refrigerate: store leftover meatballs in an airtight container up to 4 days.

Reheat: warm leftovers in a microwave safe dish

Cauliflower bean puree in a skillet.

📖 Variations

Honey Sriracha Turkey Meatballs: add a ¼ cup honey to sauce mixture and sprinkle with a tablespoon of sesame seeds.

Carb swap: Serve over polenta, cheesy grits, or brown rice instead of the cauliflower bean puree.

Protein swap: use ground chicken or lean ground beef in place of ground turkey.

Sriracha Sesame Turkey Meatballs

💭 Tips

Bake instead of frying: bake meatballs in the oven on a large baking sheet lined with parchment paper at 350 degrees for 20 minutes, until internal temperature reaches 165 degrees F.

Food processor: use a food processor to easily chop and cauliflower into fine pieces.

Boost of flavor: add a teaspoon of fresh ginger (grated) to the meatball recipe.

Glazed Sriracha Turkey Meatballs in a bowl on top of cauliflower bean puree sprinkled with fresh cilantro.

📚 Related Recipes

Venison Meatballs are an easy oven baked meatball recipe simmered in tomato sauce.

If you prefer to go meatless, try my Mom's Vegetarian Meatball recipe!

This meatball chili recipe is studded with delicious roasted garlic mini meatballs.

Turkey Hot Brown Sandwiches make an easy and delicious weeknight dinner.

Have you tried making Air Fryer Meatballs?

🍽 Serve with..

Serve Sriracha Turkey Meatballs as a main dish served over mashed cauliflower and bean polenta with a green side salad.


Don't forget to check out my Amazon storefront for some of my favorite products!

When you make this meatball recipe, please comment below and let me know what you think. I'd love it if you tag me on Instagram @grumpyshoneybunch or #grumpyshoneybunch so I can see your photos!

If you love this recipe, please leave a ⭐⭐⭐⭐⭐ rating

📖 Recipe

Sriracha Sesame Turkey Meatballs

Sriracha Sesame Turkey Meatballs

Shelby Law Ruttan
Sriracha Sesame Turkey Meatballs are glazed with a sweet and spicy sauce and served over a cauliflower bean puree. This is pure comfort food perfect for weeknight dinner.
5 from 2 votes
Print FREE recipe card with your email address Pin Recipe Save Go to Collections
Prep Time 20 minutes mins
Cook Time 20 minutes mins
Total Time 40 minutes mins
Course Main Dish
Cuisine Fusion
Servings 4 servings
Calories 300 kcal

Equipment

  • Large bowl
  • Small bowl
  • Large skillet
  • Hand whisk
  • Wooden spoon

As an Amazon Associate I earn from qualifying purchases.

Ingredients
  

  • 1¼ pound 97% lean ground turkey
  • 2 tablespoons dark sesame oil
  • cooking spray
  • ½ cup water
  • ¼ cup ketchup
  • 2 tablespoons Sriracha
  • 1½ tablespoons hoisin sauce
  • 1½ teaspoons worcestershire sauce
  • 2 cups chicken stock
  • 2 cups finely chopped cauliflower florets
  • 1 cup cannellini beans , mashed
  • 1 clove garlic , minced
  • ½ cup chopped onion
  • ½ cup white corn meal
  • ½ teaspoon salt
  • 1 tablespoon olive oil

Instructions
 

For the Turkey Meatballs

  • In a large bowl, mix together ground turkey and sesame oil until combined. Shape turkey mixture into 1" round meatballs.
  • Heat a large skillet coated with cooking spray over medium heat. Cook for 5-7 minutes, until cooking spray until turkey is browned on all sides.
  • Remove meatballs from skillet and place on a paper towel lined plate. Set aside.
  • In a small bowl, using a hand whisk, mix water, ketchup, sriracha, hoisin sauce and Worcestershire sauce together until combined.
  • Stir sauce mixture into skillet that meatballs were cooked in and bring to boil. Immediately turn heat to low and simmer for 3 minutes. Return meatballs to skillet and toss to coat with sauce. Simmer for 7-10 minutes longer

For the Cauliflower Puree

  • Heat olive oil in large skillet over medium heat until hot.
  • Add onion and garlic and saute 5 minutes, until onion has softened.
  • Stir in chicken stock, mashed beans, cauliflower, milk, cornmeal and salt. Bring cauliflower mixture to boil, reduce heat to low and simmer 20 minutes or until cauliflower is tender.
  • Serve meatballs and sauce over top of cauliflower puree. Garnish with fresh cilantro (if using).

Notes

5 meatballs per serving - you should get 20 meatballs total.

Nutrition

Serving: 5meatballsCalories: 300kcalCarbohydrates: 38gProtein: 9gFat: 13gSaturated Fat: 2gPolyunsaturated Fat: 4gMonounsaturated Fat: 6gCholesterol: 4mgSodium: 1011mgPotassium: 472mgFiber: 6gSugar: 9gVitamin A: 94IUVitamin C: 32mgCalcium: 58mgIron: 3mgNet Carbohydrates: 32g
Keyword Sriracha Turkey Meatballs
Tried this recipe?Mention @grumpyshoneybunch or tag #grumpyshoneybunch!

Bailey's Irish Cream Coffee

March 3, 2024 by Shelby Law Ruttan 9 Comments

Blue coffee mug filled with creamy Bailey's Irish Cream Coffee.

This recipe for Bailey's Irish Cream Coffee is a coffee lovers treat! It can be enjoyed any time of day and makes the perfect after dinner coffee drink or delicious holiday coffee to enjoy with brunch. 

Blue coffee mug filled with creamy Bailey's Irish Cream Coffee.

❤️ Why you'll love Baileys Coffee

Dinner coffee: creamy and delicious, its the best way to enjoy a delicious cup of hot coffee on a chilly night.

Holiday drink: enjoy a cup of coffee on any holiday and it's perfect for St. Patrick's Day!

Boozy comfort: everything is better with a splash of Baileys and its the perfect drink for the holiday season.

🥘 Ingredients

Strong brewed coffee: use your favorite coffee and feel free to use regular or decaf coffee

Baileys Irish Cream Liqueur: a creamy Irish whiskey 

Whipped cream: feel free to make your own homemade whipped cream or use canned whipped cream or cool whip.

🔪 How to Make Bailey's Irish Cream Coffee

  1. In glass measure, mix hot coffee and Irish Cream Liqueur together.
  2. Place 2 tablespoons whipped cream in a coffee mug.  Pour coffee mixture over top of the whipped cream. 
Social media sharing image for Bailey's Irish Cream Coffee.

🥄 Equipment

Coffee maker

Glass measure

Coffee mugs

Tablespoon

📖 Variations

White Russian Coffee Twist: instead of a full shot of Baileys add a splash of Baileys and a splash of kahlua and top it off with some chocolate shavings.

Spiced Baileys Irish Cream: top the coffee off with a light sprinkle of cinnamon.

Extra Creamy Baileys Coffee: add a tablespoon of heavy cream to the coffee mixture.

Caramel Baileys Coffee: add a teaspoon or 2 of brown sugar or caramel sauce (or use the Caramel Baileys Irish Cream if you can find it).

Pin image with a blue mug filled with creamy bailey's irish cream coffee.

💭 Tips

  • Make it foamy and use a coffee frother to froth the drink before serving.
  • For a classy looking drink, serve in a clear glass footed mug!

📚 Related Recipes

Looking for more St. Patrick's Day recipes made with Baileys Original Irish Cream? Check out these tasty treats below.

Baileys Brownies are fudgy and delicious with the flavor of Baileys Irish Cream baked right in.

This Irish Cream Pound Cake will hit the sweet spot with its a whisky flavored pound cake studded with mini chocolate chips.

If cupcakes are your thing, then try these Chocolate Cupcakes with Baileys Irish Cream Frosting.

These Bailey's Biscotti are perfect for coffee dunking!

🍽 Serve with..

Serve this Irish Coffee Cocktail topped with extra whipped cream or shaved chocolate.


Don't forget to check out my Amazon storefront for some of my favorite products!

When you make this Baileys recipe, please comment below and let me know what you think. I'd love it if you tag me on Instagram @grumpyshoneybunch or #grumpyshoneybunch so I can see your photos!

If you love this recipe, please leave a ⭐⭐⭐⭐⭐ rating

📖 Recipe

Blue coffee mug filled with creamy Bailey's Irish Cream Coffee.

Bailey's Irish Cream Coffee

Shelby Law Ruttan
Bailey's Irish Cream Coffee is a creamy classic cold weather cocktail perfect for after dinner or relaxing on a chilly weekend morning. Easy to make with 3 simple ingredients!
5 from 1 vote
Print FREE recipe card with your email address Pin Recipe Save Go to Collections
Prep Time 5 minutes mins
Total Time 5 minutes mins
Course Drinks
Cuisine American
Servings 1
Calories 164 kcal

Equipment

  • Coffee maker
  • Coffee mugs
  • Glass measuring cup
  • Measuring spoons

As an Amazon Associate I earn from qualifying purchases.

Ingredients
  

  • 6 oz hot brewed coffee
  • 1½ ounces Bailey's Irish Cream Liqueur
  • 2 tablespoons whipped cream

Instructions
 

  • In glass measure, mix hot coffee and Irish Cream Liqueur together.
  • Place 2 tablespoons whipped cream in a coffee mug. Pour coffee mixture over top of the whipped cream.

Nutrition

Calories: 164kcalCarbohydrates: 12gProtein: 2gFat: 8gSaturated Fat: 5gPolyunsaturated Fat: 0.1gMonounsaturated Fat: 1gCholesterol: 7mgSodium: 4mgPotassium: 97mgSugar: 9gVitamin A: 62IUCalcium: 12mgIron: 0.02mgNet Carbohydrates: 12g
Keyword Bailey's Irish Cream Coffee
Tried this recipe?Mention @grumpyshoneybunch or tag #grumpyshoneybunch!

Crispy Shrimp: Easy Pan Fried Recipe

March 2, 2024 by Shelby Law Ruttan 6 Comments

Overhead image of crispy shrimp in a white bowl with a lemon wedge on the side and a small white bowl of cocktail sauce.

When you need an easy recipe for dinner that will satisfy, then be sure to make this family favorite recipe for Crispy Shrimp! Jumbo shrimp are double breaded and pan fried until golden brown and makes an easy dinner with great flavor and texture.

A white bowl full of fried crispy shrimp and a lemon wedge side.
[feast_advanced_jump_to]

❤️ Why You'll Love Crispy Shrimp

Crispy texture: the panko coating fries up nice and golden brown and is nice and crispy!

Less oil: by shallow pan frying, you are using less oil to fry your shrimp recipe.

Simple ingredients: you just need a few basic ingredients for this pan-fried shrimp recipe.

Ingredients: flour, panko, raw shrimp, eggs, lemons, and all purpose seasoning.

🥘 Ingredients

All purpose flour 

All-purpose seasoning: this can be salt and black pepper, seasoned salt, garlic powder, or old bay seasoning.

Jumbo shrimp: choose fresh shrimp that has been peeled and deveined. 

Large eggs 

Panko breadcrumbs 

Oil: use an oil that has a high smoke point such as peanut oil or canola oil.

Lemon wedges 

One bowl with whisked egg, a second bowl with seasoned flour, a third bowl with crispy panko.
Egg wash, Panko, and seasoned flour
Upclose image of raw shrimp in seasoned flour mixture in a glass bowl.
First coat shrimp in flour mixture.
Upclose image of a breaded piece of shrimp in egg wash.
Second, dip flour coated shrimp in egg wash.
Upclose image of raw shrimp in panko breading.
Lastly, coat shrimp in panko.

🔪 How To Make Crispy Shrimp

  1. Heat oil in a large skillet or dutch oven until oil temperature reaches 350 degrees.
  2. Add the flour and seasoning to a small bowl and stir to combine.
  3. In a large bowl, add the eggs and whisk until well combined.
  4. Add the panko crumbs to a third bowl and set aside.
  5. Coat each raw shrimp with the seasoned flour mixture, then dip it in the egg mixture. Make sure the egg covers the flour coated shrimp. 
  6. Gently roll flour coated shrimp in the breadcrumbs. Place on a large baking sheet and repeat with remaining shrimp.
  7. Fry the shrimp in a single layer in hot oil in batches of 5 or 6 shrimp are golden brown and crispy, about 5 minutes. Repeat this process until all of the shrimp have been fried. 
  8. Line another baking sheet with paper towels and set aside. Place the fried shrimp on paper towel lined baking sheet to drain any excess oil. 
Panko breaded raw shrimp on a baking sheet.
Panko coated raw shrimp on baking sheet.
Fried shrimp on a baking sheet.
Fried Crispy Shrimp on baking sheet.

🥄 Equipment

Large skillet or dutch oven

Small bowls

Paper towels

Large baking sheet

Cutting board

Sharp knife

🥫Storage

Refrigerate: store leftover crispy shrimp in an airtight container up to 3 days.

Freeze: store in a freezer safe container up to 3 months.

Reheat: warm leftover fried shrimp on a baking sheet in the oven or air fryer basket at 350 degrees until warmed through.

Upclose overhead image of a white bowl filled with fried crispy shrimp.

📖 Variations

Popcorn shrimp: use smaller shrimp for poppable little bites of crispy fried shrimp - these make great po boy sandwiches!

Cajun shrimp: use cajun seasoning in place of all purpose seasoning.

Cheesy fried shrimp: stir in ¼ cup grated parmesan cheese with the panko coating.

Shrimp tacos: use fried shrimp to fill tacos and top with shredded lettuce, tomato, salsa and sour cream.

A white bowl full of crispy shrimp and a lemon wedge to the side.

💭 Tips

  • To prepare shrimp, rinse well with water and pat dry with a paper towel before coating with batter.
  • For easy prep, buy frozen shrimp that has already been peeled and deveined.

📚 Related Recipes

​Shrimp recipe lovers will want to try these delicious pan-fried Shrimp Cakes with Chipotle Sauce.

Try this delicious Pan-Fried Tofu with Dark Sweet Soy Sauce for your next vegetarian dinner night

Love fried shrimp but are on keto? Then you want to try this Keto Coconut Shrimp recipe.

Zucchini is cut into sticks and coated with an egg batter and panko for delicious Air Fryer Zucchini Fries made in just minutes!

Love pasta and seafood? Then you want to try this Lemon Pepper Shrimp Linguine recipe!

Upclose image of one pieces of panko coated fried crispy shrimp.

🍽 Serve with..

Serve pan fried shrimp with lemon wedges and a side of tartar sauce, cocktail sauce or your favorite dipping sauce.


Don't forget to check out my Amazon storefront for some of my favorite products!

When you make this Crispy Shrimp recipe, please comment below and let me know what you think. I'd love it if you tag me on Instagram @grumpyshoneybunch or #grumpyshoneybunch so I can see your photos!

If you love this recipe, please leave a ⭐⭐⭐⭐⭐ rating

📖 Recipe

Overhead image of crispy shrimp in a white bowl with a lemon wedge on the side and a small white bowl of cocktail sauce.

Crispy Shrimp: Easy Pan Fried Recipe

Shelby Law Ruttan
Everyone loves crispy fried shrimp, and this pan-fried shrimp recipe make frying your favorite seafood easy! Each golden brown piece of shrimp as a crispy panko layer with delicious plump shrimp inside every bite. Excellent with a squeeze of lemon juice or one of your favorite dipping options.
5 from 1 vote
Print FREE recipe card with your email address Pin Recipe Save Go to Collections
Prep Time 10 minutes mins
Cook Time 15 minutes mins
Total Time 25 minutes mins
Course Main Dish
Cuisine American
Servings 6
Calories 440 kcal

Equipment

  • Large skillet or dutch oven
  • Small bowls
  • Paper towels
  • Large baking sheet
  • cutting board
  • Sharp knife

As an Amazon Associate I earn from qualifying purchases.

Ingredients
  

  • ½ cup all-purpose flour
  • 1 tablespoon all-purpose seasoning
  • 1½ pounds Jumbo shrimp , peeled and deveined.
  • 2 large eggs
  • 2 cups panko breadcrumbs
  • 3 cups oil , for frying
  • Lemon wedges , optional

Instructions
 

  • Heat oil in a large skillet or dutch oven until oil temperature reaches 350 degrees.
  • Add the flour and seasoning to a small bowl and stir to combine.
  • In a large bowl, add the eggs and whisk until well combined.
  • Add the panko crumbs to a third bowl and set aside.
  • Coat each raw shrimp with the seasoned flour mixture, then dip it in the egg mixture. Make sure the egg covers the flour coated shrimp.
  • Gently roll flour coated shrimp in the breadcrumbs. Place on a large baking sheet and repeat with remaining shrimp.
  • Fry the shrimp in a single layer in hot oil in batches of 5 or 6 shrimp are golden brown and crispy, about 5 minutes. Repeat this process until all of the shrimp have been fried.
  • Line another baking sheet with paper towels and set aside. Place the fried shrimp on paper towel lined baking sheet to drain any excess oil.

Nutrition

Calories: 440kcalCarbohydrates: 51gProtein: 20gFat: 17gSaturated Fat: 2gPolyunsaturated Fat: 3gMonounsaturated Fat: 7gTrans Fat: 0.05gCholesterol: 215mgSodium: 877mgPotassium: 175mgFiber: 2gSugar: 0.1gVitamin A: 283IUVitamin C: 0.02mgCalcium: 72mgIron: 1mgNet Carbohydrates: 49g
Keyword Crispy Shrimp
Tried this recipe?Mention @grumpyshoneybunch or tag #grumpyshoneybunch!

Lemon Pepper Shrimp Linguine

March 2, 2024 by Shelby Law Ruttan 21 Comments

A white plate with cooked pasta noodles and seasoned cooked shrimp sprinkled with fresh thyme and a lemon wedge on the side.

Fans of shrimp and pasta recipes are going to love this Lemon Pepper Shrimp Linguine recipe! Plump and juicy shrimp is bathed in a buttery lemon pepper sauce and tossed with al dente pasta for a delicious dinner for busy weeknights.

Up close image of Lemon Pepper Shrimp Linguini on a white plate.

❤️ Why you'll love Lemon Pepper Shrimp Linguine

Quick & Easy recipe: with a short cooking time and simple ingredients, this shrimp pasta recipe is ready in under 30 minutes, perfect for busy weeknights.

Shrimp recipe lovers: Lemon pepper shrimp pasta makes a great weeknight dinner and is the perfect recipe for date night!

Versatile: this recipe lends well to adding your own variations with flavor and veggies.

Raw thawed peeled and deveined shrimp with tails removed.
Thawed frozen shrimp with shells and tails removed.

🥘 Ingredients

Large fresh shrimp

Olive oil

Salt

Black pepper

Lemons, for juice and zest

Fresh thyme

Unsalted butter

Dried linguine pasta

Parmesan cheese

Fresh parsley

Lemon cut in half with citrus reamer behind it.

🔪 Instructions

  1. Cook pasta in a large pot of water according to package directions. When done cooking, reserve ¼ cup pasta water, then drain remaining pasta cooking water and set pasta aside in mixing bowl.
  2. While the pasta cooks, in a small bowl, toss shrimp with salt and black pepper to coat.  
  3. Heat a large skillet over medium heat with a small amount of olive oil until hot. 
  4. Carefully add shrimp mixture to hot skillet and cook for 2-3 minutes on each side, until shrimp turn pink. 
  5. Add cooked linguine to the shrimp and using a pair of tongs, toss to combine. Remove from heat and set aside.
  6. Place lemon juice, fresh thyme, and lemon zest in a small saucepan and bring to a boil.  Remove from heat and add the butter, stirring until butter just melts.
  7. Stir the lemon butter mixture and pasta water into the pasta and shrimp mixture.  Toss to coat, sprinkle with 1 teaspoon fresh thyme to garnish and serve with lemon wedges

🥄 Equipment

Large pot

Large skillet

Small saucepan

Small bowl

Tongs

White plate with seafood and pasta.

🥫Storage

Refrigerate: store leftovers in an airtight container up to 3 days.

Reheat: warm leftovers on the stove top with a touch of water or in the microwave until warmed through.

📖 Variations

Spicy Lemon Pepper Shrimp Linguine: sprinkle shrimp mixture with ¼- ½ teaspoon red pepper flakes to add a little spicy heat to the dish.

Garlic Lemon Pepper Shrimp Linguine:  add 3 cloves minced garlic cloves to the shrimp mixture when cooking.

Creamy Lemon Pepper Shrimp: substitute heavy cream for the pasta water for a creamy pasta dish.

Pasta twist: substitute your favorite pasta shapes for the linguine. Dried penne pasta, spiral pasta, or bow tie pasta all work great in this recipe.

A white plate with cooked pasta noodles and seasoned cooked shrimp sprinkled with fresh thyme and a lemon wedge on the side.

💭 Tips

  • Fresh shrimp: buy large fresh shrimp that has already been peeled and deveined for convenience.
  • Frozen shrimp: if using frozen shrimp, thaw before cooking by running under cold water until shrimp are thawed. 

📚 Related Recipes

Pasta lovers will love this Creamy Chicken Linguine, a quick and easy weeknight recipe.

A touch of saffron makes this Shrimp Alfredo Linguine an outstanding recipe that will impress your family and friends.

Looking for a touch of sweet after dinner? These Candied Dates are the perfect bite!

This Pepper-Crusted Sirloin over Warm Farro Spinach Salad makes a great date night recipe.

Make these Date Muffins for your next Sunday morning brunch!

🍽 Serve with..

Serve this lemon butter shrimp pasta with a hearty loaf of Italian bread, cheesy garlic bread, and a green side salad.


Don't forget to check out my Amazon storefront for some of my favorite products!

When you make this shrimp recipe, please comment below and let me know what you think. I'd love it if you tag me on Instagram @grumpyshoneybunch or #grumpyshoneybunch so I can see your photos!

If you love this recipe, please leave a ⭐⭐⭐⭐⭐ rating

📖 Recipe

A white plate with cooked pasta noodles and seasoned cooked shrimp sprinkled with fresh thyme and a lemon wedge on the side.

Lemon Pepper Shrimp Linguine

Shelby Law Ruttan
If you are looking for the perfect creamy lemon shrimp pasta recipe for your next busy weeknight dinner, then you will love this quick and easy recipe packed with buttery lemon pepper flavors that is ready in under 30 minutes.
5 from 1 vote
Print FREE recipe card with your email address Pin Recipe Save Go to Collections
Prep Time 10 minutes mins
Cook Time 10 minutes mins
Total Time 20 minutes mins
Course Main Dish
Cuisine Italian-American
Servings 3
Calories 425 kcal

Equipment

  • Large pot
  • Large skillet
  • Small saucepan
  • Small bowl
  • Tongs

As an Amazon Associate I earn from qualifying purchases.

Ingredients
  

  • 1 pound large shrimp , peeled & deveined
  • ½ teaspoon salt
  • 1½ teaspoon fresh ground pepper
  • 3 tablespoons lemon juice , freshly squeezed
  • 1 medium lemon , zested, then wedged and served alongside dish
  • 2 teaspoons fresh thyme
  • 3 tablespoons unsalted butter
  • 6 ounces dried linguine

Instructions
 

  • Cook pasta in a large pot of water according to package directions. When done cooking, reserve ¼ cup pasta water, then drain remaining pasta cooking water and set pasta aside in mixing bowl.
  • While the pasta cooks, in a small bowl, toss shrimp with salt and black pepper to coat.
  • Heat a large skillet over medium heat with a small amount of olive oil until hot.
  • Carefully add shrimp mixture to hot skillet and cook for 2-3 minutes on each side, until shrimp turn pink.
  • Add cooked linguine to the shrimp and using a pair of tongs, toss to combine. Remove from heat and set aside.
  • Place lemon juice, fresh thyme, and lemon zest in a small saucepan and bring to a boil. Remove from heat and add the butter, stirring until butter just melts.
  • Stir the lemon butter mixture and pasta water into the pasta and shrimp mixture. Toss to coat.
  • Sprinkle with 1 teaspoon fresh thyme and Parmesan cheese (if using) to garnish and serve with lemon wedges.

Nutrition

Calories: 425kcalCarbohydrates: 46gProtein: 28gFat: 14gSaturated Fat: 8gPolyunsaturated Fat: 1gMonounsaturated Fat: 3gTrans Fat: 0.5gCholesterol: 221mgSodium: 1249mgPotassium: 338mgFiber: 2gSugar: 2gVitamin A: 692IUVitamin C: 8mgCalcium: 108mgIron: 1mgNet Carbohydrates: 43g
Keyword Lemon Pepper Shrimp Linguine
Tried this recipe?Mention @grumpyshoneybunch or tag #grumpyshoneybunch!

Slow Cooker Beef Teriyaki - Easy Crockpot Dinner

March 1, 2024 by Shelby Law Ruttan Leave a Comment

Top down view of a bowl of slow cooker beef teriyaki served with white rice and green onion garnish, with a black and white checked napkin and scattered green onion pieces around.

If you need a dependable weeknight meal that brings everyone to the table, this Slow Cooker Beef Teriyaki is it. The beef cooks until tender in a homemade teriyaki sauce, then gets tossed with fresh broccoli the last hour of cooking for a complete family dinner.

Top down view of a bowl of slow cooker beef teriyaki served with white rice and green onion garnish, with a black and white checked napkin and scattered green onion pieces around.

This recipe is a go-to when I need something hearty but hands off. It reminds me of how I used to throw a meal together before rushing out the door to the kids' after school activities. Just like my Air Fryer Chicken and Broccoli, this meal hits the spot without much fuss.

[feast_advanced_jump_to]

Why you'll love Slow Cooker Beef Teriyaki

Easy crock pot dinner: Just add everything to the slow cooker and walk away.

Made with pantry staples: No need to run to the store for complicated ingredients.

Family favorite: Great for busy nights when you want dinner to be filling and flavorful.

Key Ingredients

Flat lay of ingredients, including marinated beef, broccoli, green onions, soy sauce, minced garlic, ground ginger, and cornstarch.

Beef skirt steak or flank steak: These cuts become fork-tender with slow cooking.

Soy sauce: Adds salty, umami flavor to the sauce base.

Brown sugar and Honey: A little sweetness helps balance the savory sauce

Ground ginger and garlic: Classic aromatics for that teriyaki flavor.

Cornstarch: Thickens the sauce to a glossy finish

Broccoli florets: Added in the final hour so they stay bright and tender.

Green onions: For garnish and a fresh bite at the end.

Overhead view of a slow cooker filled with beef teriyaki and broccoli in a simmering sauce.

Storage Tips

Refrigerate: ​Store in an airtight container up to 4 days.

Freezer: Freeze in a sealed container up to 3 months.

Reheat: warm thawed beef teriyaki in the microwave or on the stove top over medium heat until warmed through.

Recipe Variations

Add more veggies: Toss in sliced red bell peppers and onions for more color and flavor.
Make it spicy: A pinch of red pepper flakes adds heat.

Add crunch: Stir in water chestnuts for a crispy texture.

Extreme close up of beef teriyaki with broccoli and green onion on top of rice, showcasing the thick, savory sauce coating the meat.

Top Tips

  • Use teriyaki-marinated steak if you find it pre-marinated in the store.
  • For extra flavor, sear the steak first in a little sesame oil before adding to the slow cooker.
  • Works with stew meat. Just add it to the slow cooker and cook as directed.

Serving with...

Serve this slow cooker beef teriyaki over steamed white or brown rice, or spoon it into a bowl with cauliflower rice for a low carb option.

Close up side view of slow cooker beef teriyaki and broccoli in a white bowl with a rich, glossy sauce and visible green onion slices.

More Slow Cooker Recipes

  • Slow Cooker Baby Back Ribs
  • Slow Cooker Beef Sliders
  • Marry Me Chicken (Slow Cooker Recipe)
  • Slow Cooker Shredded Beef

When you make this recipe, please comment below and let me know what you think. I'd love it if you tag me on Instagram @grumpyshoneybunch or #grumpyshoneybunch so I can see your photos!

If you love this recipe, please leave a ⭐⭐⭐⭐⭐ rating

📖 Recipe

Top down view of a bowl of slow cooker beef teriyaki served with white rice and green onion garnish, with a black and white checked napkin and scattered green onion pieces around.

Slow Cooker Beef Teriyaki with Broccoli

Shelby Law Ruttan
This Slow Cooker Beef Teriyaki is made with thin sliced beef cooked until tender in a sweet and savory teriyaki sauce, then finished with broccoli for a complete and comforting dinner.
5 from 1 vote
Print FREE recipe card with your email address Pin Recipe Save Go to Collections
Prep Time 10 minutes mins
Cook Time 5 hours hrs
Total Time 5 hours hrs 10 minutes mins
Course Main Course
Cuisine Asian
Servings 4
Calories 374 kcal

Equipment

  • Slow cooker
  • cutting board
  • Sharp knife
  • Small bowl
  • Slotted Spoon

As an Amazon Associate I earn from qualifying purchases.

Ingredients
  

  • 1½ lbs teriyaki marinated beef skirt steak
  • ½ cup soy sauce
  • 1 cup water
  • 1 tablespoon brown sugar
  • 1 tablespoon minced garlic
  • 2 teaspoons ginger powder
  • 3 tablespoons honey
  • 2 tablespoons cornstarch
  • 2 cups broccoli
  • ¼ cup green onions , sliced

Instructions
 

  • Place sliced steak into the slow cooker.
  • Add the soy sauce, brown sugar, honey, garlic, and water and stir to combine.
  • Set the slow cooker to high heat setting and cook for 4 hours.
  • Once cooked, remove the steak from the slow cooker with a slotted spoon.
  • In a small bowl, mix the 2 tablespoons of cornstarch with 2 tablespoons water until smooth. Transfer cornstarch slurry to the sauce ingredients and whisk to combine.
  • Return the steak pieces to the slow cooker. Add the broccoli florets, and cook on high for 1 hour.
  • Serve with white or brown rice, and garnish with green onions.

Nutrition

Calories: 374kcalCarbohydrates: 26gProtein: 41gFat: 13gSaturated Fat: 5gPolyunsaturated Fat: 1gMonounsaturated Fat: 5gTrans Fat: 1gCholesterol: 107mgSodium: 1752mgPotassium: 733mgFiber: 2gSugar: 17gVitamin A: 296IUVitamin C: 40mgCalcium: 47mgIron: 4mgNet Carbohydrates: 24g
Keyword Slow Cooker Beef Teriyaki
Tried this recipe?Mention @grumpyshoneybunch or tag #grumpyshoneybunch!

Jalapeño Cornbread: Easy Skillet Recipe

February 26, 2024 by Shelby Law Ruttan 11 Comments

Overhead image of jalapeno cornbread baked in a cast iron skillet with red onion, jalapeno, and halved cherry tomatoes baked on top.

This Jalapeño Cornbread is golden and crisp on the outside, soft and moist on the inside, and packed with bold flavors. Topped with jalapeño slices, red onion, cherry tomatoes, corn kernels, and melty cheese, it’s just as beautiful as it is delicious.

Overhead image of cheesy Skillet Jalapeño Cornbread topped with slices of fresh jalapeño, onion and heirloom cherry tomatoes.

Inspired by the flavors in my Mexican Street Corn Salad, this recipe brings together sweet, savory, and spicy elements in every bite. It’s perfect as a side for chili, barbecue, or even a simple snack on its own.

[feast_advanced_jump_to]

Why You’ll Love This Recipe

Crispy edges, soft center – Thanks to the cast iron skillet, you get the best texture contrast.

Packed with flavor – Sweet corn, spicy jalapeños, tangy red onion, and creamy cheese make every bite exciting.

Gorgeous presentation – The vibrant toppings turn a simple cornbread into a showstopper.

Jalapeno Cornbread Ingredients

Ingredient shot: cornmeal, buttermilk, fresh corn, jalapeno slices, red onion slices, and halved heirloom tomatoes with a cast iron skillet.

Substitutions

Dairy-free – Use plant-based milk and vegan cheese to make it dairy-free.

Flour swap – Use whole white wheat flour instead of all-purpose for a heartier texture.

Cheese options – Swap cheddar for pepper jack, mozzarella, or cotija.

Variations

Bacon & Jalapeño – Add crispy bacon bits to the top for a smoky, savory boost.

Honey Butter Cornbread – Drizzle with honey butter for a touch of sweetness. Or, try hot honey (affiliate link) for extra sweet heat!

Extra Spicy – Add diced serrano peppers or a pinch of cayenne.

Partially baked batter with veggie topping in a cast iron skillet.

Top Tips for the Best Jalapeño Cornbread

Preheat the skillet – A hot skillet ensures crispy edges.

Don’t overmix – Mix until just combined to keep the cornbread tender.

Layer toppings strategically – Press some into the batter and leave some on top for the best look and texture.

Baked Cheesy Jalapeno Cornbread in a cast iron skillet with one slice removed.

Storage & Reheating

Store – Keep leftovers in an airtight container at room temperature for up to 2 days or in the fridge for up to 5 days.

Freeze – Wrap slices individually and freeze for up to 3 months. Thaw at room temp or warm in the oven.

Reheat – Warm in a 300°F oven for 10 minutes or microwave for 20-30 seconds.

Once slice of Jalapeno Cornbread on a black plate.

Serving Suggestions

With chili or beef stew for a hearty meal.

As a BBQ side alongside ribs or grilled chicken.

Topped with pulled pork or BBQ chicken nachos for a hearty open-faced sandwich.

With garlic scrambled eggs for a savory breakfast twist

FAQ's

Can I use a different type of skillet?

While a cast iron skillet is recommended for its even heat distribution and rustic presentation, you can use a square baking dish as an alternative.

Related Recipes

  • Upclose image of maple cornbread muffins on a white plate.
    Maple Cornbread Muffins
  • Featured image for Air Fryer Corn on the Cob.
    Air Fryer Corn on the Cob
  • Jalapeno Creamed Corn with Sweet Chili Shrimp.
    Jalapeno Creamed Corn with Chai Sweet Chili Shrimp
  • Chickpea Patties topped with sour cream, salsa, and fresh thyme sprig.
    Chickpea and Corn Patties

When you make this Jalapeno Cornbread recipe, please comment below and let me know what you think. I'd love it if you tag me on Instagram @grumpyshoneybunch or #grumpyshoneybunch so I can see your photos!

If you love this recipe, please leave a ⭐⭐⭐⭐⭐ rating

📖 Recipe

Overhead image of jalapeno cornbread baked in a cast iron skillet with red onion, jalapeno, and halved cherry tomatoes baked on top.

Jalapeño Cornbread: Easy Skillet Recipe

Shelby Law Ruttan
Baked in a cast iron skillet, this jalapeño cornbread is crispy outside, soft inside, and packed with cheese, corn, and spicy jalapeños.
5 from 1 vote
Print FREE recipe card with your email address Pin Recipe Save Go to Collections
Prep Time 15 minutes mins
Cook Time 30 minutes mins
Total Time 45 minutes mins
Course Side Dish
Cuisine American
Servings 12
Calories 295 kcal

Equipment

  • 2 Large mixing bowl
  • Cast Iron Skillet
  • Wooden spoon
  • cutting board
  • Sharp knife

As an Amazon Associate I earn from qualifying purchases.

Ingredients
  

  • 2 cups cornmeal
  • 1 cup all purpose flour
  • 1½ teaspoons salt
  • 1 tablespoon baking powder
  • 3 tablespoons sugar
  • 2½ cups buttermilk
  • 2 large eggs
  • 6 tablespoons unsalted butter , melted
  • 1 cup shredded cheddar-gruyere cheese
  • 1 jalapeno , sliced into 9 thin slices, dicing the remaining jalapeno
  • ¼ cup thinly sliced red onion
  • 1 cup baby heirloom tomatoes , sliced in half
  • ⅔ cup fresh corn kernels

Instructions
 

  • Pre-heat oven to 425 degrees.
  • Place 1 tablespoon of olive oil in cast iron skillet and place in preheated oven for 10 minutes.
  • In a large bowl, whisk together flour, salt, baking powder, and brown sugar. Set aside.
  • In a separate bowl, whisk together buttermilk, eggs, and melted butter.
  • Pour wet ingredients over dry ingredients and stir until just combined. Add ½ cup of sharp cheddar cheese, diced jalapeno, and ⅓ cup corn.
  • Remove skillet from oven and swirl to coat bottom of pan with hot oil. Pour cornbread batter in hot skillet.
  • Place skillet in oven and bake for 10 minutes.
  • Remove cornbread from oven and top with tomato halves, remaining corn, cheese, and ¼ cup red onion.
  • Return cornbread to oven and bake for 20 minutes, until cornbread leaves no wet batter on toothpick when inserted in center of bread and top of cornbread is lightly golden brown.
  • Remove from oven and cool on wire rack. Serve warm.

Notes

Substitutions

Dairy-free – Use plant-based milk and vegan cheese to make it dairy-free.
Flour swap – Use whole white wheat flour instead of all-purpose for a heartier texture.
Cheese options – Swap cheddar for pepper jack, mozzarella, or cotija.

Variations

Bacon & Jalapeño – Add crispy bacon bits to the top for a smoky, savory boost.
Honey Butter Cornbread – Drizzle with honey butter for a touch of sweetness. Or, try hot honey (affiliate link) for extra sweet heat!
Extra Spicy – Add diced serrano peppers or a pinch of cayenne.

Nutrition

Calories: 295kcalCarbohydrates: 36gProtein: 9gFat: 13gSaturated Fat: 7gPolyunsaturated Fat: 1gMonounsaturated Fat: 4gTrans Fat: 0.2gCholesterol: 61mgSodium: 527mgPotassium: 243mgFiber: 3gSugar: 7gVitamin A: 486IUVitamin C: 5mgCalcium: 195mgIron: 2mgNet Carbohydrates: 33g
Keyword Jalapeno Cornbread
Tried this recipe?Mention @grumpyshoneybunch or tag #grumpyshoneybunch!

Red Velvet Bundt Cake with Cream Cheese Glaze

February 22, 2024 by Shelby Law Ruttan Leave a Comment

A square image with a slice of red velvet bundt cake topped with cream cheese icing on a cake serve.

This moist Red Velvet Bundt Cake Recipe is a homemade chocolate cake with beautiful red hue and delicious tender crumb topped with a thick cream cheese glaze piped over top.  This copycat recipe for the popular Nothing Bundt Cake brand is perfect for Valentine's Day, birthdays, church potlucks or summer picnics.

Hero image of one slice of red velvet bundt cake on a silver cake servier.

❤️ Why you'll love it

Moist cake: the combination of oil, buttermilk, and vinegar guarantees a velvety, melt-in-your-mouth texture making it the best red velvet cake recipe.

Showstopper Appearance: This chocolate bundt cake is not just a treat for the taste buds but also a feast for the eyes. The deep red color and intricate bundt shape make it a showstopper at any gathering.

Cream Cheese Frosting Bliss: The decadent cream cheese frosting adds a luscious finish, perfectly complementing the subtle chocolate notes of the cake.

Ingredients for Red Velvet Bundt Cake.

🥘 Ingredients for Red Velvet Bundt Cake

All-purpose flour

Baking soda

Sea salt

Unsalted butter

Granulated sugar

Vegetable oil

Large eggs

Unsweetened cocoa powder

Pure vanilla extract

Red gel food coloring: I prefer a gel food coloring over liquid food coloring.

Low fat buttermilk

White vinegar

Cream cheese

Powdered sugar

Whole milk

Cooking spray

Cream cheese frosting ingredients in a white bowl.
Creamed sugar and butter in a mixing bowl.
Mixing together all the cake wet ingredients.
Adding eggs to red velvet cake batter.

Why these ingredients:

  1. Buttermilk and Vinegar: The tangy combination of buttermilk and white vinegar not only adds a delightful twist to the flavor but also contributes to the cake's moist and tender crumb.
  2. Vegetable oil: Unlike butter alone, the addition of oil ensures a supremely moist texture, making each bite of this bundt cake an indulgent experience.
  3. Cocoa Powder and Red Food Coloring: These ingredients collaborate to give the cake its iconic red hue. The cocoa powder intensifies the chocolate flavor, creating a perfect balance with the vibrant red color.
Cake batter in a white mixing bowl with dry and wet ingredients being mixed in.
Red Velvet cake batter in a white mixing bowl.
Cake batter in bundt cake pan.
Overhead image of baked bundt cake in pan.

🔪 Instructions

For the Cake

  1. Preheat the oven to 350°F. Thoroughly spray bundt pan with cooking spray.
  2. In a medium bowl, whisk together the all-purpose flour, baking soda, and salt; set aside. 
  3. In a large bowl, using an electric mixer on medium speed, combine butter and sugar until creamy. 
  4. Add the vegetable oil, unsweetened cocoa powder, vanilla extract, food gel, and eggs, mixing until well combined. 
  5. Gradually add half of the dry ingredients, the wet ingredients, followed by buttermilk and vinegar. 
  6. Add the remaining flour mixture to the batter and mix until well combined. 
  7. Pour the cake batter into the prepared pan and bake for 50 to 60 minutes, until a skewer inserted into the center comes out clean. 
  8. Remove the bundt cake from the oven and cool on a wire rack for 15 minutes.  
  9. Remove the cake from the pan by placing the wire rack on top of the baked cake and flipping it over to gently release cake from pan using a flexible spatula if necessary to loosen the cake from on the sides of the pan. 
  10. Let the cake cool completely before finishing with frosting.

For the Cream Cheese Frosting

  1. In a large bowl using an electric mixer on medium speed, whip the butter, cream cheese, until a velvety consistency forms. If it appears too thick, adjust its consistency by incorporating a dash of milk, as necessary, until the desired level of creaminess is achieved.
  2. Add the frosting to a piping bag, cut the tip to your desired size and pipe the ridges of the cake. Smooth some frosting on the inside hole of the cake. 
Overhead image of Red Velvet Bund Cake with one slice cut and being removed from the cake platter.

🥄 Equipment

Bundt Cake Pan

Large mixing bowl

Medium bowl

Electric mixer

Cooling rack

Piping bag

🥫Storage

Room temperature: Store cake in an airtight container up to 4 days.

Freezer: for longer storage, store cake in a freezer safe container up to 3 months.

📖 Variations

Mini Bundt Cakes: Divide the batter into mini bundt pans for individual servings.

Double chocolate: Add 1 cups mini chocolate chips to the batter for a richer chocolate flavor.

Side view of Baked Red Velvet Bundt Cake on a cake plate.

💭 Tips

Espresso punch: For an extra kick, add a hint of espresso powder to intensify the chocolate flavor.

Easy mixing: make sure to use room temperature ingredients ensure a smoother batter and better incorporation of flavors.

🙋 FAQ's

Can I use natural food coloring instead of the traditional red food coloring?

Absolutely! Keep in mind that it might result in a slightly different shade, but the flavor will remain fantastic.

Can I make this chocolate bundt cake ahead of time?

Yes! This cake actually tends to get even better as it sits. Prepare it a day in advance and let the flavors mingle.

📚 Related Recipes

Try these Red Velvet Cupcakes for a delicious and portable dessert.

Red Velvet Brownies are studded with white chocolate and make a delicious presentation.

If you are looking for the perfect Easter cake, try this Best Carrot Bundt Cake with Cream Cheese Frosting.

This Chocolate Chip Bundt Cake is light, spongy and studded with mini chocolate chips and a chocolate glaze.

Coffee lovers will love this Chocolate Kahlua Bundt Cake.

Are you a German Chocolate Cake fan? Try this German Chocolate Bundt Cake with a coconut pecan filling!

If you love red velvet recipes, you will want to try these Red Velvet Peppermint Thumbprint cookies!

🍽 Serve Red Velvet Bundt Cake With..

Pair slices of this red velvet delight with a scoop of vanilla ice cream or a dollop of whipped cream.


Don't forget to check out my Amazon storefront for some of my favorite products!

When you make this Red Velvet Bundt Cake recipe, please comment below and let me know what you think. I'd love it if you tag me on Instagram @grumpyshoneybunch or #grumpyshoneybunch so I can see your photos!

If you love this recipe, please leave a ⭐⭐⭐⭐⭐ rating

Whole Red Velvet Bundt Cake on a cake platter with once slice being removed with a cake server.

🍽 Serve with..

Pair slices of this red velvet delight with a scoop of vanilla ice cream or a dollop of whipped cream.


📖 Recipe

A square image with a slice of red velvet bundt cake topped with cream cheese icing on a cake serve.

Red Velvet Bundt Cake

Shelby Law Ruttan
This Red Velvet Bundt Cake recipe is a moist, homemade cake packed with chocolate flavor with a gorgeous red hue. It can be served with or without a chick spread of delicious cream cheese frosting.
5 from 1 vote
Print FREE recipe card with your email address Pin Recipe Save Go to Collections
Prep Time 20 minutes mins
Cook Time 50 minutes mins
Total Time 1 hour hr 10 minutes mins
Course Desserts
Cuisine American
Servings 16
Calories 341 kcal

Equipment

  • Bundt cake pan
  • Large mixing bowl
  • Medium bowl
  • Electric mixer
  • Cooling Rack
  • Piping bag

As an Amazon Associate I earn from qualifying purchases.

Ingredients
  

For the Cake

  • 2½ cups all-purpose flour (300 grams)
  • 1 teaspoon baking soda
  • 1 teaspoon fine sea salt
  • 6 tablespoons unsalted butter , softened
  • 1¾ cup granulated sugar
  • ⅓ cup vegetable oil
  • 2 large eggs , room temperature
  • 3 tablespoons cocoa powder
  • 2 teaspoon vanilla extract
  • 1 tablespoon red food dye
  • ¾ cup buttermilk
  • 1 teaspoon white vinegar

For the Frosting

  • 6 tablespoonz unsalted butter , softened
  • 8 tablespoons cream cheese
  • 2 cups powdered sugar
  • 1 tablespoon milk

Instructions
 

For the Cake

  • Preheat the oven to 350°F. Thoroughly spray bundt pan with cooking spray.
  • In a medium bowl, whisk together the all-purpose flour, baking soda, and salt; set aside.
  • In a large bowl, using an electric mixer on medium speed, combine butter and sugar until creamy.
  • Add the vegetable oil, unsweetened cocoa powder, vanilla extract, food gel, and eggs, mixing until well combined.
  • Gradually add half of the dry ingredients, the wet ingredients, followed by buttermilk and vinegar.
  • Add the remaining flour mixture to the batter and mix until well combined.
  • Pour the cake batter into the prepared pan and bake for 50 to 60 minutes, until a skewer inserted into the center comes out clean.
  • Remove the bundt cake from the oven and cool on a wire rack for 15 minutes.
  • Remove the cake from the pan by placing the wire rack on top of the baked cake and flipping it over to gently release cake from pan using a flexible spatula if necessary to loosen the cake from on the sides of the pan.
  • Let the cake cool completely before finishing with frosting.

For the Cream Cheese Frosting

  • In a large bowl using an electric mixer on medium speed, whip the butter, cream cheese, until a velvety consistency forms. If it appears too thick, adjust its consistency by incorporating a dash of milk, as necessary, until the desired level of creaminess is achieved.
  • Add the frosting to a piping bag, cut the tip to your desired size and pipe the ridges of the cake. Smooth some frosting on the inside hole of the cake.

Nutrition

Calories: 341kcalCarbohydrates: 53gProtein: 4gFat: 13gSaturated Fat: 5gPolyunsaturated Fat: 2gMonounsaturated Fat: 5gTrans Fat: 0.2gCholesterol: 44mgSodium: 259mgPotassium: 73mgFiber: 1gSugar: 38gVitamin A: 292IUCalcium: 31mgIron: 1mgNet Carbohydrates: 52g
Keyword Red Velvet Bundt Cake
Tried this recipe?Mention @grumpyshoneybunch or tag #grumpyshoneybunch!

Easy Dinner Rolls: The Best Beginner Roll Recipe

February 15, 2024 by Shelby Law Ruttan Leave a Comment

Featured image for Easy Dinner rolls.

If you are looking for an easy recipe for some homemade dinner rolls to serve at your next meal, then this Easy Dinner Rolls recipe is the answer. Baked to golden brown perfection, these rolls are a perfect addition to your table for any special occasion or as a part of weeknight dinner.

Baked Easy Dinner Rolls on cooling rack.

❤️ Why you'll love it

Easy homemade rolls: these soft dinner rolls are a great recipe for a someone making bread for the first time and don't require a lot of bread-baking skills.

Simple ingredients: you need just the basic ingredients to make these buttery dinner rolls!

Quick bread solution: this easy recipe is ready fairly quickly and delicious warm out of the oven!

🥘 Ingredients

Granulated sugar: sugar helps the yeast grow and aids in the rising of the dough. You can substitute honey or maple syrup if desired.

Active dry yeast: can use instant yeast, rise time may be a little quicker. 

Warm water: can use warmed whole milk for a richer roll.

Unsalted butter, melted

All purpose flour: bread flour can be used, however due to its higher protein content you may need to adjust the liquid or use less flour.

Salt
Cooking spray

Flour in a measuring cup, sugar, yeast, salt, and butter.

🔪 How to Make Easy Dinner Rolls

  1. In a small bowl, dissolve sugar in warm water. Sprinkle with yeast and stir to combine. Let stand 3 minutes. Stir in melted butter.
  2. In a large bowl, combine 1-½ cups of flour and salt using a hand whisk. 
  3. Add yeast mixture to flour mixture and stir with a wooden spoon until a soft dough forms. Turn roll dough out onto a lightly floured surface and knead until smooth and elastic (about 4 minutes). 
  4. Knead in remaining flour as needed, 1 tablespoon at a time, kneading into a smooth ball and dough is no longer sticky. 
  5. Coat a large bowl with cooking spray or olive oil. Place dough in bowl and turn to coat. Cover bowl with plastic wrap and let dough rise in warm place for 1 hour for the first rise, until dough has doubled in size. 
  6. Deflate dough, then cover with towel and let rest 5 minutes.
  7. Remove dough from Divide dough into 12 equal pieces, shaping into dough balls. Place 1 dough ball in each of 12 muffin cups coated with cooking spray. Cover and let rise 20 minutes or until doubled in size.
  8. Preheat oven to 400 degrees. Bake for 13 minutes, until golden brown. Remove from oven and cool on wire rack for 10 minutes. Remove from pan and serve warm.
Dough balls on floured board.

🥄 Equipment

Large mixing bowl

Small bowl

Wooden spoon

12 cup muffin pan

Wire rack

🥫Storage

Room temperature: store dinner rolls in an airtight container up to 4 days.

Freezer: store in an airtight freezer bag up to 3 months.

Reheat: warm dinner rolls in an air fryer or oven at 350 degrees until warmed through.

Featured image for Easy Dinner rolls.

📖 Variations

Herb rolls: Knead some of your favorite fresh herbs into the roll dough to infuse some aromatic flavors into the bread dough.

💭 Tips

  • For a richer dinner roll, use warm milk in place of warm water.
  • Use a square baking pan instead of a muffin pan.
  • Use a food scale for a precise sizing of each dinner roll.

📚 Related Recipes

Fans of sweet potatoes will love the slight sweetness and golden color of these Sweet Potato Rolls.

A bread machine can take the work of kneading your dough and make it a simple task! Try this Italian Bread in a Bread Machine recipe the next time you make a loaf!

Butternut Squash Rolls are another beautiful, soft, and fluffy dinner roll recipe!

Looking for a dinner roll similar to the flavor of Hawaiian Sweet Rolls? Then you must try this Homemade Sweet Dinner Roll recipe!

🍽 Serve with..

Serve this easy dinner roll recipe warm with butter. These rolls are great for every day or any holiday meal.


When you make this recipe, please comment below and let me know what you think. I'd love it if you tag me on Instagram @grumpyshoneybunch or #grumpyshoneybunch so I can see your photos!

If you love this recipe, please leave a ⭐⭐⭐⭐⭐ rating

📖 Recipe

Featured image for Easy Dinner rolls.

Easy Dinner Rolls: The Best Beginner Roll Recipe

Shelby Law Ruttan
 Easy Dinner Rolls make a great addition to your weekly menu or holiday table. These fluffy rolls are delicious served warm with butter or any of your favorite bread toppings.
5 from 1 vote
Print FREE recipe card with your email address Pin Recipe Save Go to Collections
Cook Time 13 minutes mins
Total Time 13 minutes mins
Course Breads
Cuisine American
Servings 12
Calories 101 kcal

As an Amazon Associate I earn from qualifying purchases.

Ingredients
  

  • 2 tablespoons granulated sugar
  • 2½ teaspoons active dry yeast
  • ⅔ cup warm water (100 – 110 degrees)
  • 3 tablespoons butter , melted
  • 1¾ cups all purpose flour divided
  • ½ teaspoon salt
  • cooking spray

Instructions
 

  • In a small bowl, dissolve sugar in warm water. Sprinkle with yeast and stir to combine. Let stand 3 minutes. Stir in melted butter.
  • In a large bowl, combine 1-½ cups of flour and salt using a hand whisk.
  • Add yeast mixture to flour mixture and stir with a wooden spoon until a soft dough forms. Turn roll dough out onto a lightly floured surface and knead until smooth and elastic (about 4 minutes).
  • Knead in remaining flour as needed, 1 tablespoon at a time, kneading into a smooth ball and dough is no longer sticky.
  • Coat a large bowl with cooking spray or olive oil. Place dough in bowl and turn to coat. Cover bowl with plastic wrap and let dough rise in warm place for 1 hour for the first rise, until dough has doubled in size.
  • Deflate dough, then cover with towel and let rest 5 minutes.
  • Remove dough from Divide dough into 12 equal pieces, shaping into dough balls. Place 1 dough ball in each of 12 muffin cups coated with cooking spray. Cover and let rise 20 minutes or until doubled in size.
  • Preheat oven to 400 degrees. Bake for 13 minutes, until golden brown. Remove from oven and cool on wire rack for 10 minutes. Remove from pan and serve warm.

Nutrition

Calories: 101kcalCarbohydrates: 16gProtein: 2gFat: 3gSaturated Fat: 2gPolyunsaturated Fat: 0.2gMonounsaturated Fat: 1gTrans Fat: 0.1gCholesterol: 8mgSodium: 121mgPotassium: 27mgFiber: 1gSugar: 2gVitamin A: 87IUVitamin C: 0.002mgCalcium: 4mgIron: 1mgNet Carbohydrates: 16g
Keyword Easy Dinner Rolls
Tried this recipe?Mention @grumpyshoneybunch or tag #grumpyshoneybunch!

Easy Venison Sloppy Joes with Homemade Joe Sauce

February 13, 2024 by Shelby Law Ruttan Leave a Comment

Venison Sloppy Joes served on an onion hamburger bun topped with homemade coleslaw.

This Venison Sloppy Joes recipe is a wild game meat take on the classic American weeknight meal made with ground beef. Simmered in a , slightly sweet and spiced homemade sloppy joe sauce, this easy dinner is a great recipe to make on busy weeknights.

Venison Sloppy Joes served on an onion hamburger bun topped with homemade coleslaw.

❤️ Why You'll Love Venison Sloppy Joes

Wild game recipes: this is the perfect recipe for ground venison and sloppy joe fans alike!

Homemade sloppy joe sauce: the flavor of this sloppy joe sauce is deep and it is far better for you than opening a an of manwich!

Nutritious meal: ground venison is naturally lean, making this a low fat and low calorie option for those on a low calorie diet.

🥘 Ingredients

White onion

Red bell pepper: feel free to use a green bell pepper if preferred

Fresh garlic cloves

Olive oil

Ground venison

Chili powder

Cumin seed - crushed

Cinnamon

Salt

Black pepper

Tomato sauce

Worcestershire sauce

Brown sugar

Ketchup

Hamburger buns

Breaking ground meat down with a meat masher.
Using a meat masher helps break the ground meat down into perfect crumbles.

🔪 How to Make Venison Sloppy Joes

  1. In a large skillet over medium-high heat, saute onions, peppers and garlic in olive oil for 2 minutes, until softened. Add ground venison and cook chopping with a meat chopper to break the meat up, for 7 minutes, til ground meat is no longer pink. 
  2. Add crushed cumin seed, chili powder, cinnamon and salt to the venison and stir to combine. Reduce to medium heat and cook for 2 minutes to blend spices. 
  3. Stir tomato sauce, brown sugar, ketchup, and water into the meat mixture. Cook, stirring, over low heat for 5 minutes, until venison mixture thickens.

🥄 Equipment

Large skillet: use a large deep skillet or a large pot if needed.

Meat masher

Cutting board

Sharp knife

🥫Storage

Refrigerate: store leftovers in an airtight container in the refrigerator for up to three days.

Reheat: in a skillet or microwave and serve over fresh buns, rice, or even on nachos.

📖 Variations

Sweet and Smoky Sloppy Does: use smoked paprika or cayenne pepper for a sweet and spicy twist.

Ground meat swap out: swap ground turkey, chicken, or beef for the ground venison.

​Zingy Sloppy Joes: add a tablespoon of ground yellow mustard to the sauce.

Venison sloppy joe pin.

💭 Tips

Thicker sauce: if the sauce is too thin for you, add a tablespoon or two of tomato paste to help thicken it up some.

📚 Related Recipes

Want to skip the ketchup? Try this Sloppy Joe Recipe without Ketchup.

Low carb and made with ground veal, these Sloppy Joe Stuffed Biscuits are a new family favorite!

This Butternut Steak Rice Bowl is a healthy recipe that is packed with flavor.

This recipe for Venison in Mushroom Gravy served over egg noodles is delicious wild game comfort food!

Try this easy oven baked recipe for homemade Venison Meatballs!

🍽 Serve with..

Serve place sloppy joes on a hamburger bun topped with homemade coleslaw or pickled red onion and any of your favorite sides.


Don't forget to check out my Amazon storefront for some of my favorite products!

When you make this homemade venison sloppy joe recipe, please comment below and let me know what you think. I'd love it if you tag me on Instagram @grumpyshoneybunch or #grumpyshoneybunch so I can see your photos!

If you love this recipe, please leave a ⭐⭐⭐⭐⭐ rating

📖 Recipe

Venison Sloppy Joes served on an onion hamburger bun topped with homemade coleslaw.

Easy Venison Sloppy Joes with Homemade Joe Sauce

Shelby Law Ruttan
This recipe for homemade sloppy joes has the perfect blend of ground venison, aromatic spices and a touch of sweet for a wild take on the traditional sloppy joe recipe.
5 from 1 vote
Print FREE recipe card with your email address Pin Recipe Save Go to Collections
Prep Time 10 minutes mins
Cook Time 20 minutes mins
Total Time 30 minutes mins
Course Main Dish
Cuisine American
Servings 4
Calories 502 kcal

Equipment

  • Large skillet
  • Meat masher
  • cutting board
  • Sharp knife

As an Amazon Associate I earn from qualifying purchases.

Ingredients
  

  • ½ onion chopped
  • ½ red bell pepper chopped
  • 2 garlic cloves minced
  • 2 tablespoon olive oiil
  • 1 pound ground venison
  • 1 tablespoon chili powder
  • 1 teaspoon cumin seed , crushed
  • ⅛ teaspoon cinnamon
  • 1 teaspoon salt
  • 8 ounce tomato sauce
  • 1 teaspoon brown sugar
  • ¾ cup ketchup
  • ⅓ cup water
  • 6 hamburger buns

Instructions
 

  • In a large skillet over medium-high heat, saute onions, peppers and garlic in olive oil for 2 minutes, until softened. Add ground venison and cook chopping with a meat chopper to break the meat up, for 7 minutes, til ground meat is no longer pink.
  • Add crushed cumin seed, chili powder, cinnamon and salt to the venison and stir to combine. Reduce to medium heat and cook for 2 minutes to blend spices.
  • Stir tomato sauce, brown sugar, ketchup, and water into the meat mixture. Cook, stirring, over low heat for 5 minutes, until venison mixture thickens.

Nutrition

Calories: 502kcalCarbohydrates: 53gProtein: 33gFat: 18gSaturated Fat: 5gPolyunsaturated Fat: 3gMonounsaturated Fat: 7gCholesterol: 91mgSodium: 1698mgPotassium: 855mgFiber: 4gSugar: 19gVitamin A: 1543IUVitamin C: 27mgCalcium: 141mgIron: 7mgNet Carbohydrates: 49g
Keyword Venison Sloppy Joes
Tried this recipe?Mention @grumpyshoneybunch or tag #grumpyshoneybunch!

Orange Blueberry Muffins

February 12, 2024 by Shelby Law Ruttan 40 Comments

Featured image for Orange Blueberry Muffins

These Orange Blueberry Muffins are a delicious way to enjoy the combination of juicy citrus and plump blueberries! These homemade muffins are easy to make and make a great addition to breakfast or delicious snack with a hot cup of coffee or tea.

Featured image for Orange Blueberry Muffins
[feast_advanced_jump_to]

❤️ Why you'll love it

Domed muffin top: these blueberry orange muffins have a perfectly domed top sprinkled with sugar crystals.

Moist and tender: these are the perfect muffins with a moist and tender crumb and a delicious sugar sprinkle on top of the muffins.

Healthy muffins: sweetened with honey and a little sugar, these muffins are not only delicious but healthier for you!

🥘 Ingredients

Fresh Orange:  orange zest and juice adds a punch of citrusy aroma, while the juice imparts a refreshing tanginess, making your muffins irresistibly flavorful.

Buttermilk: contributes to the muffins' tenderness and moistness, creating a texture that's simply heavenly.

Large eggs

Honey: aids in sweetening the muffins and brings a subtle depth of flavor that pairs wonderfully with the orange and blueberry combo.

Unsalted butter 

Granulated sugar

All-purpose flour

Baking powder

Baking soda

Salt

Fresh blueberries

Decorating sugar for topping (optional)

Overhead image of baked muffin with decorating sugar baked on top.

🔪 Instructions

  1. Preheat oven to 400 degrees F. Line 12-cup muffin cups with paper liners and set aside. 
  2. Pour the freshly squeezed orange juice into a 1-cup measuring cup and pour in enough buttermilk to make 1 cup of liquid. 
  3. Add the juice and buttermilk mixture to a large bowl and whisk in the eggs, honey and melted butter.
  4. In a medium bowl, rub the sugar and orange zest together with your fingertips until the sugar is moist and the fragrance of orange strong. 
  5. In another large bowl, whisk together the flour, baking powder, baking soda, and salt. Pour the liquid ingredients over the dry ingredients and, with a rubber spatula, quickly stir to blend until batter is just combined.
  6. Fold blueberries into the muffin batter. Divide the batter evenly among the 12 muffin cups.
  7. Top muffins with decorating sugar and bake in preheated oven for 22 to 25 minutes. 
  8. When fully baked, the tops of the muffins will be golden brown and springy to the touch and a toothpick inserted into the center of the muffins will come out clean.
  9. Transfer muffins to a wire rack and cool for 5 minutes before carefully removing each muffin from the pan to cool completely.

🥄 Equipment

12-cup muffin pan - you can use a regular pan with paper liners or use a silicone muffin pan, which needs neither greasing nor paper cups.

Large mixing bowl

Small bowl

Medium bowl

Hand whisk

Rubber spatula

Wire rack

Orange Blueberry Muffin broken in half to show the inside of the muffin.

🥫Storage

Store this orange muffins recipe in an airtight container at room temperature for up to three days or in the refrigerator for up to one week. 

To reheat muffins, warm for 7-10 seconds the microwave or a few minutes in a preheated oven or air fyer will restore that freshly baked goodness.

📖 Variations

Berry Pecan Muffins: try adding a handful of chopped roasted pecans for some added crunch.

Mixed Berry Muffins: swap out the blueberries for raspberries, blackberries, or strawberries for a different berry twist.

💭 Top Tip

Even baking: place the oven rack in the middle of oven for overall even baking and browning.

Buttermilk substitute: make your own buttermilk by adding a tablespoon of lemon juice or white vinegar in a measuring cup and then filled it to ¾ cup with 1% milk.

🙋 FAQ's

Can I use frozen blueberries?

Yes, just make sure to fold them into the batter while they're still frozen to prevent them from bleeding too much.

Can I use orange extract instead of fresh juice?

Yes, you can use all milk in place of the orange juice and add ½ teaspoon orange extract to the muffin batter.

📚 Related Recipes

Fans of Cranberry and orange flavor will love these Cranberry Orange Sweet Rolls for your next weekend brunch.

Try these Cranberry Chocolate Chip Muffins for a citrus and chocolate packed snack.

Soft Pineapple Cookies with an Orange Glaze are a great way to enjoy an afternoon coffee or tea!

Shortbread lovers will love these crisp and buttery Cranberry Orange Shortbread Cookies!

🍽 Serve with..

Serve Orange Blueberry muffins warm with a dollop of whipped cream for a delightful dessert or enjoy them alongside your morning coffee or tea for a perfect start to the day.


Don't forget to check out my Amazon storefront for some of my favorite products!

When you make this recipe, please comment below and let me know what you think. I'd love it if you tag me on Instagram @grumpyshoneybunch or #grumpyshoneybunch so I can see your photos!

If you love this recipe, please leave a ⭐⭐⭐⭐⭐ rating

📖 Recipe

Featured image for Orange Blueberry Muffins

Orange Blueberry Muffins

Shelby Law Ruttan
These Orange Blueberry Muffins are moist and tender, bursting with orange flavor and fresh sweet blueberries, the perfect compliment of flavors to start your morning off.
No ratings yet
Print FREE recipe card with your email address Pin Recipe Save Go to Collections
Prep Time 10 minutes mins
Cook Time 20 minutes mins
Total Time 30 minutes mins
Course Breakfast & Brunch
Cuisine American
Servings 12
Calories 215 kcal

Equipment

  • Muffin pan
  • Large bowl
  • Small bowl
  • Medium bowl
  • Hand whisk
  • rubber spatula
  • Wire rack
  • Muffin liners

As an Amazon Associate I earn from qualifying purchases.

Ingredients
  

  • 1 orange , juiced and zested
  • ¾ cup buttermilk
  • 2 large eggs
  • 3 tablespoons honey
  • ½ cup unsalted butter , melted and cooled
  • ⅓ cup sugar
  • 2 cups all-purpose flour
  • 2½ teaspoons baking powder
  • ¼ teaspoon baking soda
  • ¼ teaspoon salt
  • 1 cup fresh blueberries
  • decorating sugar for topping (optional)

Instructions
 

  • Center a rack in the oven and preheat the oven to 400 degrees F.
    Butter or spray the 12 molds in a regular-size muffin pan or fit the
    molds with paper muffin cups. Alternatively, use a silicone muffin pan,
    which needs neither greasing nor paper cups. Place the muffin pan on a
    baking sheet.

Nutrition

Calories: 215kcalCarbohydrates: 30gProtein: 4gFat: 9gSaturated Fat: 5gPolyunsaturated Fat: 1gMonounsaturated Fat: 2gTrans Fat: 0.3gCholesterol: 53mgSodium: 189mgPotassium: 89mgFiber: 1gSugar: 13gVitamin A: 337IUVitamin C: 7mgCalcium: 82mgIron: 1mgNet Carbohydrates: 29g
Keyword Orange Blueberry Muffins
Tried this recipe?Mention @grumpyshoneybunch or tag #grumpyshoneybunch!

Best Carrot Bundt Cake with Cream Cheese Frosting

February 8, 2024 by Shelby Law Ruttan Leave a Comment

A slice of carrot bundt cake topped with thick cream cheese glaze and chopped pecans.

If you are looking for a bundt cake recipe that will elevate your baking game, then today's recipe for Carrot Bundt Cake topped with a thick cream cheese glaze . Inspired by the beloved Nothin' Bundt Carrot cake, this copycat recipe promises to be one of your new favorite cakes for special occasions (think Easter dessert and birthdays!)

Whole carrot bundt cake on a white plate with cream cheese glaze and chopped pecans.

❤️ Why you'll love it

Carrot cake lover: if you love carrot cake, you will love the flavor of the classic carrot cake baked in a bundt cake pan!

Moist and delicious: made with shredded fresh carrots, this is a moist carrot cake recipe with a nice tight crumb and nutty pecan topping.

Simple ingredients: made with pantry staples, warm spices, and fresh carrots, making this an easy recipe to throw together in a pinch.

Ingredients for carrot bundt cake and cream cheese frosting.
Carrot Bundt Cake Ingredients
Dry ingredients for carrot cake recipe.
Dry Ingredients
Eggs on top of creamed butter mixture.
Wet Ingredients
Dry ingredients added to wet ingredients for cake.
Combining wet and dry ingredients

🥘 Carrot Bundt Cake Ingredients

Unsalted butter

Granulated sugar 

Large eggs 

Whole milk 

All-purpose flour 

Ground cinnamon 

Nutmeg 

Baking powder 

Baking soda 

Fresh carrots: adds to the sweetness of the cake and provides moisture

Cream cheese

Powdered sugar 

Vanilla extract 

Pecans

Nonstick cooking spray 

Mixed cake batter in a white mixing bowl.
Cake batter
Grated carrots on top of cake batter.
Shredded carrots on top of cake batter
Carrot cake batter in a bundt pan.
Cake batter smoothed into bundt pan
Overhead image of baked cake in pan.
Baked carrot cake in bundt pan

🔪 How to make Carrot Bundt Cake

For the Carrot Bundt Cake

  1. Preheat oven to 350 degrees. Coat a large bundt pan with nonstick cooking spray. Set prepared pan aside.
  2. In a large mixing bowl, using an electric mixer, blend together the butter and granulated sugar until mixture is combined
  3. Add eggs and milk to butter mixture, then continue to mix on medium-low speed until fully incorporated. 
  4. In medium bowl, combine all-purpose flour, ground cinnamon, nutmeg, baking powder, and baking soda. Gradually add to wet ingredients mixing on low speed until all dry ingredients are added. Increase to medium speed as needed to combine until no flour pockets remain. 
  5. Using a wooden spoon, gently fold in the grated carrots until evenly distributed throughout the batter. 
  6. Pour the carrot cake batter into the prepared bundt pan and smooth out the top of the cake batter using the back of a tablespoon.
  7. Hold the cake pan in the air about 2” from a flat surface and drop to the counter to shake any bubbles out of the cake batter.  
  8. Bake in preheated oven for 45-55 minutes or until the cake a toothpick or cake tester inserted into the middle comes out clean. 
  9. Let carrot cake cool on a wire rack in the bundt pan for 15 minutes. Lay a plate or cooling rack over top of the bundt cake and flip cake over to release out  flipping onto a plate, cooling rack, or serving platter to cool completely. 

For the Cream Cheese Frosting:

  1. In a large bowl using an electric mixer, cream together the cream cheese, vanilla, and butter until well combined. 
  2. Gradually add in the powdered sugar to the cream cheese mixture and mix until creamy.
  3. Place cream cheese frosting in a piping bag and cut wide piece off the tip of the bag.  
  4. Start in the center on top of a ridge or between a ridge and pipe the frosting over the curve of your cake but not going all the way down the side. Repeat this around the whole cake. You can also use a knife or frosting spatula to spread it around the bundt cake. 
  5. Top with chopped pecans and store in an airtight container.
Cream cheese and butter in a white mixing bowl.
Cream cheese and butter
Powdered sugar being on top of butter and cream cheese mixture.
Powdered sugar added to cream cheese mixture
Cream cheese frosting in a white mixing bowl.
Cream cheese frosting
Cream cheese frosting in a piping bag.
Cream cheese frosting in piping bag

🥄 Equipment

10-Cup bundt pan

Large mixing bowl

Medium mixing bowl

Electric mixer

Wooden spoon

Rubber spatula

Box grater: to shred the fresh carrots

Wire rack

Piping bag and large tip

Baked carrot bundt cake on a wooden board.
Cooled carrot bundt cake
Overhead process shot of cream cheese icing piped onto bundt cake.
Icing on top of carrot bundt cake
Overhead image of glazed carrot bundt cake on a wooden board.
Chopped pecans on top of iced bundt cake

🥫Storing your Carrot Bundt Cake

Refrigerate: for best results, store leftovers in the refrigerator in an airtight container up to 7 days.

Freezer: store leftover carrot bundt cake in an airtight freezer bag up to 3 months.

📖 Variations

Citrus Twist: Add a hint of orange zest or lemon zest to the batter for a citrusy kick.

Nut-Free Option: Swap pecans for shredded coconut or leave them out entirely for a nut-free version.

Add ins: stir in a cup of raisins, semi sweet chocolate chips, or shredded coconut for more added texture and a variety of flavor.

Little cakes: use a mini bundt pan and make individual portion sized carrot bundt cakes!

Side view of carrot cake bundt cake.

💭 Tips

Room Temperature: make sure your cream cheese and eggs are at room temperature for a smoother batter and frosting.

Pre-shredded carrots: if you don't want to shred your own carrots, you can use bagged pre-shredded carrots.

Caramel flavors: substitute brown sugar for the white sugar.

📚 Related Recipes

Those watching their sugar intake will love this easy cupcake recipe for Sugar Free Carrot Cupcakes.

Air Fryer Carrot Fries are super easy and so delicious!

Carrot Cake Energy Bites are healthy raw food treat with all the yumminess of your favorite carrot cake.

Best Carrot Cake with Raisins and Walnuts with a Homemade Cream Cheese Frosting is the perfect layer cake for special occasions!

Chocolate Bundt Cake with Peanut Butter Caramel Drizzle is decadent, delicious and low calorie!

Light and airy, everyone loves this Chocolate Chip Bundt Cake!

One slice of carrot bundt cake on a glass plate with the whole bund cake blurred in the background.

🍽 Serve with..

Serve Carrot Bundt Cake with a dollop of whipped cream, a scoop of vanilla ice cream, or enjoy it as is with a cup of your favorite tea or coffee.


When you make this recipe, please comment below and let me know what you think. I'd love it if you tag me on Instagram @grumpyshoneybunch or #grumpyshoneybunch so I can see your photos!

If you love this recipe, please leave a ⭐⭐⭐⭐⭐ rating

📖 Recipe

A slice of carrot bundt cake topped with thick cream cheese glaze and chopped pecans.

Best Carrot Bundt Cake with Cream Cheese Frosting

Shelby Law Ruttan
Create a slice of heaven with our Carrot Bundt Cake! This moist carrot cake features fresh carrots, warm spices, and a creamy cream cheese frosting with sprinkled with pecans, the perfect cake for Easter dessert or your next special occasion!
5 from 1 vote
Print FREE recipe card with your email address Pin Recipe Save Go to Collections
Prep Time 20 minutes mins
Cook Time 55 minutes mins
Total Time 1 hour hr 15 minutes mins
Course Desserts
Cuisine American
Servings 16
Calories 399 kcal

Equipment

  • 10-Cup bundt pan
  • Large mixing bowl
  • Medium bowl
  • Electric mixer
  • Wooden spoon
  • rubber spatula
  • box grater
  • Wire rack
  • Piping bag and large tip

As an Amazon Associate I earn from qualifying purchases.

Ingredients
  

For the cake

  • ½ cup unsalted butter softened
  • 1½ cups granulated sugar
  • 4 large eggs
  • 1 cup whole milk
  • 3 cups all-purpose flour
  • 1 teaspoon ground cinnamon
  • ½ teaspoon nutmeg
  • ¾ teaspoon baking powder
  • ¾ teaspoon baking soda
  • 2¼ cups finely shredded carrots

For the Frosting

  • 8 ounces cream cheese softened
  • 4 tablespoons butter softened
  • 2 cups powdered sugar
  • 1 teaspoon vanilla extract
  • ½ cup chopped pecans

Instructions
 

For the Carrot Bundt Cake

  • Preheat oven to 350 degrees. Coat a large bundt pan with nonstick cooking spray. Set prepared pan aside.
  • In a large mixing bowl, using an electric mixer, blend together the butter and granulated sugar until mixture is combined
  • Add eggs and milk to butter mixture, then continue to mix on medium-low speed until fully incorporated.
  • In medium bowl, combine all-purpose flour, ground cinnamon, nutmeg, baking powder, and baking soda. Gradually add to wet ingredients mixing on low speed until all dry ingredients are added. Increase to medium speed as needed to combine until no flour pockets remain.
  • Using a wooden spoon, gently fold in the grated carrots until evenly distributed throughout the batter.
  • Pour the carrot cake batter into the prepared bundt pan and smooth out the top of the cake batter using the back of a tablespoon.
  • Hold the cake pan in the air about 2” from a flat surface and drop to the counter to shake any bubbles out of the cake batter.
  • Bake in preheated oven for 45-55 minutes or until the cake a toothpick or cake tester inserted into the middle comes out clean.
  • Let carrot cake cool on a wire rack in the bundt pan for 15 minutes. Lay a plate or cooling rack over top of the bundt cake and flip cake over to release out flipping onto a plate, cooling rack, or serving platter to cool completely.

For the Cream Cheese Frosting:

  • In a large bowl using an electric mixer, cream together the cream cheese, vanilla, and butter until well combined.
  • Gradually add in the powdered sugar to the cream cheese mixture and mix until creamy.
  • Place cream cheese frosting in a piping bag and cut wide piece off the tip of the bag.
  • Start in the center on top of a ridge or between a ridge and pipe the frosting over the curve of your cake but not going all the way down the side. Repeat this around the whole cake. You can also use a knife or frosting spatula to spread it around the bundt cake.
  • Top with chopped pecans and store in an airtight container.

Nutrition

Calories: 399kcalCarbohydrates: 56gProtein: 6gFat: 18gSaturated Fat: 9gPolyunsaturated Fat: 2gMonounsaturated Fat: 5gTrans Fat: 0.4gCholesterol: 80mgSodium: 174mgPotassium: 158mgFiber: 2gSugar: 36gVitamin A: 3549IUVitamin C: 1mgCalcium: 66mgIron: 1mgNet Carbohydrates: 54g
Keyword Carrot Bundt Cake
Tried this recipe?Mention @grumpyshoneybunch or tag #grumpyshoneybunch!
  • « Previous Page
  • 1
  • 2
  • 3
  • 4
  • 5
  • …
  • 32
  • Next Page »
Shelby Law Ruttan.

Hey, I'm Shelby

Welcome! I'm Shelby Law Ruttan, I'm a mom, grandmother, cookbook author, and content creator for HoneyB's Kitchen who started blogging family recipes in 2007....

About me

Footer

↑ back to top

About

About Shelby Law Ruttan

Privacy Policy

Terms and Conditions of Use

Accessibility Statement

As Featured In:

Contact Shelby

Contact

Work with me

As an Amazon Associate I earn from qualifying purchases.

Copyright © 2025 Foodie Pro on the Foodie Pro Theme

Rate This Recipe

Your vote:


A rating is required
A name is required
An email is required