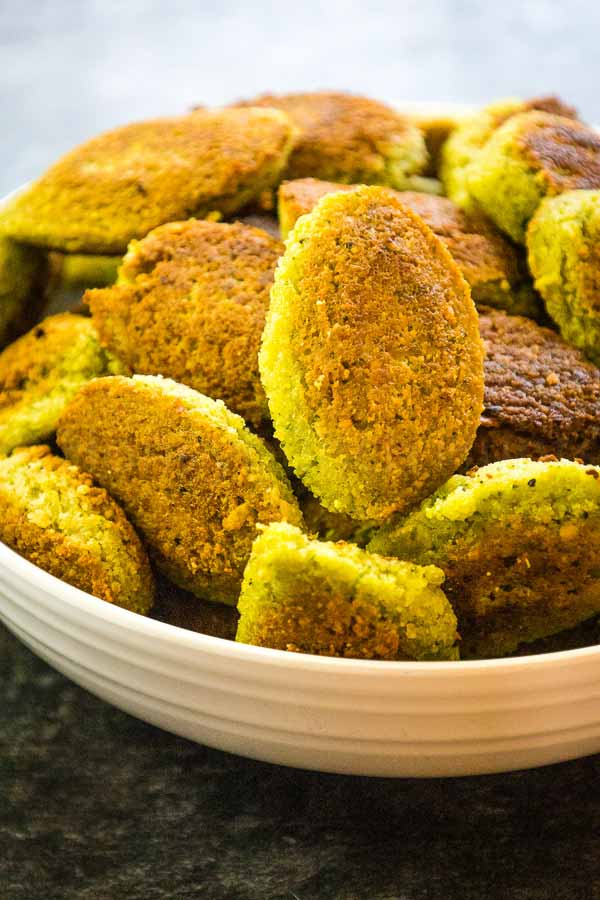
These Chickpea and Corn Patties are a delicious plant-based healthy recipe that can be enjoyed as a veggie burgers between buns with your favorite toppings, or on their own with a side of sour cream and salsa.

❤️ Why you'll love it
Vegan recipe: these vegan chickpea patties are entirely plant based as long as you use non-dairy sour cream as a garnish.
Meal prep: this chickpea patty recipe is easily made ahead of time and are easily portable, reheating great in the microwave.
Simple ingredients: this recipe is made with simple pantry staples and fresh, healthy ingredients!
🥘 Ingredients
Frozen corn: thawed and patted dry
Onion: I chose a yellow onion, but feel free to use red, white, or green onion
Fresh thyme
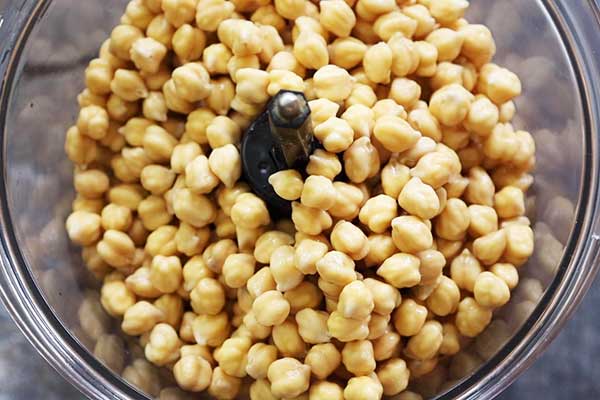
Canned chickpeas: also known as garbanzo beans
Whole wheat bread
Black pepper
Ground red pepper
Garlic powder
Cornmeal: used in the chickpea patties and also dust the outside before frying to make crispy patties.
Fresh parsley (optional)

🔪 Instructions
- In a large skillet over medium-high heat, add 1 teaspoon oil and heat until hot.
- Add corn, onion, and minced thyme. Saute 2 minutes. Place corn mixture in a large bowl.
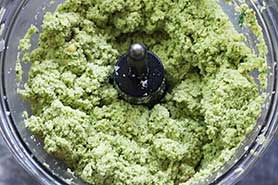
- Add chickpeas, breadcrumbs, 2 tablespoons cornmeal, salt, and red pepper flakes in a food processor. Pulse 8 times or until combined and chunky (not smooth).
- Transfer chickpea mixture to corn mixture and stir to combine.
- Using a ¼ cup measuring scoop, divide chickpea mixture into 8 equal portions, shaping each into ½ inch thick patty; dredge in cornmeal.
- Heat oil in frying pan coated with cooking spray over medium-high heat. Place patties in hot skillet; cook 5 minutes. Carefully turn patties over; cook 4 minutes or until golden brown. (you may need to do this in two batches.
- Serve with sour cream and salsa. Garnish with fresh thyme sprigs or fresh parsley if desired.
🥄 Equipment
Food processor
Large nonstick skillet
Wooden mixing spoon
Mesh strainer (to drain the chickpeas)
Turner

🥫Storage
Refrigerate: store leftover chickpea patties in an airtight container in the fridge up to 5 days.
Freeze: store in a freezer safe airtight container in the freezer up to 3 months.
Reheat: warm thawed chickpea patties in a skillet sprayed with cooking spray over medium heat, or on a microwave safe plate in the microwave until warmed through.
📖 Variations
- Substitute your favorite fresh herbs for the thyme .
- Use red onion in place of the yellow onion.
- Canned corn or fresh corn can be substituted for the frozen corn.
- Add 1 tablespoon chili powder to the chickpea mixture for added flavor.
- Stir in ¼ cup nutritional yeast powder go add a cheese like flavor to the patties.
- All purpose flour can be substituted for the cornmeal
💭 Tips
- A food processor saves time, but if you don't have one, you can use a potato masher instead for mashing the chickpeas.
- Place chickpeas in a mesh strainer and rinse with water to remove excess starch buildup. Lightly pat with a paper towel ro remove excess moisture.

📚 Related Recipes
Lebanese Pita Bread is a perfect side to these easy chickpea patties.
Mediterranean Chickpea Salad makes a wonderful side dish or lunch.
Chickpea Spinach Curry makes a delicious vegan lunch.
This Garlic Scrambled Eggs with Chickpeas recipe is a long time family favorite!
These Oven Roasted Chickpeas are the perfect snack.
These vegan Soy Burger Patties are delicious and easy to make.
🍽 Serve with..
Serve these chickpea burgers with a side of sour cream, salsa, or your favorite toppings.
Don't forget to check out my Amazon storefront for some of my favorite products!
When you make this recipe, please comment below and let me know what you think. I'd love it if you tag me on Instagram @grumpyshoneybunch or #grumpyshoneybunch so I can see your photos!
If you love this recipe, please leave a ⭐⭐⭐⭐⭐ rating
📖 Recipe

Chickpea and Corn Patties
As an Amazon Associate I earn from qualifying purchases.
Ingredients
- 2 teaspoons olive oil divided
- 1½ cups frozen corn , thawed
- ½ medium onion chopped
- 1 teaspoon minced fresh thyme
- 19 ounces canned chickpeas rinsed and drained
- ½ cup fresh breadcrumbs
- ½ teaspoon salt
- ¼ teaspoon ground red pepper
- 4 teaspoons cornmeal
- cooking spray
- 4 tablespoons sour cream
- 4 tablespoons salsa
- 1 thyme sprig , garnish (optional)
Instructions
- In a large skillet over medium-high heat, add 1 teaspoon oil and heat until hot.
- Add corn, onion, and minced thyme. Saute 2 minutes. Place corn mixture in a large bowl.
- Add chickpeas, breadcrumbs, 2 tablespoons cornmeal, salt, and red pepper flakes in a food processor. Pulse 8 times or until combined and chunky (not smooth).
- Transfer chickpea mixture to corn mixture and stir to combine.
- Using a ¼ cup measuring scoop, divide chickpea mixture into 8 equal portions, shaping each into ½ inch thick patty; dredge in cornmeal.
- Heat ½ teaspoon oil in skillet coated with cooking spray over medium-high heat. Add 4 patties; cook 5 minutes. Carefully turn patties over; cook 4 minutes or until golden.
- Repeat procedure with ½ teaspoon oil and remaining patties.
- Serve with sour cream and salsa. Garnish with thyme sprigs if desired.